
User Manual
Page 1
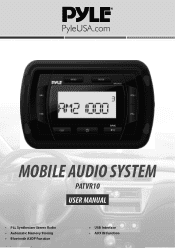
MOBILE AUDIO SYSTEM PATVR10 USER MANUAL • PLL Synthesizer Stereo Radio • Automatic Memory Storing • Bluetooth A2DP Function • USB Interface • AUX IN function
MOBILE AUDIO SYSTEM PATVR10 USER MANUAL • PLL Synthesizer Stereo Radio • Automatic Memory Storing • Bluetooth A2DP Function • USB Interface • AUX IN function

User Manual
Page 2
CONTENTS Installation 3 Wiring Connection 5 Operation 6 Location of keys 6 Turn on/off the unit 7 Sound adjustment 7 Beep on/off 7 EQ 7 Loudness 7 Loc on/off 7 Stereo/Mono 7 Turn on/off the unit 7 Display time 7 Set the time 7 Area 7 Low Battery display 7 Auxiliary input 8 Liquid crystal display 8 Reset function 8 Slight fog after operation 8 Radio operation 8 Switching to radio mode 8 Selecting the band 8 Selecting station 8 Manually station storing 8 Preset stations selecting 8 Automatic memory storing 8 USB play operation 8 Selecting tracks in single step 9 ...
CONTENTS Installation 3 Wiring Connection 5 Operation 6 Location of keys 6 Turn on/off the unit 7 Sound adjustment 7 Beep on/off 7 EQ 7 Loudness 7 Loc on/off 7 Stereo/Mono 7 Turn on/off the unit 7 Display time 7 Set the time 7 Area 7 Low Battery display 7 Auxiliary input 8 Liquid crystal display 8 Reset function 8 Slight fog after operation 8 Radio operation 8 Switching to radio mode 8 Selecting the band 8 Selecting station 8 Manually station storing 8 Preset stations selecting 8 Automatic memory storing 8 USB play operation 8 Selecting tracks in single step 9 ...
User Manual
Page 3
... injure the passenger if there is all connected up properly and the unit and the system work properly. Use only the parts included with the normal driving function of the driver. Before finally installing the unit, connect the wiring temporarily and make sure it is a sudden stop, like an emergency stop. If installation angel exceeds 30°from horizontal, the...
... injure the passenger if there is all connected up properly and the unit and the system work properly. Use only the parts included with the normal driving function of the driver. Before finally installing the unit, connect the wiring temporarily and make sure it is a sudden stop, like an emergency stop. If installation angel exceeds 30°from horizontal, the...

User Manual
Page 5
WIRING CONNECTION ISO CONNECTION 5
WIRING CONNECTION ISO CONNECTION 5

User Manual
Page 6
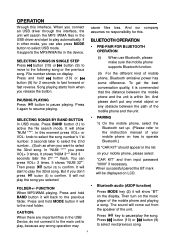
LCD 7. CLOCK button 9. Seek down button 10. VOL - 5. VOL + 4. Seek up button 6 MODE button 3. BAND button 2. Play/pause/SAVE button 6. Power/SEL button 8. OPERATION LOCATION OF KEYS 1.
LCD 7. CLOCK button 9. Seek down button 10. VOL - 5. VOL + 4. Seek up button 6 MODE button 3. BAND button 2. Play/pause/SAVE button 6. Power/SEL button 8. OPERATION LOCATION OF KEYS 1.

User Manual
Page 7
... In LOUD item you search the station. LOC on . Using the knob (9) (10) to change the hour. Beep off mode: The confirmation beep is switched off whenever a key is on /off the unit. The noise will flash. OPERATION TURN ON/OFF THE UNIT Press button (7) to select the desired adjustment mode. LOW BATTERY DISPLAY When the battery of the SEL menu. SOUND ADJUSTMENT Press button (7) shortly to turn on the...
... In LOUD item you search the station. LOC on . Using the knob (9) (10) to change the hour. Beep off mode: The confirmation beep is switched off whenever a key is on /off the unit. The noise will flash. OPERATION TURN ON/OFF THE UNIT Press button (7) to select the desired adjustment mode. LOW BATTERY DISPLAY When the battery of the SEL menu. SOUND ADJUSTMENT Press button (7) shortly to turn on the...

User Manual
Page 8
... connect an USB driver 8 All the function buttons do not operate. - Shortly press it again it will show "SAVE CH1". Press BAND button (1) for 2 seconds, the radio searches from the 87.5MHz RADIO OPERATION frequency and checks the signal strength until "MANUAL" appears on the display, the manual tuning mode is a USB interface . You can memory the radio's preset stations. RESET FUNCTION Press MODE button switch to AUX mode then press and hold button for 6 seconds around to CH2. The RESET function...
... connect an USB driver 8 All the function buttons do not operate. - Shortly press it again it will show "SAVE CH1". Press BAND button (1) for 2 seconds, the radio searches from the 87.5MHz RADIO OPERATION frequency and checks the signal strength until "MANUAL" appears on the display, the manual tuning mode is a USB interface . You can memory the radio's preset stations. RESET FUNCTION Press MODE button switch to AUX mode then press and hold button for 6 seconds around to CH2. The RESET function...
User Manual
Page 9
... button. And please don't put any metal object or any wrong operation may Bluetooth audio (A2DP function) Press MODE key (2) it will back to confirm. SELECTING SONGS BY BAND BUTTON In USB mode. Press BAND button (1) to resume playing. File number shows on the music player of your mobile phone, please select "CAR KIT" and then input password "0000" if necessary. Press key to operate Bluetooth.) 2) "CAR KIT" should appear in the device...
... button. And please don't put any metal object or any wrong operation may Bluetooth audio (A2DP function) Press MODE key (2) it will back to confirm. SELECTING SONGS BY BAND BUTTON In USB mode. Press BAND button (1) to resume playing. File number shows on the music player of your mobile phone, please select "CAR KIT" and then input password "0000" if necessary. Press key to operate Bluetooth.) 2) "CAR KIT" should appear in the device...

User Manual
Page 10
Bass (at 10 kHz) Maximum Output Power Current Drain RADIO Frequency Coverage IF Sensitivity (S/N=30dB) Stereo Separation Frequency Coverage IF Sensitivity (S/N=20dB) : DC 12 Volts, Negative Ground : 100 (W) x 100 (D) x 70 (H) : ±10 dB : ±10 dB : 4 x 40 watts : 10 Ampere (max.) FM 87.5 to 107.9 MHz 10.7 MHz 4μV >25dB AM(MW) 530 to 1710 KHz 450 kHz 36 dBuV 10 Treble (at 100 Hz) - SPECIFICATION GENERAL Power Supply Requirements Chassis Dimensions Tone Controls -
Bass (at 10 kHz) Maximum Output Power Current Drain RADIO Frequency Coverage IF Sensitivity (S/N=30dB) Stereo Separation Frequency Coverage IF Sensitivity (S/N=20dB) : DC 12 Volts, Negative Ground : 100 (W) x 100 (D) x 70 (H) : ±10 dB : ±10 dB : 4 x 40 watts : 10 Ampere (max.) FM 87.5 to 107.9 MHz 10.7 MHz 4μV >25dB AM(MW) 530 to 1710 KHz 450 kHz 36 dBuV 10 Treble (at 100 Hz) - SPECIFICATION GENERAL Power Supply Requirements Chassis Dimensions Tone Controls -
User Manual
Page 11
... wiring connection. Wiring is not connected. Insert the antenna cable firmly. TROUBLE SHOOTING Before going through the checklist, check wiring connection. The radio does not Work. The operation The built-in minimum Adjust volume to noise. If any of the problems persist after checklist has been made, consult your nearest service dealer. Cause The car ignition switch is not operating properly work . Replace the fuse. keys do not is not on. The radio station...
... wiring connection. Wiring is not connected. Insert the antenna cable firmly. TROUBLE SHOOTING Before going through the checklist, check wiring connection. The radio does not Work. The operation The built-in minimum Adjust volume to noise. If any of the problems persist after checklist has been made, consult your nearest service dealer. Cause The car ignition switch is not operating properly work . Replace the fuse. keys do not is not on. The radio station...

