

Instruction Manual
Page 1
USER MANUAL 19'' Rack Mount 300 Watt Power Amplifier/ Mixer w/70V Output & Mic Talkover
USER MANUAL 19'' Rack Mount 300 Watt Power Amplifier/ Mixer w/70V Output & Mic Talkover

Instruction Manual
Page 2
... expect years of installation suggestions as well as instructions to AC power 11.Mounting the amplifier 11.Turning the amplifier on 12.Using the power meter 12.Using the master volume control 12.About the internal clip circuitry 12.About the internal protection circuitry 13.About the feedback filter 13.Caring for amplifying music or vocal program material. It contains a range of trouble-free service from this manual thoroughly before you...
... expect years of installation suggestions as well as instructions to AC power 11.Mounting the amplifier 11.Turning the amplifier on 12.Using the power meter 12.Using the master volume control 12.About the internal clip circuitry 12.About the internal protection circuitry 13.About the feedback filter 13.Caring for amplifying music or vocal program material. It contains a range of trouble-free service from this manual thoroughly before you...
Instruction Manual
Page 3
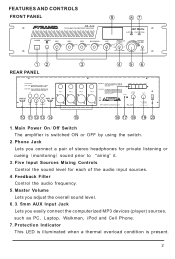
... 20 1.Main Power On/Off Switch The amplifier is switched ON or OFF by using the switch. 2.Phone Jack Lets you connect a pair of stereo headphones for private listening or cueing (monitoring) sound prior to "airing" it. 3.Five Input Sources Mixing Controls Control the sound level for each of the audio input sources. 4.Feedback Filter Control the audio frequency. 5.Master Volume Lets you adjust the overall sound level. 6.3.5mm AUX Input Jack Lets you easily connect the computerized MP3 devices (player) sources, such as...
... 20 1.Main Power On/Off Switch The amplifier is switched ON or OFF by using the switch. 2.Phone Jack Lets you connect a pair of stereo headphones for private listening or cueing (monitoring) sound prior to "airing" it. 3.Five Input Sources Mixing Controls Control the sound level for each of the audio input sources. 4.Feedback Filter Control the audio frequency. 5.Master Volume Lets you adjust the overall sound level. 6.3.5mm AUX Input Jack Lets you easily connect the computerized MP3 devices (player) sources, such as...
Instruction Manual
Page 4
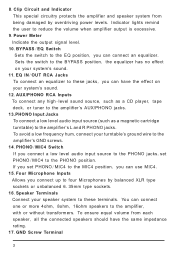
... four Microphones by overdriving power levels. Indicator lights remind the user to reduce the volume when amplifier output is excessive. 9.Power Meter Indicate the output signal level. 10.BYPASS/EQ Switch Sets the switch to the amplifier, with or without transformers. Sets the switch to the BYPASS position, the equalizer has no effect on your system's sound. 12.AUX/PHONO RCA Inputs To connect any high-level sound source, such as a CD player, tape deck, or tuner to the amplifier's AUX/PHONO jacks. 13.PHONO Input Jacks To connect a low level audio input source...
... four Microphones by overdriving power levels. Indicator lights remind the user to reduce the volume when amplifier output is excessive. 9.Power Meter Indicate the output signal level. 10.BYPASS/EQ Switch Sets the switch to the amplifier, with or without transformers. Sets the switch to the BYPASS position, the equalizer has no effect on your system's sound. 12.AUX/PHONO RCA Inputs To connect any high-level sound source, such as a CD player, tape deck, or tuner to the amplifier's AUX/PHONO jacks. 13.PHONO Input Jacks To connect a low level audio input source...
Instruction Manual
Page 5
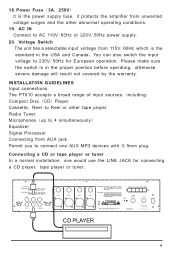
... a selectable input voltage from unwanted voltage surges and the other tape player Radio Tuner Microphones (up to 4 simultaneously) Equalizer Signal Processor Connecting front AUX jack Permit you to 230V/50Hz for connecting a CD player, tape player or tuner. 4 Connecting a CD or tape player or tuner In a normal installation, one AUX MP3 devices with 3.5mm plug. You can also switch the input voltage to connect one would use the LINE JACK for European operation. INSTALLATION GUIDELINES Input connections The PT610 accepts a broad range of input sources, including: Compact Disc...
... a selectable input voltage from unwanted voltage surges and the other tape player Radio Tuner Microphones (up to 4 simultaneously) Equalizer Signal Processor Connecting front AUX jack Permit you to 230V/50Hz for connecting a CD player, tape player or tuner. 4 Connecting a CD or tape player or tuner In a normal installation, one AUX MP3 devices with 3.5mm plug. You can also switch the input voltage to connect one would use the LINE JACK for European operation. INSTALLATION GUIDELINES Input connections The PT610 accepts a broad range of input sources, including: Compact Disc...

Instruction Manual
Page 6
Connecting a Turntable In this situation, use the PHONO JACK, and set the PHONO/MIC4 SELECTOR switch to 4 low impedance microphones. IN EQ OR MIXER Connecting microphone The MIC IN jacks permit you to connect up to the PHONO position. The microphones can be used with either a 6.35mm plug, or a 3-pin XLR type plug. 5 "PHONO" TURNTABLE Connecting and equalizer or external signal processor Connect the processor's OUT to the amplifier's IN, and the processor's IN connector to the amplifier's OUT.
Connecting a Turntable In this situation, use the PHONO JACK, and set the PHONO/MIC4 SELECTOR switch to 4 low impedance microphones. IN EQ OR MIXER Connecting microphone The MIC IN jacks permit you to connect up to the PHONO position. The microphones can be used with either a 6.35mm plug, or a 3-pin XLR type plug. 5 "PHONO" TURNTABLE Connecting and equalizer or external signal processor Connect the processor's OUT to the amplifier's IN, and the processor's IN connector to the amplifier's OUT.
Instruction Manual
Page 7
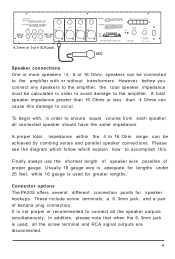
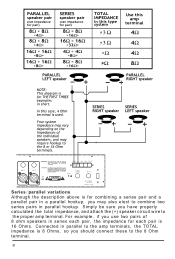
... Ohm range can be connected to the amplifier. Please see the diagram which follow which explain how to occur. Connector options The PA305 offers several different connection points for lengths under 25 feet, while 16 gauge is not proper or recommended to ensure equal volume from each speaker, all connected speaker should have the same impedance. 6.3 mm or 3-pi n XLRJack MIC Speaker connections One or more speakers...
... Ohm range can be connected to the amplifier. Please see the diagram which follow which explain how to occur. Connector options The PA305 offers several different connection points for lengths under 25 feet, while 16 gauge is not proper or recommended to ensure equal volume from each speaker, all connected speaker should have the same impedance. 6.3 mm or 3-pi n XLRJack MIC Speaker connections One or more speakers...
Instruction Manual
Page 8
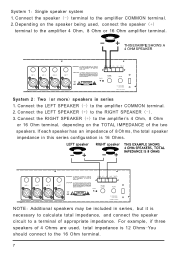
... in series 1.Connect the LEFT SPEAKER (-) to the amplifier COMMON terminal. 2.Connect the LEFT SPEAKER (+) to the RIGHT SPEAKER (-). 3.Connect the RIGHT SPEAKER (+) to the amplifier's 4 Ohm, 8 Ohm or 16 Ohm terminal, depending on the speaker being used , total impedance is necessary to calculate total impedance, and connect the speaker circuit to a terminal of appropriate impedance. For example, if three speakers of 4 Ohms are used , connect the speaker (+) terminal to the amplifier 4 Ohm, 8 Ohm or 16 Ohm amplifier terminal.
... in series 1.Connect the LEFT SPEAKER (-) to the amplifier COMMON terminal. 2.Connect the LEFT SPEAKER (+) to the RIGHT SPEAKER (-). 3.Connect the RIGHT SPEAKER (+) to the amplifier's 4 Ohm, 8 Ohm or 16 Ohm terminal, depending on the speaker being used , total impedance is necessary to calculate total impedance, and connect the speaker circuit to a terminal of appropriate impedance. For example, if three speakers of 4 Ohms are used , connect the speaker (+) terminal to the amplifier 4 Ohm, 8 Ohm or 16 Ohm amplifier terminal.
Instruction Manual
Page 9
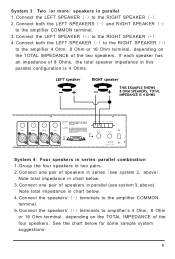
... more) speakers in parallel 1.Connect the LEFT SPEAKER (-) to the RIGHT SPEAKER (-). 2.Connect both the LEFT SPEAKERS (-) and RIGHT SPEAKER (-) to the amplifier COMMON terminal. 3.Connect the LEFT SPEAKER (+) to the RIGHT SPEAKER (+). 4.Connect both the LEFT SPEAKER (-) to the RIGHT SPEAKER (+) to amplifier's 4 Ohm, 8 Ohm or 16 Ohm terminal, depending on the TOTAL IMPEDANCE of speakers in series (see system 3, above ). If each speaker has an impedance of 8 Ohms, the total speaker impedance in...
... more) speakers in parallel 1.Connect the LEFT SPEAKER (-) to the RIGHT SPEAKER (-). 2.Connect both the LEFT SPEAKERS (-) and RIGHT SPEAKER (-) to the amplifier COMMON terminal. 3.Connect the LEFT SPEAKER (+) to the RIGHT SPEAKER (+). 4.Connect both the LEFT SPEAKER (-) to the RIGHT SPEAKER (+) to amplifier's 4 Ohm, 8 Ohm or 16 Ohm terminal, depending on the TOTAL IMPEDANCE of speakers in series (see system 3, above ). If each speaker has an impedance of 8 Ohms, the total speaker impedance in...
Instruction Manual
Page 10
For example, if you use two pairs of 8 ohm speakers in series each pair is 8 Ohms, so you should connect these to the 8 Ohm terminal. 9 Series/parallel variations Although the description above is for each pair, the impedance for combining a series pair and a parallel pair in a parallel hookup, you may also elect to combine two series pairs in parallel to the amp terminals, the TOTAL impedance is 16 Ohms. Connected in parallel hookup. Simply be sure you have properly calculated the total impedance, and attach the (+) speaker circuit wire to the proper amp terminal.
For example, if you use two pairs of 8 ohm speakers in series each pair is 8 Ohms, so you should connect these to the 8 Ohm terminal. 9 Series/parallel variations Although the description above is for each pair, the impedance for combining a series pair and a parallel pair in a parallel hookup, you may also elect to combine two series pairs in parallel to the amp terminals, the TOTAL impedance is 16 Ohms. Connected in parallel hookup. Simply be sure you have properly calculated the total impedance, and attach the (+) speaker circuit wire to the proper amp terminal.
Instruction Manual
Page 11
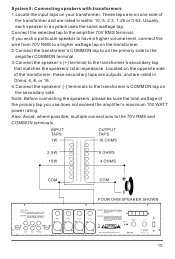
... matches the speakers' total impedance. Connect the selected tap to the 70V RMS and COMMON terminals. Located on the secondary side. These taps are on your transformer. If you use does not exceed the amplifier's maximum 100 WATT power rating. System 5: Connecting speakers with transformers 1.Locate the input taps on one side of the transformer, these secondary taps are outputs, and are...
... matches the speakers' total impedance. Connect the selected tap to the 70V RMS and COMMON terminals. Located on the secondary side. These taps are on your transformer. If you use does not exceed the amplifier's maximum 100 WATT power rating. System 5: Connecting speakers with transformers 1.Locate the input taps on one side of the transformer, these secondary taps are outputs, and are...

Instruction Manual
Page 12
... it suitable for such an installation. Then gradually increase the volume as necessary. Follow these four slots and into the PHONES jack on . 4.Adjust the controls of MIC 1-3, Mic4/AUX and LINE to the desired volume and balance. 11 Using headphones To listen privately, or to monitor sound sources, connect a pair of low impedance stereo headphones (not supplied) with the volume control set to LOW level BEFORE you set the POWER switch to OFF position.
... it suitable for such an installation. Then gradually increase the volume as necessary. Follow these four slots and into the PHONES jack on . 4.Adjust the controls of MIC 1-3, Mic4/AUX and LINE to the desired volume and balance. 11 Using headphones To listen privately, or to monitor sound sources, connect a pair of low impedance stereo headphones (not supplied) with the volume control set to LOW level BEFORE you set the POWER switch to OFF position.

Instruction Manual
Page 13
... . 12 For ease of the meter's range. To obtain best performance with the least distortion, be sure to power overload, the built-in dark environments, the meter is illuminated. Using the power meter The meter pointer position indicates the amplifier output power. Using the Master Volume control The Master Volume control increases or decreases output level gain. Setting output level too high can overdrive the amplifier, causing permanent damage. Correct whatever...
... . 12 For ease of the meter's range. To obtain best performance with the least distortion, be sure to power overload, the built-in dark environments, the meter is illuminated. Using the power meter The meter pointer position indicates the amplifier output power. Using the Master Volume control The Master Volume control increases or decreases output level gain. Setting output level too high can overdrive the amplifier, causing permanent damage. Correct whatever...
Instruction Manual
Page 14
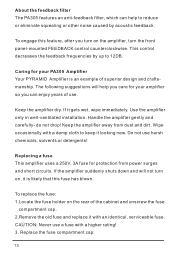
... identical, serviceable fuse. Keep the amplifier away from power surges and short circuits. CAUTION: Never use harsh chemicals, solvents or detergents! This control decreases the feedback frequencies by acoustic feedback. Use the amplifier only in well-ventilated installation. If the amplifier suddenly shuts down and will help you turn on the rear of the cabinet and unscrew the fuse compartment cap. 2.Remove the old fuse and replace it...
... identical, serviceable fuse. Keep the amplifier away from power surges and short circuits. CAUTION: Never use harsh chemicals, solvents or detergents! This control decreases the feedback frequencies by acoustic feedback. Use the amplifier only in well-ventilated installation. If the amplifier suddenly shuts down and will help you turn on the rear of the cabinet and unscrew the fuse compartment cap. 2.Remove the old fuse and replace it...
Instruction Manual
Page 15
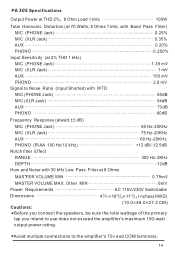
... Frequency Respones (atwatt,±3 dB) MIC (PHONE Jack) MIC (XLR Jack) AUX PHONO (RIAA 100 Hz/10 kHz) Notch filter Effect RANGE DEPTH Hum and Noise with Band Pass Filter) MIC (PHONE Jack) 0.25% MIC (XLR Jack) 0.35% AUX 0.20% PHONO 0.250% Input Sensitivity (at 2% THD 1 kHz) MIC (PHONE Jack) 1.35 mV MIC (XLR Jack) 1 mV AUX 150 mV PHONO 2.8 mV Signal to use does not exceed the amplifier's maximum 100-watt output power rating. Avoid multiple connections...
... Frequency Respones (atwatt,±3 dB) MIC (PHONE Jack) MIC (XLR Jack) AUX PHONO (RIAA 100 Hz/10 kHz) Notch filter Effect RANGE DEPTH Hum and Noise with Band Pass Filter) MIC (PHONE Jack) 0.25% MIC (XLR Jack) 0.35% AUX 0.20% PHONO 0.250% Input Sensitivity (at 2% THD 1 kHz) MIC (PHONE Jack) 1.35 mV MIC (XLR Jack) 1 mV AUX 150 mV PHONO 2.8 mV Signal to use does not exceed the amplifier's maximum 100-watt output power rating. Avoid multiple connections...


