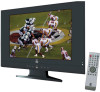
P19LCD Manual 1
Page 2
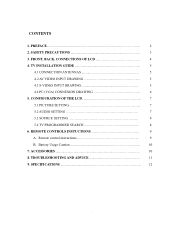
..., BACK, CONNECTIONS OF LCD 4 4. TV INSTALLATION GUIDE 5 4.1 CONNECTION ANTENNAS 5 4.2 AV VIDEO INPUT DRAWING 5 4.3 S-VIDEO INPUT DRAWING 5 4.4 PC (VGA) CONNEXION DRAWING 6 5. TROUBLESHOOTING AND ADVICE 11 9. SAFETY PRECAUTIONS 3 3. REMOTE CONTROLS INSTUCTIONS 9 A. ACCESSORIES 10 8. Remote control instructions 9 B. Battery Usage Caution 10 7. CONTENTS 1. PREFACE... 2 2. CONFIGURATION OF THE LCD 7 5.1 PICTURE SETTING 7 5.2 AUDIO SETTING 7 5.3 SOURCE SETTING 8 5.4 TV PROGRAMMER SEARCH 8 6. SPECIFICATIONS 12...
..., BACK, CONNECTIONS OF LCD 4 4. TV INSTALLATION GUIDE 5 4.1 CONNECTION ANTENNAS 5 4.2 AV VIDEO INPUT DRAWING 5 4.3 S-VIDEO INPUT DRAWING 5 4.4 PC (VGA) CONNEXION DRAWING 6 5. TROUBLESHOOTING AND ADVICE 11 9. SAFETY PRECAUTIONS 3 3. REMOTE CONTROLS INSTUCTIONS 9 A. ACCESSORIES 10 8. Remote control instructions 9 B. Battery Usage Caution 10 7. CONTENTS 1. PREFACE... 2 2. CONFIGURATION OF THE LCD 7 5.1 PICTURE SETTING 7 5.2 AUDIO SETTING 7 5.3 SOURCE SETTING 8 5.4 TV PROGRAMMER SEARCH 8 6. SPECIFICATIONS 12...
P19LCD Manual 1
Page 3
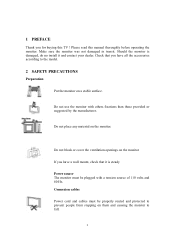
Check that you have a wall mount, check that it is damaged, do no install it and contact your dealer. Do not block or cover the ventilation openings on the monitor If you have all the accessories according to fall. 2 Do not use the monitor with a tension source of 110 volts and 60 Hz. Connexion cables Power cord and cables must be properly...
Check that you have a wall mount, check that it is damaged, do no install it and contact your dealer. Do not block or cover the ventilation openings on the monitor If you have all the accessories according to fall. 2 Do not use the monitor with a tension source of 110 volts and 60 Hz. Connexion cables Power cord and cables must be properly...
P19LCD Manual 1
Page 4
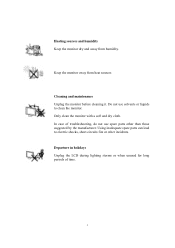
... Unplug the LCD during lighting storms or when unused for long periods of troubleshooting, do not use solvents or liquids to electric shocks, short-circuits fire or other than those suggested by the manufacturer. Using inadequate spare parts can lead to clean the monitor. Keep the monitor away from humidity. Do not use spare parts other incidents. Heating sources and humidity...
... Unplug the LCD during lighting storms or when unused for long periods of troubleshooting, do not use solvents or liquids to electric shocks, short-circuits fire or other than those suggested by the manufacturer. Using inadequate spare parts can lead to clean the monitor. Keep the monitor away from humidity. Do not use spare parts other incidents. Heating sources and humidity...

P19LCD Manual 1
Page 5
3 Front , Back , Connections of LCD Front View Back View and Control Connections 4
3 Front , Back , Connections of LCD Front View Back View and Control Connections 4
P19LCD Manual 1
Page 6
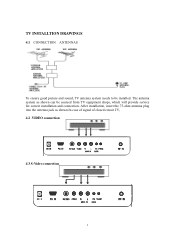
TV INSTALLTION DRAWINGS 4.1 CONNECTION ANTENNAS To ensure good picture and sound, TV antenna system needs to be sourced from TV equipment shops, which will provide service for correct installation and connection. After installation, insert the 75-ohm antenna plug into the antenna jack as shown can be installed. The antenna system as shown.In case of signal of closed circuit TV, 4.2 .VIDEO connection 4.3 S-Video connection 5
TV INSTALLTION DRAWINGS 4.1 CONNECTION ANTENNAS To ensure good picture and sound, TV antenna system needs to be sourced from TV equipment shops, which will provide service for correct installation and connection. After installation, insert the 75-ohm antenna plug into the antenna jack as shown can be installed. The antenna system as shown.In case of signal of closed circuit TV, 4.2 .VIDEO connection 4.3 S-Video connection 5
P19LCD Manual 1
Page 8
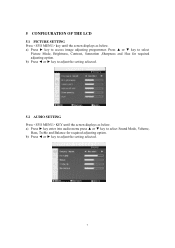
.... 5.2 AUDIO SETTING Press KEY until the screen displays as below . Press ▲ or ▼ key to select Sound Mode, Volume, Bass, Treble and Balance for required adjusting option. a) Press ► key enter into audio menu press ▲ or ▼ key to select Picture Mode, Brightness, Contrast, Saturation ,Sharpness and Hue for required adjusting option. a) Press ► key to access image adjusting programmer. 5 CONFIGURATION OF THE LCD 5.1 PICTURE SETTING...
.... 5.2 AUDIO SETTING Press KEY until the screen displays as below . Press ▲ or ▼ key to select Sound Mode, Volume, Bass, Treble and Balance for required adjusting option. a) Press ► key enter into audio menu press ▲ or ▼ key to select Picture Mode, Brightness, Contrast, Saturation ,Sharpness and Hue for required adjusting option. a) Press ► key to access image adjusting programmer. 5 CONFIGURATION OF THE LCD 5.1 PICTURE SETTING...
P19LCD Manual 1
Page 9
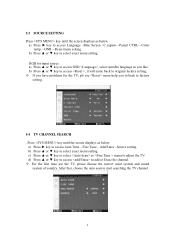
... factory setting. — If you have problems for input source a) Press ▲ or ▼ key to access OSD , select suitable language as you to back to add or Erase the channel. — For the first time use menu help you like. a) Press ► key to access Language -Blue Screen -C.capion-Parent CTRL-Color temp-ONR-Reset menu setting. 5.3 SOURCE SETTING Press key until the screen displays as below . a) Press ► key to access Auto...
... factory setting. — If you have problems for input source a) Press ▲ or ▼ key to access OSD , select suitable language as you to back to add or Erase the channel. — For the first time use menu help you like. a) Press ► key to access Language -Blue Screen -C.capion-Parent CTRL-Color temp-ONR-Reset menu setting. 5.3 SOURCE SETTING Press key until the screen displays as below . a) Press ► key to access Auto...
P19LCD Manual 1
Page 10
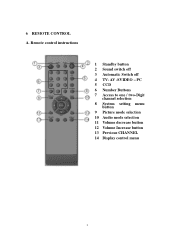
PC 5 CCD 6 Number Buttons 7 Access to one / two-Digit channel selection 8 System setting menu button 9 Picture mode selection 10 Audio mode selection 11 Volume decrease button 12 Volume Increase button 13 Previous CHANNEL 14 Display control menu 9 Remote control instructions 1 Standby button 2 Sound switch off 3 Automatic Switch off 4 TV- AV -SVIDEO - 6 REMOTE CONTROL A.
PC 5 CCD 6 Number Buttons 7 Access to one / two-Digit channel selection 8 System setting menu button 9 Picture mode selection 10 Audio mode selection 11 Volume decrease button 12 Volume Increase button 13 Previous CHANNEL 14 Display control menu 9 Remote control instructions 1 Standby button 2 Sound switch off 3 Automatic Switch off 4 TV- AV -SVIDEO - 6 REMOTE CONTROL A.
P19LCD Manual 1
Page 11
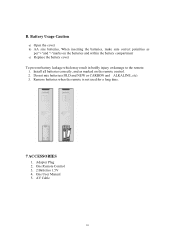
... Remote Control 3. 2 Batteries 1.5V 4. Adapter Plug 2. Do not mix batteries:(OLD and NEW or CARBON and ALKALINE, etc) 3. Remove batteries when the remote is not used for a long time. 7 ACCESSORIES 1. AV Cable 10 B. Battery Usage Caution a) Open the cover b) AA size batteries, When inserting the batteries, make sure correct polarities as marked on the batteries and within the battery compartment c) Replace...
... Remote Control 3. 2 Batteries 1.5V 4. Adapter Plug 2. Do not mix batteries:(OLD and NEW or CARBON and ALKALINE, etc) 3. Remove batteries when the remote is not used for a long time. 7 ACCESSORIES 1. AV Cable 10 B. Battery Usage Caution a) Open the cover b) AA size batteries, When inserting the batteries, make sure correct polarities as marked on the batteries and within the battery compartment c) Replace...
P19LCD Manual 1
Page 12
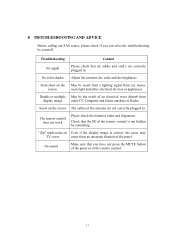
... cables of the antenna are correctly plugged in . neon light and other TV, Computer and Game machine or Radio Snow on the May be the result of the remote control. 11 Double or multiple May be result from a lighting signal from car, motor, screen. Troubleshooting Control No signal Please check that you can solve the troubleshooting by something. No sound Make sure that all cables and cord...
... cables of the antenna are correctly plugged in . neon light and other TV, Computer and Game machine or Radio Snow on the May be the result of the remote control. 11 Double or multiple May be result from a lighting signal from car, motor, screen. Troubleshooting Control No signal Please check that you can solve the troubleshooting by something. No sound Make sure that all cables and cord...

P19LCD Manual 1
Page 13
... for your reference, any change to the design and specification will not be advised. 12 SPECIFICATIONS Screen Size Display Type Resolution(Pixel) Brightness Color Contrast Ratio View Angle(H/V) Aspect Ratio Power Source TV System Video Input Format Antenna Input Audio Output Video S-Video Input PC Audio (Videos-Video-PC) Weight Dimensions (with stand) 19 Inch TFT LCD 1440 * 900 300cd/㎡ 24 bit 700 : 1 120/100 16:10 120VAC 60HZ DC12V Adapter ≤50W NTSC NTSC / PAL Standard antenna socket 75 Ω...
... for your reference, any change to the design and specification will not be advised. 12 SPECIFICATIONS Screen Size Display Type Resolution(Pixel) Brightness Color Contrast Ratio View Angle(H/V) Aspect Ratio Power Source TV System Video Input Format Antenna Input Audio Output Video S-Video Input PC Audio (Videos-Video-PC) Weight Dimensions (with stand) 19 Inch TFT LCD 1440 * 900 300cd/㎡ 24 bit 700 : 1 120/100 16:10 120VAC 60HZ DC12V Adapter ≤50W NTSC NTSC / PAL Standard antenna socket 75 Ω...


