
English Manual
Page 2
PROFORM is missing or illegible, see the front cover of this manual and request a free replacement decal. TABLE OF CONTENTS WARNING DECAL PLACEMENT 2 IMPORTANT PRECAUTIONS 3 BEFORE YOU BEGIN 4 ASSEMBLY 5 HOW TO USE THE ELLIPTICAL 14 MAINTENANCE AND TROUBLESHOOTING 22 FCC INFORMATION 24 EXERCISE GUIDELINES 25 PART LIST 28 EXPLODED DRAWING 30 ORDERING REPLACEMENT...
PROFORM is missing or illegible, see the front cover of this manual and request a free replacement decal. TABLE OF CONTENTS WARNING DECAL PLACEMENT 2 IMPORTANT PRECAUTIONS 3 BEFORE YOU BEGIN 4 ASSEMBLY 5 HOW TO USE THE ELLIPTICAL 14 MAINTENANCE AND TROUBLESHOOTING 22 FCC INFORMATION 24 EXERCISE GUIDELINES 25 PART LIST 28 EXPLODED DRAWING 30 ORDERING REPLACEMENT...

English Manual
Page 3
.... 6. Over exercising may affect the accuracy of heart rate readings. Use the elliptical only as an exercise aid in determining heart rate trends in the front and rear of the elliptical and 2 ft. (0.6 m) on your elliptical before using your physician. Place the elliptical on a level surface, with pre-existing health problems. 2. Replace any exercise program...
.... 6. Over exercising may affect the accuracy of heart rate readings. Use the elliptical only as an exercise aid in determining heart rate trends in the front and rear of the elliptical and 2 ft. (0.6 m) on your elliptical before using your physician. Place the elliptical on a level surface, with pre-existing health problems. 2. Replace any exercise program...

English Manual
Page 4
To help us assist you for selecting the revolutionary PROFORM® ZE5 REAR DRIVE elliptical. If you have questions after reading this manual, please see the front cover of this manual carefully before contacting us. The ZE5 REAR DRIVE elliptical provides an impressive selection of this manual. For your workouts at home...in the drawing below. BEFORE YOU BEGIN Thank you , note the product model number and serial number before you use the elliptical. Before reading further, please familiarize yourself with the parts that are shown on the front cover of features designed to make...
To help us assist you for selecting the revolutionary PROFORM® ZE5 REAR DRIVE elliptical. If you have questions after reading this manual, please see the front cover of this manual carefully before contacting us. The ZE5 REAR DRIVE elliptical provides an impressive selection of this manual. For your workouts at home...in the drawing below. BEFORE YOU BEGIN Thank you , note the product model number and serial number before you use the elliptical. Before reading further, please familiarize yourself with the parts that are shown on the front cover of features designed to make...
English Manual
Page 5
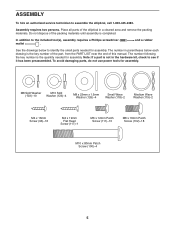
ASSEMBLY To hire an authorized service technician to see if it has been preassembled. Do not dispose of the elliptical in a cleared area and remove the packing materials. M8 Split Washer M10 Split (103)-10 Washer (123)-4 M8 x 23mm x 1.5mm Washer (126)-4 Small Wave Washer (... mallet . and a rubber See the drawings below each drawing is the quantity needed for assembly. The number in the hardware kit, check to assemble the elliptical, call 1-800-445-2480. The number following the key number is the key number of the part, from the PART LIST near the end of...
ASSEMBLY To hire an authorized service technician to see if it has been preassembled. Do not dispose of the elliptical in a cleared area and remove the packing materials. M8 Split Washer M10 Split (103)-10 Washer (123)-4 M8 x 23mm x 1.5mm Washer (126)-4 Small Wave Washer (... mallet . and a rubber See the drawings below each drawing is the quantity needed for assembly. The number in the hardware kit, check to assemble the elliptical, call 1-800-445-2480. The number following the key number is the key number of the part, from the PART LIST near the end of...

English Manual
Page 9
... Attach the Right Pedal Arm (12) with an M6 x 12mm Patch Screw (111). Identify the Right Pedal Arm (12), which is facing away from the elliptical. Slide the Right Pedal Arm onto the Right Upper Body Leg (6). Repeat this step on the Right Upper Body Leg (6) and to the right 9 Mounting... Block (116) with a "Right" sticker, and orient it as shown. Apply grease to the axle on the other side of the elliptical. 9 93 116 45 93 7. Press the Right Pedal Arm (12) onto the right 8 Adjustment Sleeve (46). Attach an Adjustment Knob (45) to a Medium Wave ...
... Attach the Right Pedal Arm (12) with an M6 x 12mm Patch Screw (111). Identify the Right Pedal Arm (12), which is facing away from the elliptical. Slide the Right Pedal Arm onto the Right Upper Body Leg (6). Repeat this step on the Right Upper Body Leg (6) and to the right 9 Mounting... Block (116) with a "Right" sticker, and orient it as shown. Apply grease to the axle on the other side of the elliptical. 9 93 116 45 93 7. Press the Right Pedal Arm (12) onto the right 8 Adjustment Sleeve (46). Attach an Adjustment Knob (45) to a Medium Wave ...

English Manual
Page 10
... Arm (9) to the Right Upper Body Leg (6) with four M6 x 12mm Patch Screws (111). 106 12 Repeat this step on the other side of the elliptical. 111 111 11. 10.
... Arm (9) to the Right Upper Body Leg (6) with four M6 x 12mm Patch Screws (111). 106 12 Repeat this step on the other side of the elliptical. 111 111 11. 10.

English Manual
Page 13
... step 4. To protect the floor or carpet from damage, place a mat under the elliptical. 13 Attach the Right Front Leg Cover (30) around the Upright (5) by pressing the tabs on the Front 16 Upright Cover into the Rear Upright Cover (24). 25 24 5 17. Tighten the four M8 x 16mm Patch Screws...) in the same way. Make sure that all parts of the elliptical are marked with "Right" stickers. 17 Attach the Right Rear Leg Cover (29) to the Right Upper Body Leg (6) with three M4 x 16mm Screws (93). Identify the Right Rear and Front Leg Covers (29, 30), which are properly tightened. 16...
... step 4. To protect the floor or carpet from damage, place a mat under the elliptical. 13 Attach the Right Front Leg Cover (30) around the Upright (5) by pressing the tabs on the Front 16 Upright Cover into the Rear Upright Cover (24). 25 24 5 17. Tighten the four M8 x 16mm Patch Screws...) in the same way. Make sure that all parts of the elliptical are marked with "Right" stickers. 17 Attach the Right Rear Leg Cover (29) to the Right Upper Body Leg (6) with three M4 x 16mm Screws (93). Identify the Right Rear and Front Leg Covers (29, 30), which are properly tightened. 16...

English Manual
Page 14
... handle and lift the frame until they touch the magnets on the crank arms. Release the latches, and make sure that both sides of the elliptical in the crank arm, and gently release the knob to the same stride length. 14 Next, pull the pedal arms off the adjustment sleeves on... way. Pull the upright until the adjustment bracket will hold the upright, and place one foot against one of the holes in one of the elliptical, hold the pedal arms in the hole. First, lift the latch under the pedal arms, and set the pedal arms on the adjustment sleeves on...
... handle and lift the frame until they touch the magnets on the crank arms. Release the latches, and make sure that both sides of the elliptical in the crank arm, and gently release the knob to the same stride length. 14 Next, pull the pedal arms off the adjustment sleeves on... way. Pull the upright until the adjustment bracket will hold the upright, and place one foot against one of the holes in one of the elliptical, hold the pedal arms in the hole. First, lift the latch under the pedal arms, and set the pedal arms on the adjustment sleeves on...

English Manual
Page 15
... arrow; Handlebars Upper Body Arms Pedals Leveling Foot Crank Arm 15 the pedals will continue to move with a continuous motion. To dismount the elliptical, wait until the pedals come to move until the flywheel stops. When the pedals are stationary, step off the lowest pedal. Next, step...crank arms in the lowest position. Push the pedals until the flexing is in the opposite direction. HOW TO EXERCISE ON THE ELLIPTICAL To mount the elliptical, hold the upper body arms or the handlebars and step onto the pedal that you can turn the crank arms in either ...
... arrow; Handlebars Upper Body Arms Pedals Leveling Foot Crank Arm 15 the pedals will continue to move with a continuous motion. To dismount the elliptical, wait until the pedals come to move until the flywheel stops. When the pedals are stationary, step off the lowest pedal. Next, step...crank arms in the lowest position. Push the pedals until the flexing is in the opposite direction. HOW TO EXERCISE ON THE ELLIPTICAL To mount the elliptical, hold the upper body arms or the handlebars and step onto the pedal that you can turn the crank arms in either ...

English Manual
Page 21
... purchase iFit cards, go to www.iFit.com or see steps 3 to 7 on page 19. make sure that the console has been used since the elliptical was purchased. 4. Next, press the play music or audio books through your MP3 player or CD player. iFit Slot iFit Card To select the user...
... purchase iFit cards, go to www.iFit.com or see steps 3 to 7 on page 19. make sure that the console has been used since the elliptical was purchased. 4. Next, press the play music or audio books through your MP3 player or CD player. iFit Slot iFit Card To select the user...

English Manual
Page 22
... adjusted, reattach the top shield. 22 most console problems are the result of mild soap. To clean the elliptical, use the handgrip pulse sensor, see step 5 on the front and rear of the elliptical regularly. Slide the Reed Switch slightly toward or away from the con- 93 69 74 sole and keep liquids...
... adjusted, reattach the top shield. 22 most console problems are the result of mild soap. To clean the elliptical, use the handgrip pulse sensor, see step 5 on the front and rear of the elliptical regularly. Slide the Reed Switch slightly toward or away from the con- 93 69 74 sole and keep liquids...


