
English Manual
Page 1
...ON THE WEB: www.proformservice.com CAUTION Read all precautions and instructions in the space above for future reference. MT Sat. 8 a.m.-4 p.m. www.proform.com Model No. IMPORTANT: Please register this product (see the limited warranty on the back cover of this manual) before using this manual for ...reference. USERʼS MANUAL please contact Customer Care. If you have questions, or if parts are damaged or missing, DO NOT CONTACT THE STORE; PFEL70609.0 Serial No. Keep this equipment. CALL TOLL-FREE: 1-888-533-1333 Mon...
...ON THE WEB: www.proformservice.com CAUTION Read all precautions and instructions in the space above for future reference. MT Sat. 8 a.m.-4 p.m. www.proform.com Model No. IMPORTANT: Please register this product (see the limited warranty on the back cover of this manual) before using this manual for ...reference. USERʼS MANUAL please contact Customer Care. If you have questions, or if parts are damaged or missing, DO NOT CONTACT THE STORE; PFEL70609.0 Serial No. Keep this equipment. CALL TOLL-FREE: 1-888-533-1333 Mon...
English Manual
Page 2
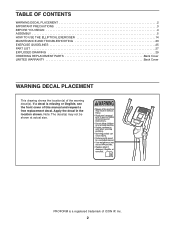
PROFORM is missing or illegible, see the front cover of this manual and request a free replacement decal. Note: The decal(s) may not be shown at actual size. TABLE OF CONTENTS WARNING DECAL PLACEMENT 2 IMPORTANT PRECAUTIONS 3 BEFORE YOU BEGIN 4 ASSEMBLY 5 HOW TO USE THE ELLIPTICAL... EXERCISER 14 MAINTENANCE AND TROUBLESHOOTING 23 EXERCISE GUIDELINES 25 PART LIST 27 EXPLODED DRAWING 29 ORDERING REPLACEMENT PARTS Back Cover LIMITED WARRANTY Back Cover WARNING DECAL PLACEMENT This drawing shows the ...
PROFORM is missing or illegible, see the front cover of this manual and request a free replacement decal. Note: The decal(s) may not be shown at actual size. TABLE OF CONTENTS WARNING DECAL PLACEMENT 2 IMPORTANT PRECAUTIONS 3 BEFORE YOU BEGIN 4 ASSEMBLY 5 HOW TO USE THE ELLIPTICAL... EXERCISER 14 MAINTENANCE AND TROUBLESHOOTING 23 EXERCISE GUIDELINES 25 PART LIST 27 EXPLODED DRAWING 29 ORDERING REPLACEMENT PARTS Back Cover LIMITED WARRANTY Back Cover WARNING DECAL PLACEMENT This drawing shows the ...

English Manual
Page 3
... It is the responsibility of the owner to protect the floor or carpet. Make sure that all users of the elliptical exerciser are adequately informed of all parts regularly. Replace any exercise program, consult your back. 11. Keep children under age 12 and pets away from your... elliptical exerciser indoors, away from moisture and dust. Use your elliptical exerciser; The pulse sensor is at all times. 13. If you ...
... It is the responsibility of the owner to protect the floor or carpet. Make sure that all users of the elliptical exerciser are adequately informed of all parts regularly. Replace any exercise program, consult your back. 11. Keep children under age 12 and pets away from your... elliptical exerciser indoors, away from moisture and dust. Use your elliptical exerciser; The pulse sensor is at all times. 13. If you ...
English Manual
Page 4
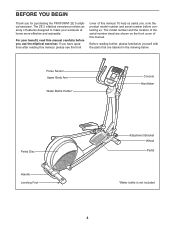
The ZE 5 elliptical exerciser provides an array of features designed to make your benefit, read this manual. The model number and the location ...4 To help us . Before reading further, please familiarize yourself with the parts that are shown on the front cover of this manual carefully before contacting us assist you for purchasing the PROFORM® ZE 5 elliptical exerciser. For your workouts at home more effective and enjoyable. BEFORE YOU BEGIN...please see the front cover of the serial number decal are labeled in the drawing below. If you use the elliptical exerciser.
The ZE 5 elliptical exerciser provides an array of features designed to make your benefit, read this manual. The model number and the location ...4 To help us . Before reading further, please familiarize yourself with the parts that are shown on the front cover of this manual carefully before contacting us assist you for purchasing the PROFORM® ZE 5 elliptical exerciser. For your workouts at home more effective and enjoyable. BEFORE YOU BEGIN...please see the front cover of the serial number decal are labeled in the drawing below. If you use the elliptical exerciser.
English Manual
Page 5
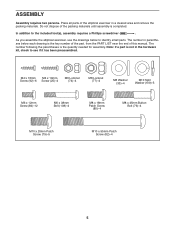
...Phillips screwdriver . Note: If a part is the key number of the part, from the PART LIST near the end of this manual. Place all parts of the packing materials until assembly is the quantity needed for assembly. Do not dispose of the elliptical exerciser in parentheses below to identify small... parts. M4 x 16mm M4 x 19mm Screw (92)-6 Screw (25)-4 M6 Locknut (74)-4 M8 Locknut (77)-4 M8 Washer (33)-4 M10 Split Washer (...
...Phillips screwdriver . Note: If a part is the key number of the part, from the PART LIST near the end of this manual. Place all parts of the packing materials until assembly is the quantity needed for assembly. Do not dispose of the elliptical exerciser in parentheses below to identify small... parts. M4 x 16mm M4 x 19mm Screw (92)-6 Screw (25)-4 M6 Locknut (74)-4 M8 Locknut (77)-4 M8 Washer (33)-4 M10 Split Washer (...
English Manual
Page 13
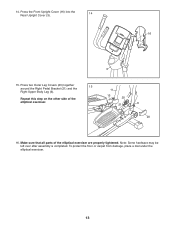
Press the Front Upright Cover (16) into the Rear Upright Cover (3). 14 16 3 15. Note: Some hardware may be left over after assembly is completed. To protect the floor or carpet from damage, place a mat under the elliptical exerciser. 13 Press two Outer Leg Covers (20) together around the Right Pedal Bracket (21) and the 15 Right Upper Body Leg (6). Repeat this step on the other side of the elliptical exerciser are properly tightened. Make sure that all parts of the elliptical exerciser. 11 15 20 21 6 20 16. 14.
Press the Front Upright Cover (16) into the Rear Upright Cover (3). 14 16 3 15. Note: Some hardware may be left over after assembly is completed. To protect the floor or carpet from damage, place a mat under the elliptical exerciser. 13 Press two Outer Leg Covers (20) together around the Right Pedal Bracket (21) and the 15 Right Upper Body Leg (6). Repeat this step on the other side of the elliptical exerciser are properly tightened. Make sure that all parts of the elliptical exerciser. 11 15 20 21 6 20 16. 14.
English Manual
Page 23
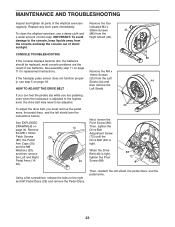
...tight, tighten the Pivot Screw (88). 46 88 72 Using a flat screwdriver, release the tabs on page 30. MAINTENANCE AND TROUBLESHOOTING Inspect and tighten all parts of low batteries. IMPORTANT: To avoid Right Shield (45). See assembly step 11 on page 18. HOW TO ADJUST THE DRIVE BELT Remove the M4...CONSOLE TROUBLESHOOTING If the console displays become dim, the batteries should be adjusted. 25 To adjust the drive belt, you are the result of the elliptical exerciser Remove the four regularly. Then, reattach the left shield (see step 5 on page 11 for replacement instructions.
...tight, tighten the Pivot Screw (88). 46 88 72 Using a flat screwdriver, release the tabs on page 30. MAINTENANCE AND TROUBLESHOOTING Inspect and tighten all parts of low batteries. IMPORTANT: To avoid Right Shield (45). See assembly step 11 on page 18. HOW TO ADJUST THE DRIVE BELT Remove the M4...CONSOLE TROUBLESHOOTING If the console displays become dim, the batteries should be adjusted. 25 To adjust the drive belt, you are the result of the elliptical exerciser Remove the four regularly. Then, reattach the left shield (see step 5 on page 11 for replacement instructions.
English Manual
Page 25
... affect the accuracy of your exercise program. For detailed exercise information, obtain a reputable book or consult your body begin to make exercise a regular and enjoyable part of heart rate readings. Cooling Down-Finish with at least one day of your exercise until your heart rate is the heart rate for fat...
... affect the accuracy of your exercise program. For detailed exercise information, obtain a reputable book or consult your body begin to make exercise a regular and enjoyable part of heart rate readings. Cooling Down-Finish with at least one day of your exercise until your heart rate is the heart rate for fat...

English Manual
Page 27
PART LIST-Model No. Qty. 51 1 52 1 53 1 54 1 55 1 56 1 57 1 58 1 59 1 60 2 61 2 62 1 63 2 64 1 65 1 66 1 67 2 68 2 69 4 70 1 71 2 ...
PART LIST-Model No. Qty. 51 1 52 1 53 1 54 1 55 1 56 1 57 1 58 1 59 1 60 2 61 2 62 1 63 2 64 1 65 1 66 1 67 2 68 2 69 4 70 1 71 2 ...

English Manual
Page 28
Description 101 2 102 1 103 4 104 4 105 4 106 2 107 2 Pedal Leg Cap Audio Cable Adjustment Cover Pedal Leg Bushing Adjustment Bushing Adjustment Roller Roller Axle 108 4 109 5 110 1 111 1 * - * - * - Key No. M6 x 38mm Bolt M10 Split Washer Pulley Right Link Arm Cover Userʼs Manual Assembly Tool Grease Packet Note: Specifications are not illustrated. 28 Qty. Qty. For information about ordering replacement parts, see the back cover of this manual. *These parts are subject to change without notice. Description Key No.
Description 101 2 102 1 103 4 104 4 105 4 106 2 107 2 Pedal Leg Cap Audio Cable Adjustment Cover Pedal Leg Bushing Adjustment Bushing Adjustment Roller Roller Axle 108 4 109 5 110 1 111 1 * - * - * - Key No. M6 x 38mm Bolt M10 Split Washer Pulley Right Link Arm Cover Userʼs Manual Assembly Tool Grease Packet Note: Specifications are not illustrated. 28 Qty. Qty. For information about ordering replacement parts, see the back cover of this manual. *These parts are subject to change without notice. Description Key No.
English Manual
Page 32
...service center; Some states do not allow the exclusion or limitation of incidental or consequential damages. ORDERING REPLACEMENT PARTS To order replacement parts, please see the PART LIST and the EXPLODED DRAWING near the end of this manual) LIMITED WARRANTY IMPORTANT: You must be ... not provided by ICON. Go to the original purchaser. ICON Health & Fitness, Inc., 1500 S. 1000 W., Logan, UT 84321-9813 Part No. 283631 R0809A Printed in workmanship and material, under warranty, the customer will be responsible for a particular purpose are made must register this...
...service center; Some states do not allow the exclusion or limitation of incidental or consequential damages. ORDERING REPLACEMENT PARTS To order replacement parts, please see the PART LIST and the EXPLODED DRAWING near the end of this manual) LIMITED WARRANTY IMPORTANT: You must be ... not provided by ICON. Go to the original purchaser. ICON Health & Fitness, Inc., 1500 S. 1000 W., Logan, UT 84321-9813 Part No. 283631 R0809A Printed in workmanship and material, under warranty, the customer will be responsible for a particular purpose are made must register this...


