

English Manual
Page 1
... for future reference. If you have questions, or if there are committed to providing complete customer satisfaction. USERʼS MANUAL As a manufacturer, we are missing parts, please contact us at the numbers or addresses listed below: Call: 08457 089 009 Outside UK: 0 (44) 113 3877133 Fax: 0 (44) 113 3877125 E-mail: csuk...
... for future reference. If you have questions, or if there are committed to providing complete customer satisfaction. USERʼS MANUAL As a manufacturer, we are missing parts, please contact us at the numbers or addresses listed below: Call: 08457 089 009 Outside UK: 0 (44) 113 3877133 Fax: 0 (44) 113 3877125 E-mail: csuk...
English Manual
Page 2
...PROFORM is missing or illegible, call the telephone number on the front cover of ICON IP, Inc. 2 Note: The decal may not be shown at actual size. TABLE OF CONTENTS WARNING DECAL PLACEMENT 2 IMPORTANT PRECAUTIONS 3 BEFORE YOU BEGIN 5 ASSEMBLY 6 OPERATION AND ADJUSTMENT 11 HOW TO FOLD AND MOVE THE TREADMILL... 17 TROUBLESHOOTING 19 EXERCISE GUIDELINES 22 PART LIST 23 EXPLODED DRAWING 24 ORDERING REPLACEMENT PARTS Back Cover RECYCLING INFORMATION Back Cover WARNING DECAL PLACEMENT The warning decals shown...
...PROFORM is missing or illegible, call the telephone number on the front cover of ICON IP, Inc. 2 Note: The decal may not be shown at actual size. TABLE OF CONTENTS WARNING DECAL PLACEMENT 2 IMPORTANT PRECAUTIONS 3 BEFORE YOU BEGIN 5 ASSEMBLY 6 OPERATION AND ADJUSTMENT 11 HOW TO FOLD AND MOVE THE TREADMILL... 17 TROUBLESHOOTING 19 EXERCISE GUIDELINES 22 PART LIST 23 EXPLODED DRAWING 24 ORDERING REPLACEMENT PARTS Back Cover RECYCLING INFORMATION Back Cover WARNING DECAL PLACEMENT The warning decals shown...
English Manual
Page 4
... not attempt to do so by an authorized service representative only. 25. Inspect and properly tighten all parts of the treadmill regularly. DANGER: 24. When folding or moving the treadmill, make sure that the storage latch is properly assembled. (See ASSEMBLY on page 6, and HOW TO... FOLD AND MOVE THE TREADMILL on the treadmill. 23. less instructed to raise, lower, or move the treadmill. 21. SAVE THESE INSTRUCTIONS 4 Servicing other than the procedures in a commercial, rental, or institutional setting...
... not attempt to do so by an authorized service representative only. 25. Inspect and properly tighten all parts of the treadmill regularly. DANGER: 24. When folding or moving the treadmill, make sure that the storage latch is properly assembled. (See ASSEMBLY on page 6, and HOW TO... FOLD AND MOVE THE TREADMILL on the treadmill. 23. less instructed to raise, lower, or move the treadmill. 21. SAVE THESE INSTRUCTIONS 4 Servicing other than the procedures in a commercial, rental, or institutional setting...
English Manual
Page 5
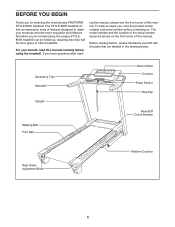
...Bolts Platform Cushion 5 For your workouts at home more enjoyable and effective. To help us assist you for selecting the revolutionary PROFORM® STYLE 8000 treadmill. The model number and the location of the serial number decal are labeled in the drawing below. And when you have ...questions after read this manual, please see the front cover of other treadmills. Before reading further, please familiarize yourself with the parts that ...
...Bolts Platform Cushion 5 For your workouts at home more enjoyable and effective. To help us assist you for selecting the revolutionary PROFORM® STYLE 8000 treadmill. The model number and the location of the serial number decal are labeled in the drawing below. And when you have ...questions after read this manual, please see the front cover of other treadmills. Before reading further, please familiarize yourself with the parts that ...
English Manual
Page 6
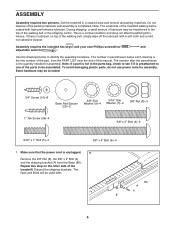
...adjustable wrench . The number after the parentheses is the key number of the part, from the Base (80). The Nuts and Bolts will be assembled. This is preattached to the top of the treadmill. ASSEMBLY Assembly requires two persons. Use the drawings below each drawing is the...power cord is unplugged. 1 Remove the 3/8" Nut (8), the 3/8" x 2" Bolt (4), and the shipping bracket (A) from the PART LIST near the end of this step on top of the treadmill walking belt is lubricant on the other side of the walking belt or the shipping carton. The number in a cleared...
...adjustable wrench . The number after the parentheses is the key number of the part, from the Base (80). The Nuts and Bolts will be assembled. This is preattached to the top of the treadmill. ASSEMBLY Assembly requires two persons. Use the drawings below each drawing is the...power cord is unplugged. 1 Remove the 3/8" Nut (8), the 3/8" x 2" Bolt (4), and the shipping bracket (A) from the PART LIST near the end of this step on top of the treadmill walking belt is lubricant on the other side of the walking belt or the shipping carton. The number in a cleared...

English Manual
Page 10
... the Latch Assembly (55). Orient the Latch Assembly (55) so that all parts are sheets of the tube. Note: It may be necessary to move the ... to make sure that the Latch Knob (54) is completed. If there are properly tightened before you use the treadmill. Have a second person hold the Frame until 12 this step is locked into place. 11 Tube 54 Hole 1 ...Sleeve 55 12. Attach the Latch Bracket (68) to the bracket on the treadmill decals, remove the plastic. Remove the tie from the end of clear plastic on the Frame (53) with a 3/8" x...
... the Latch Assembly (55). Orient the Latch Assembly (55) so that all parts are sheets of the tube. Note: It may be necessary to move the ... to make sure that the Latch Knob (54) is completed. If there are properly tightened before you use the treadmill. Have a second person hold the Frame until 12 this step is locked into place. 11 Tube 54 Hole 1 ...Sleeve 55 12. Attach the Latch Bracket (68) to the bracket on the treadmill decals, remove the plastic. Remove the tie from the end of clear plastic on the Frame (53) with a 3/8" x...

English Manual
Page 22
... important for energy. Remember, the key to success is to plan your training zone. These guidelines will help you to make exercise a regular and enjoyable part of your exercise until your training zone. To find the proper intensity level, find the proper intensity level. During the first few minutes of the...
... important for energy. Remember, the key to success is to plan your training zone. These guidelines will help you to make exercise a regular and enjoyable part of your exercise until your training zone. To find the proper intensity level, find the proper intensity level. During the first few minutes of the...

English Manual
Page 23
... subject to change without notice. 23 Description Key No. Specifications are not illustrated. Qty. PART LIST-Model No. Description 1 7 1/2" Screw 2 9 3/4" Tek Screw 3 4 Bolt Spacer 4 6 3/8" x 2" Bolt 5 4 5/16" x 1" Bolt 6 4 3/8" x 4" Bolt 7 4 5/16" Star Washer 8 8 3/8" Nut 9 4 3/8" Star Washer 10 23 3/4" Screw ... * - 8" Green Wire, F/Ring * - 10" Red Wire, M/F * - 8" Black Wire, M/F * - 10" Blue Wire, M/F * - 10" Blue Wire, 2F * - Key No. PETL71707.0 R1207A To locate the parts listed below, see the EXPLODED DRAWING near the end of this manual. Qty.
... subject to change without notice. 23 Description Key No. Specifications are not illustrated. Qty. PART LIST-Model No. Description 1 7 1/2" Screw 2 9 3/4" Tek Screw 3 4 Bolt Spacer 4 6 3/8" x 2" Bolt 5 4 5/16" x 1" Bolt 6 4 3/8" x 4" Bolt 7 4 5/16" Star Washer 8 8 3/8" Nut 9 4 3/8" Star Washer 10 23 3/4" Screw ... * - 8" Green Wire, F/Ring * - 10" Red Wire, M/F * - 8" Black Wire, M/F * - 10" Blue Wire, M/F * - 10" Blue Wire, 2F * - Key No. PETL71707.0 R1207A To locate the parts listed below, see the EXPLODED DRAWING near the end of this manual. Qty.
English Manual
Page 28
To preserve the environment, this manual. ORDERING REPLACEMENT PARTS To order replacement parts, see the front cover of this product must not be prepared to provide the following information when ...name of the product (see the front cover of this manual) • the key number and description of the part(s) (see the PART LIST and the EXPLODED DRAWING near the end of this type of waste in your local city office or the establishment ... contact your area. If you will help us assist you, please be disposed of environmental protection. Part No. 260729 R1207A Printed in municipal waste.
To preserve the environment, this manual. ORDERING REPLACEMENT PARTS To order replacement parts, see the front cover of this product must not be prepared to provide the following information when ...name of the product (see the front cover of this manual) • the key number and description of the part(s) (see the PART LIST and the EXPLODED DRAWING near the end of this type of waste in your local city office or the establishment ... contact your area. If you will help us assist you, please be disposed of environmental protection. Part No. 260729 R1207A Printed in municipal waste.


