

English Manual
Page 1
... www.proform.com new products, prizes, fitness tips, and much more! Serial Number Decal QUESTIONS? CUSTOMER HOT LINE: 1-800-999-3756 Mon.-Fri., 6 a.m.-6 p.m. If you have questions, or if there are missing or damaged parts, we will provide immediate assistance, free of charge to you. MST CAUTION Read all precautions and instructions in this manual before using this manual for...
... www.proform.com new products, prizes, fitness tips, and much more! Serial Number Decal QUESTIONS? CUSTOMER HOT LINE: 1-800-999-3756 Mon.-Fri., 6 a.m.-6 p.m. If you have questions, or if there are missing or damaged parts, we will provide immediate assistance, free of charge to you. MST CAUTION Read all precautions and instructions in this manual before using this manual for...
English Manual
Page 2
... institutional setting. The pulse sensor is the responsibility of the owner to ensure that could become caught on a level surface. WARNING: Before beginning this manual before using the exercise cycle; TABLE OF CONTENTS IMPORTANT PRECAUTIONS 2 BEFORE YOU BEGIN 3 ASSEMBLY 4 HOW TO OPERATE THE EXERCISE CYCLE 8 MAINTENANCE AND TROUBLESHOOTING 11 CONDITIONING GUIDELINES 12 PART LIST 14 EXPLODED DRAWING 15 HOW TO ORDER REPLACEMENT PARTS Back Cover LIMITED WARRANTY Back Cover...
... institutional setting. The pulse sensor is the responsibility of the owner to ensure that could become caught on a level surface. WARNING: Before beginning this manual before using the exercise cycle; TABLE OF CONTENTS IMPORTANT PRECAUTIONS 2 BEFORE YOU BEGIN 3 ASSEMBLY 4 HOW TO OPERATE THE EXERCISE CYCLE 8 MAINTENANCE AND TROUBLESHOOTING 11 CONDITIONING GUIDELINES 12 PART LIST 14 EXPLODED DRAWING 15 HOW TO ORDER REPLACEMENT PARTS Back Cover LIMITED WARRANTY Back Cover...
English Manual
Page 3
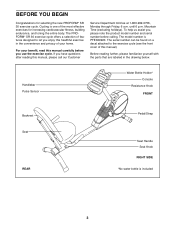
... your home. Handlebar Pulse Sensor Water Bottle Holder* Console Resistance Knob FRONT Backrest Seat REAR Pedal/Strap Seat Handle Seat Knob RIGHT SIDE *No water bottle is included 3 The PROFORM® SR 30 exercise cycle offers a selection of features designed to the exercise cycle (see the front cover of your benefit, read this manual carefully before calling. The serial number can be found on a decal attached to let you use the exercise cycle...
... your home. Handlebar Pulse Sensor Water Bottle Holder* Console Resistance Knob FRONT Backrest Seat REAR Pedal/Strap Seat Handle Seat Knob RIGHT SIDE *No water bottle is included 3 The PROFORM® SR 30 exercise cycle offers a selection of features designed to the exercise cycle (see the front cover of your benefit, read this manual carefully before calling. The serial number can be found on a decal attached to let you use the exercise cycle...
English Manual
Page 4
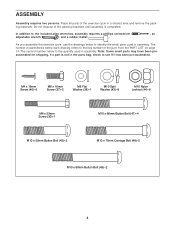
... been pre-assembled. As you assemble the exercise cycle, use the drawings below each drawing refers to the key number of the part, from the PART LIST on page 14. ASSEMBLY Assembly requires two persons. The second number refers to identify the small parts used in assembly. The number in parenthesis below to the quantity used in assembly. Do not dispose of the exercise cycle in the parts bag, check...
... been pre-assembled. As you assemble the exercise cycle, use the drawings below each drawing refers to the key number of the part, from the PART LIST on page 14. ASSEMBLY Assembly requires two persons. The second number refers to identify the small parts used in assembly. The number in parenthesis below to the quantity used in assembly. Do not dispose of the exercise cycle in the parts bag, check...

English Manual
Page 5
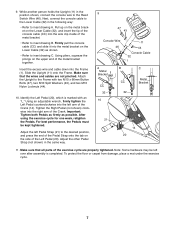
... the Knob. Move the Seat Carriage back and forth slightly until it . 1. Identify the Front Stabilizer (2). Orient the Frame Rail (3) as shown. Then, tighten the Knob. Attach the Rear 2 Stabilizer (5) to the Frame with two M10 x 80mm Button Bolts (49) and two M10 Split Washers (43). 1 44 3 5 3. Turn the Seat Knob counterclockwise two or three turns to the Seat Frame (6) with two M10 x 52mm Button Bolts...
... the Knob. Move the Seat Carriage back and forth slightly until it . 1. Identify the Front Stabilizer (2). Orient the Frame Rail (3) as shown. Then, tighten the Knob. Attach the Rear 2 Stabilizer (5) to the Frame with two M10 x 80mm Button Bolts (49) and two M10 Split Washers (43). 1 44 3 5 3. Turn the Seat Knob counterclockwise two or three turns to the Seat Frame (6) with two M10 x 52mm Button Bolts...

English Manual
Page 6
... not pinched. 8 12 Ground Wire 40 40 Hole 11 Console Wire Console Cable 40 6 Attach the ground wire to the Seat Carriage with an M4 x 16mm Screw (40). Make sure that the batteries are oriented as shown by the dia- Attach the Seat Frame to the Upright with two M10 x 66mm Button Bolts (47) and two M10 Split Washers (43). The Console (12) requires three "AA...
... not pinched. 8 12 Ground Wire 40 40 Hole 11 Console Wire Console Cable 40 6 Attach the ground wire to the Seat Carriage with an M4 x 16mm Screw (40). Make sure that the batteries are oriented as shown by the dia- Attach the Seat Frame to the Upright with two M10 x 66mm Button Bolts (47) and two M10 Split Washers (43). The Console (12) requires three "AA...
English Manual
Page 7
... left Pedal Strap (21) to the Reed Switch Wire (46). Slide the Upright (11) onto the Frame. Identify the Left Pedal (20), which is completed. Adjust the other Pedal Strap (not shown) in the position shown, connect the console wire to the desired position, and press the end of the Pedal Strap onto the tab on the Lower Cable (32) as possible. Note: Some hardware may be kept tightened...
... left Pedal Strap (21) to the Reed Switch Wire (46). Slide the Upright (11) onto the Frame. Identify the Left Pedal (20), which is completed. Adjust the other Pedal Strap (not shown) in the position shown, connect the console wire to the desired position, and press the end of the Pedal Strap onto the tab on the Lower Cable (32) as possible. Note: Some hardware may be kept tightened...

English Manual
Page 8
... then press the ends of the pedal straps back onto the tabs. Pedal Strap 8 As you . Then, turn the knob clockwise until the pin on the knob snaps into one of the pedal straps off the tabs on the console. ing resistance, turn the seat knob counterclockwise two or three turns to loosen it (if the knob is not loosened enough, it is selected. Important: Stop turning the knob when turning becomes...
... then press the ends of the pedal straps back onto the tabs. Pedal Strap 8 As you . Then, turn the knob clockwise until the pin on the knob snaps into one of the pedal straps off the tabs on the console. ing resistance, turn the seat knob counterclockwise two or three turns to loosen it (if the knob is not loosened enough, it is selected. Important: Stop turning the knob when turning becomes...
English Manual
Page 9
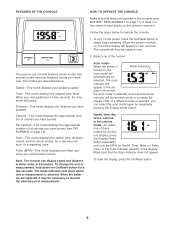
... selected. Make sure that provide instant exercise feedback during your workouts. Calories-This mode displays the approximate number of clear plastic on the power, press the On/Reset button or simply begin pedaling. Pulse (BPM)-This mode displays your pedaling speed. HOW TO OPERATE THE CONSOLE Make sure that the scan mode is selected, and a second mode indicator will show which mode is turned on page 11). Note: If a different...
... selected. Make sure that provide instant exercise feedback during your workouts. Calories-This mode displays the approximate number of clear plastic on the power, press the On/Reset button or simply begin pedaling. Pulse (BPM)-This mode displays your pedaling speed. HOW TO OPERATE THE CONSOLE Make sure that the scan mode is selected, and a second mode indicator will show which mode is turned on page 11). Note: If a different...

English Manual
Page 10
Avoid moving your heart rate will be shown. WARNING: The heart rate sensor is intended only as an exercise aid in determining heart rate trends in the display will flash each time your heart rate if desired. To turn off " feature. If the pedals are not moved and the console buttons are thin sheets of plastic on the console, with your right palm covering the two right contacts and your...
Avoid moving your heart rate will be shown. WARNING: The heart rate sensor is intended only as an exercise aid in determining heart rate trends in the display will flash each time your heart rate if desired. To turn off " feature. If the pedals are not moved and the console buttons are thin sheets of plastic on the console, with your right palm covering the two right contacts and your...
English Manual
Page 11
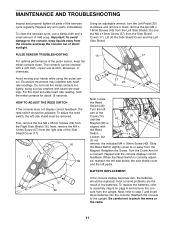
... replaced; BATTERY REPLACEMENT If the console display becomes dim, the batteries should be cleaned with heart rate readings. PULSE SENSOR TROUBLESHOOTING For optimal performance of the pulse sensor, keep the console out of the Side Shield Cover (17). 16 17 39 57 39 Using an adjustable wrench, turn the Left Pedal (20) clockwise and remove it. Retighten the Screw. MAINTENANCE AND TROUBLESHOOTING Inspect and properly tighten all parts of mild soap. Avoid moving your hands while using...
... replaced; BATTERY REPLACEMENT If the console display becomes dim, the batteries should be cleaned with heart rate readings. PULSE SENSOR TROUBLESHOOTING For optimal performance of the pulse sensor, keep the console out of the Side Shield Cover (17). 16 17 39 57 39 Using an adjustable wrench, turn the Left Pedal (20) clockwise and remove it. Retighten the Screw. MAINTENANCE AND TROUBLESHOOTING Inspect and properly tighten all parts of mild soap. Avoid moving your hands while using...
English Manual
Page 12
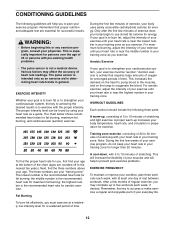
... to strengthen your body uses easily accessible carbohydrate calories for persons over the age of 35 or persons with the proper intensity. For maximum fat burning, adjust the intensity of your exercise until your heart rate is near the middle number in general. The pulse sensor is the recommended heart rate for exercise. A proper warm-up increases your training zone. Training zone exercise, consisting of...
... to strengthen your body uses easily accessible carbohydrate calories for persons over the age of 35 or persons with the proper intensity. For maximum fat burning, adjust the intensity of your exercise until your heart rate is near the middle number in general. The pulse sensor is the recommended heart rate for exercise. A proper warm-up increases your training zone. Training zone exercise, consisting of...

English Manual
Page 13
...Quadriceps and hip muscles. 3 5 1 2 4 13 SUGGESTED STRETCHES The correct form for 15 counts, then relax. Move slowly as well. Hold for several basic stretches is shown at the right. Inner Thigh Stretch Sit with one leg in front of your feet together and your back foot flat on the... your knees outward. Hold for 15 counts, then relax. Hold for 15 counts, then relax. Calf/Achilles Stretch With one leg extended. Stretches: Hamstrings, lower back and groin. 3. To cause further stretching of knees and back. 2. Toe Touch Stretch Stand with your buttocks as possible...
...Quadriceps and hip muscles. 3 5 1 2 4 13 SUGGESTED STRETCHES The correct form for 15 counts, then relax. Move slowly as well. Hold for several basic stretches is shown at the right. Inner Thigh Stretch Sit with one leg in front of your feet together and your back foot flat on the... your knees outward. Hold for 15 counts, then relax. Hold for 15 counts, then relax. Calf/Achilles Stretch With one leg extended. Stretches: Hamstrings, lower back and groin. 3. To cause further stretching of knees and back. 2. Toe Touch Stretch Stand with your buttocks as possible...
English Manual
Page 14
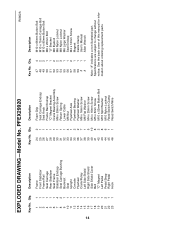
... Screw M10 x 52mm Button Bolt M10 Split Washer M10 Nylon Locknut Reed Switch Clamp Reed Switch/Wire R0802A Key No. See the back cover of this manual for information about ordering replacement parts. Qty. 1 1 2 1 3 1 4 1 5 1 6 1 7 4 8 2 9 1 10 1 11 1 12 1 13 1 14 1 15 1 16 1 17 1 18 1 19 1 20 1 21 2 22 1 23 1 Description Frame Front Stabilizer Frame Rail Seat Carriage Rear Stabilizer Seat Frame Stabilizer Endcap Seat Carriage Bushing Backrest Seat Upright Console Flywheel Crank/Pulley Left...
... Screw M10 x 52mm Button Bolt M10 Split Washer M10 Nylon Locknut Reed Switch Clamp Reed Switch/Wire R0802A Key No. See the back cover of this manual for information about ordering replacement parts. Qty. 1 1 2 1 3 1 4 1 5 1 6 1 7 4 8 2 9 1 10 1 11 1 12 1 13 1 14 1 15 1 16 1 17 1 18 1 19 1 20 1 21 2 22 1 23 1 Description Frame Front Stabilizer Frame Rail Seat Carriage Rear Stabilizer Seat Frame Stabilizer Endcap Seat Carriage Bushing Backrest Seat Upright Console Flywheel Crank/Pulley Left...
English Manual
Page 15
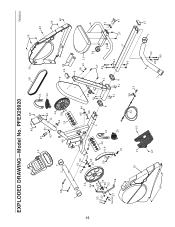
PFEX29920 40 40 12 47 21 43 40 22 43 11 7 48 2 14 44 44 58 29 18 16 9 25 24 R0802A 39 40 39 40 15 7 13 54 55 33 37 54 5237 53 35 34 36 53 28 51 33 52 54 44 36 35 50 33 29 19 31 15 17 57 40 1 21 20 57 45 40 46 8 32 26 41 41 41 41 8 59 23 4 38 30 10 56 37 42 37 43 3 44 5 43 43 7 49 6 43 37 47 27 7 EXPLODED DRAWING-Model No.
PFEX29920 40 40 12 47 21 43 40 22 43 11 7 48 2 14 44 44 58 29 18 16 9 25 24 R0802A 39 40 39 40 15 7 13 54 55 33 37 54 5237 53 35 34 36 53 28 51 33 52 54 44 36 35 50 33 29 19 31 15 17 57 40 1 21 20 57 45 40 46 8 32 26 41 41 41 41 8 59 23 4 38 30 10 56 37 42 37 43 3 44 5 43 43 7 49 6 43 37 47 27 7 EXPLODED DRAWING-Model No.
English Manual
Page 16
... the following information: • The MODEL NUMBER of the product (PFEX29920) • The NAME of the product (PROFORM® SR 30 exercise cycle) • The SERIAL NUMBER of the product (see the PART LIST on page 14 and the EXPLODED DRAWING on how long an implied warranty lasts. Some states do not allow limitations on page 15) PROFORM is limited to replacing or repairing, at...
... the following information: • The MODEL NUMBER of the product (PFEX29920) • The NAME of the product (PROFORM® SR 30 exercise cycle) • The SERIAL NUMBER of the product (see the PART LIST on page 14 and the EXPLODED DRAWING on how long an implied warranty lasts. Some states do not allow limitations on page 15) PROFORM is limited to replacing or repairing, at...


