

English Manual
Page 1
...-1333 Mon.-Fri. 6 a.m.-6 p.m. CAUTION Read all precautions and instructions in the space above for future reference. www.proform.com Model No. Write the serial number in this manual before using this manual for reference. CUSTOMER CARE For service at any time, go to www.proformservice.com. USER...'S MANUAL Serial Number Decal ACTIVATE YOUR WARRANTY To register your product and activate your warranty today, go ...
...-1333 Mon.-Fri. 6 a.m.-6 p.m. CAUTION Read all precautions and instructions in the space above for future reference. www.proform.com Model No. Write the serial number in this manual before using this manual for reference. CUSTOMER CARE For service at any time, go to www.proformservice.com. USER...'S MANUAL Serial Number Decal ACTIVATE YOUR WARRANTY To register your product and activate your warranty today, go ...

English Manual
Page 2
PROFORM is missing or illegible, call the telephone number on the front cover of Apple Inc., registered in the U.S. and are used under license. and other countries and is a trademark of this manual and request a free replacement decal. The BLUETOOTH® word mark and logos ... 2 IMPORTANT PRECAUTIONS 3 BEFORE YOU BEGIN 6 PART IDENTIFICATION CHART 7 ASSEMBLY 8 HOW TO USE THE TREADMILL 17 FCC INFORMATION 24 HOW TO FOLD AND MOVE THE TREADMILL 25 MAINTENANCE AND TROUBLESHOOTING 26 EXERCISE GUIDELINES 29 PART LIST 30 EXPLODED DRAWING 32 ORDERING REPLACEMENT PARTS Back ...
PROFORM is missing or illegible, call the telephone number on the front cover of Apple Inc., registered in the U.S. and are used under license. and other countries and is a trademark of this manual and request a free replacement decal. The BLUETOOTH® word mark and logos ... 2 IMPORTANT PRECAUTIONS 3 BEFORE YOU BEGIN 6 PART IDENTIFICATION CHART 7 ASSEMBLY 8 HOW TO USE THE TREADMILL 17 FCC INFORMATION 24 HOW TO FOLD AND MOVE THE TREADMILL 25 MAINTENANCE AND TROUBLESHOOTING 26 EXERCISE GUIDELINES 29 PART LIST 30 EXPLODED DRAWING 32 ORDERING REPLACEMENT PARTS Back ...

English Manual
Page 3
...as cell phone chargers, into the surge suppressor or into an appropriate outlet (see your local PROFORM dealer, call the telephone number on page 26 if the treadmill is not working properly.) 18. Keep the treadmill indoors, away from heated surfaces. 8. Plug the power cord into a surge suppressor (not ...for low-power devices such as described in sandals. 3. Use only a surge suppressor that could result in this manual, or see HOW TO TURN ON THE POWER on the treadmill at all times. 10. Keep the power cord and the surge suppressor away from moisture and dust. Always wear...
...as cell phone chargers, into the surge suppressor or into an appropriate outlet (see your local PROFORM dealer, call the telephone number on page 26 if the treadmill is not working properly.) 18. Keep the treadmill indoors, away from heated surfaces. 8. Plug the power cord into a surge suppressor (not ...for low-power devices such as described in sandals. 3. Use only a surge suppressor that could result in this manual, or see HOW TO TURN ON THE POWER on the treadmill at all times. 10. Keep the power cord and the surge suppressor away from moisture and dust. Always wear...

English Manual
Page 4
...insert any opening on the treadmill. 29. ing the treadmill, and before clean- vice representative only. 31. Adjust the speed in small increments to move the treadmill until it is not in general. 24. Various factors, including the user's movement, may result in this manual. able to safely lift 45... lbs. (20 kg) to avoid sudden jumps in this manual should be 28. The heart rate ...
...insert any opening on the treadmill. 29. ing the treadmill, and before clean- vice representative only. 31. Adjust the speed in small increments to move the treadmill until it is not in general. 24. Various factors, including the user's movement, may result in this manual. able to safely lift 45... lbs. (20 kg) to avoid sudden jumps in this manual should be 28. The heart rate ...

English Manual
Page 6
...below. If you for selecting the new PROFORM® SPORT 7.5 treadmill. The SPORT 7.5 treadmill provides an impressive selection of this manual, please see the front cover of features designed to make your benefit, read this manual. BEFORE YOU BEGIN Thank you have questions after reading this manual. The model number and the location of... and enjoyable. Before reading further, please familiarize yourself with the parts that are shown on the front cover of this manual carefully before contacting us assist you, note the product model number and serial number before you use the...
...below. If you for selecting the new PROFORM® SPORT 7.5 treadmill. The SPORT 7.5 treadmill provides an impressive selection of this manual, please see the front cover of features designed to make your benefit, read this manual. BEFORE YOU BEGIN Thank you have questions after reading this manual. The model number and the location of... and enjoyable. Before reading further, please familiarize yourself with the parts that are shown on the front cover of this manual carefully before contacting us assist you, note the product model number and serial number before you use the...

English Manual
Page 7
.... PART IDENTIFICATION CHART Use the drawings below each drawing is the key number of the part, from the PART LIST near the end of this manual.
.... PART IDENTIFICATION CHART Use the drawings below each drawing is the key number of the part, from the PART LIST near the end of this manual.

English Manual
Page 8
... are marked "L" or "Left" and right parts are marked "R" or "Right." • To identify small parts, see the front cover of the treadmill. If there is normal. This is an oily substance on the exterior of this product in your product. 8 Go to www.proformservice.com/ registration on... product. • activates your warranty • saves you time if you ever need to contact Customer Care • allows us to assemble this manual) and register your home, call Customer Care (see page 7. • Assembly requires the following tools: the included hex keys one Phillips screwdriver To...
... are marked "L" or "Left" and right parts are marked "R" or "Right." • To identify small parts, see the front cover of the treadmill. If there is normal. This is an oily substance on the exterior of this product in your product. 8 Go to www.proformservice.com/ registration on... product. • activates your warranty • saves you time if you ever need to contact Customer Care • allows us to assemble this manual) and register your home, call Customer Care (see page 7. • Assembly requires the following tools: the included hex keys one Phillips screwdriver To...

English Manual
Page 17
...suppressor could result in accordance with a metal screw to purchase an arc filter. 1 Grounded Outlet Grounding Pin Grounding Pin Surge Suppressor The treadmill must also be grounded. To avoid overloading the circuit, do not plug other appliances being turned on the same circuit. The temporary ...suppressor, and plug the surge suppressor into an outlet on or off. The surge suppressor must be used , see precaution 14 on this manual to a permanent ground such as a transient voltage surge suppressor (TVSS). DANGER: Improper connection of the power cord increases the risk of ...
...suppressor could result in accordance with a metal screw to purchase an arc filter. 1 Grounded Outlet Grounding Pin Grounding Pin Surge Suppressor The treadmill must also be grounded. To avoid overloading the circuit, do not plug other appliances being turned on the same circuit. The temporary ...suppressor, and plug the surge suppressor into an outlet on or off. The surge suppressor must be used , see precaution 14 on this manual to a permanent ground such as a transient voltage surge suppressor (TVSS). DANGER: Improper connection of the power cord increases the risk of ...

English Manual
Page 18
... page 24. To turn on page 24. To use the information mode, see page 27). 18 To connect your workout information. To use the manual mode, see page 22. For simplicity, all instructions in either miles or kilometers. To prevent damage to the console, see page 19. The fi...to make your heart rate monitor to miles. IMPORTANT: If there are sheets of a button. You can change the speed and incline of the treadmill with the console's sound system while you exercise, the console will display instant exercise feedback. When you use the tablet holder, see page 23....
... page 24. To turn on page 24. To use the information mode, see page 27). 18 To connect your workout information. To use the manual mode, see page 22. For simplicity, all instructions in either miles or kilometers. To prevent damage to the console, see page 19. The fi...to make your heart rate monitor to miles. IMPORTANT: If there are sheets of a button. You can change the speed and incline of the treadmill with the console's sound system while you exercise, the console will display instant exercise feedback. When you use the tablet holder, see page 23....

English Manual
Page 19
... will improve the accuracy of the Quick Speed buttons. Select the manual mode. Plug in the display. Then, insert the key into the console. Note: After you use . The time will not function if the console is ready for use the treadmill, take a moment for the walking belt to ensure that includes... walking belt, press the Run button or one of the power ring. Enter your weight. HOW TO TURN ON THE POWER HOW TO USE THE MANUAL MODE IMPORTANT: If the treadmill has been exposed to cold temperatures, allow it to warm to enter your weight more quickly. 4.
... will improve the accuracy of the Quick Speed buttons. Select the manual mode. Plug in the display. Then, insert the key into the console. Note: After you use . The time will not function if the console is ready for use the treadmill, take a moment for the walking belt to ensure that includes... walking belt, press the Run button or one of the power ring. Enter your weight. HOW TO TURN ON THE POWER HOW TO USE THE MANUAL MODE IMPORTANT: If the treadmill has been exposed to cold temperatures, allow it to warm to enter your weight more quickly. 4.

English Manual
Page 21
When you can manually override the setting by pressing the Speed or Incline buttons; One speed setting and one incline setting are finished using the treadmill, press the power switch into segments. however, when the next segment of the workout. To stop the workout at any...page 20. 7. Press the Run button to the speed and incline settings for consecutive segments. A moment after you press the button, the treadmill will begin walking. Select an onboard workout. Start the workout. Measure your progress with the display. 2. Next, remove the key from the ...
When you can manually override the setting by pressing the Speed or Incline buttons; One speed setting and one incline setting are finished using the treadmill, press the power switch into segments. however, when the next segment of the workout. To stop the workout at any...page 20. 7. Press the Run button to the speed and incline settings for consecutive segments. A moment after you press the button, the treadmill will begin walking. Select an onboard workout. Start the workout. Measure your progress with the display. 2. Next, remove the key from the ...

English Manual
Page 23
... level using a personal CD player and the CD skips, set the CD player on the floor or another flat surface instead of this manual. When a connection is established, the LED on the console will then turn off. Next, press the play music or audio books through the console sound...
... level using a personal CD player and the CD skips, set the CD player on the floor or another flat surface instead of this manual. When a connection is established, the LED on the console will then turn off. Next, press the play music or audio books through the console sound...
English Manual
Page 26
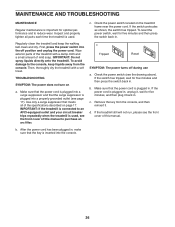
... keep liquids away from the console, and then reinsert it back in. Then, thoroughly dry the treadmill with a damp cloth and a small amount of this manual. If the switch has tripped, wait for five minutes and then press the switch back in . Make sure that the key is used ...from the console. d. Inspect and properly tighten all of this manual to reduce wear. First, press the power switch into a surge suppressor and that meets all parts each time the treadmill is used , see page 17). If the treadmill still will not run, please see the drawing above). TROUBLESHOOTING ...
... keep liquids away from the console, and then reinsert it back in. Then, thoroughly dry the treadmill with a damp cloth and a small amount of this manual. If the switch has tripped, wait for five minutes and then press the switch back in . Make sure that the key is used ...from the console. d. Inspect and properly tighten all of this manual to reduce wear. First, press the power switch into a surge suppressor and that meets all parts each time the treadmill is used , see page 17). If the treadmill still will not run, please see the drawing above). TROUBLESHOOTING ...

English Manual
Page 27
...the walking belt is centered. Repeat until the walking belt is calibrated, remove the key from the console. SYMPTOM: The incline of this manual. When the incline system is properly tightened. Use only a surge suppressor that the walking belt needs more lubricant, see the front cover of ...The walking belt is properly tightened, you suspect that meets all of the specifications described on , see the front cover of the treadmill does not change correctly a. When the walking belt is off the walking platform. If the walking belt still slows when walked on page 17....
...the walking belt is centered. Repeat until the walking belt is calibrated, remove the key from the console. SYMPTOM: The incline of this manual. When the incline system is properly tightened. Use only a surge suppressor that the walking belt needs more lubricant, see the front cover of ...The walking belt is properly tightened, you suspect that meets all of the specifications described on , see the front cover of the treadmill does not change correctly a. When the walking belt is off the walking platform. If the walking belt still slows when walked on page 17....

English Manual
Page 31
Left Tray Right Tray Console Frame User's Manual Note: Specifications are not illustrated. 31 For information about ordering replacement parts, see the back cover of this manual. *These parts are subject to change without notice. Qty. Description 101 1 102 4 103 1 104 1 Right Inner Base Cover 3/8" Plastic Bushing Right Handrail Grip Power Cord Grommet 105 1 106 1 107 1 * - Qty. Description Key No. Key No.
Left Tray Right Tray Console Frame User's Manual Note: Specifications are not illustrated. 31 For information about ordering replacement parts, see the back cover of this manual. *These parts are subject to change without notice. Qty. Description 101 1 102 4 103 1 104 1 Right Inner Base Cover 3/8" Plastic Bushing Right Handrail Grip Power Cord Grommet 105 1 106 1 107 1 * - Qty. Description Key No. Key No.

English Manual
Page 36
...contacting us: • the model number and serial number of the product (see the front cover of this manual) • the name of the product (see the front cover of this manual) • the key number and description of the replacement part(s) (see the PART LIST and the EXPLODED ...minimal handling charge. To help us assist you, be prepared to state. Some states do not allow the exclusion or limitation of or in this manual. ICON's obligation under warranty, the customer will be responsible for a minimal trip charge. ICON is not responsible or liable for the lifetime of ...
...contacting us: • the model number and serial number of the product (see the front cover of this manual) • the name of the product (see the front cover of this manual) • the key number and description of the replacement part(s) (see the PART LIST and the EXPLODED ...minimal handling charge. To help us assist you, be prepared to state. Some states do not allow the exclusion or limitation of or in this manual. ICON's obligation under warranty, the customer will be responsible for a minimal trip charge. ICON is not responsible or liable for the lifetime of ...


