
English Manual
Page 2
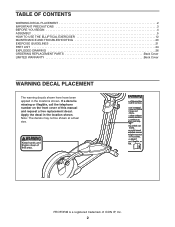
Apply the decal in the locations shown. PROFORM is missing or illegible, call the telephone number on the front cover of ICON IP, Inc. 2 TABLE OF CONTENTS WARNING DECAL PLACEMENT 2 IMPORTANT PRECAUTIONS 3 BEFORE YOU BEGIN 4 ASSEMBLY 5 HOW TO USE THE ELLIPTICAL EXERCISER 12 MAINTENANCE AND TROUBLESHOOTING 20 EXERCISE GUIDELINES 21 PART LIST 24...
Apply the decal in the locations shown. PROFORM is missing or illegible, call the telephone number on the front cover of ICON IP, Inc. 2 TABLE OF CONTENTS WARNING DECAL PLACEMENT 2 IMPORTANT PRECAUTIONS 3 BEFORE YOU BEGIN 4 ASSEMBLY 5 HOW TO USE THE ELLIPTICAL EXERCISER 12 MAINTENANCE AND TROUBLESHOOTING 20 EXERCISE GUIDELINES 21 PART LIST 24...

English Manual
Page 3
...to ensure that could become caught on a level surface, with pre-existing health problems. 2. Replace any exercise program, consult your elliptical exerciser in a commercial, rental, or institutional setting. 4. The pulse sensor is especially important for personal injury or property damage sustained...serious injury, read all important precautions and instructions in this manual and all warnings on your elliptical exerciser before using your elliptical exerciser on your elliptical exerciser only as an exercise aid in determining heart rate trends in general. 12. ICON assumes...
...to ensure that could become caught on a level surface, with pre-existing health problems. 2. Replace any exercise program, consult your elliptical exerciser in a commercial, rental, or institutional setting. 4. The pulse sensor is especially important for personal injury or property damage sustained...serious injury, read all important precautions and instructions in this manual and all warnings on your elliptical exerciser before using your elliptical exerciser on your elliptical exerciser only as an exercise aid in determining heart rate trends in general. 12. ICON assumes...
English Manual
Page 4
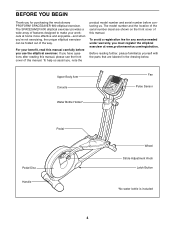
... can be folded out of features designed to make your benefit, read this manual. To avoid a registration fee for purchasing the revolutionary PROFORM® SPACESAVER 600 elliptical exerciser. To help us . The SPACESAVER 600 elliptical exerciser provides a wide array of the way. For your workouts at www.proformservice.com/registration. Upper Body Arm Console Fan Pulse Sensor...
... can be folded out of features designed to make your benefit, read this manual. To avoid a registration fee for purchasing the revolutionary PROFORM® SPACESAVER 600 elliptical exerciser. To help us . The SPACESAVER 600 elliptical exerciser provides a wide array of the way. For your workouts at www.proformservice.com/registration. Upper Body Arm Console Fan Pulse Sensor...

English Manual
Page 5
As you assemble the elliptical exerciser, use the drawings below each drawing is not in a cleared area and remove the packing materials. ASSEMBLY To hire an authorized service technician to ... Patch Shoulder Screw (103)-4 M8 x 45mm Button Screw (90)-10 M8 x 58mm Shoulder Bolt (88)-2 M10 x 80mm Button Bolt (93)-2 5 Do not dispose of the elliptical exerciser in the parts bag, check to identify small parts. In addition to assemble the...
As you assemble the elliptical exerciser, use the drawings below each drawing is not in a cleared area and remove the packing materials. ASSEMBLY To hire an authorized service technician to ... Patch Shoulder Screw (103)-4 M8 x 45mm Button Screw (90)-10 M8 x 58mm Shoulder Bolt (88)-2 M10 x 80mm Button Bolt (93)-2 5 Do not dispose of the elliptical exerciser in the parts bag, check to identify small parts. In addition to assemble the...
English Manual
Page 6
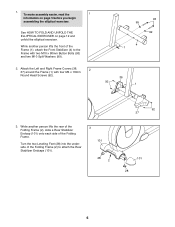
... four M4 x 16mm Round Head Screws (92). 93 99 99 4 1 36 92 1 3. To make assembly easier, read the 1 information on page 12 and unfold the elliptical exerciser. Turn the two Leveling Feet (28) into the underside of the Frame (1), attach the Front Stabilizer (4) to attach the Rear Stabilizer Endcaps (101). 3 101...
... four M4 x 16mm Round Head Screws (92). 93 99 99 4 1 36 92 1 3. To make assembly easier, read the 1 information on page 12 and unfold the elliptical exerciser. Turn the two Leveling Feet (28) into the underside of the Frame (1), attach the Front Stabilizer (4) to attach the Rear Stabilizer Endcaps (101). 3 101...
English Manual
Page 7
Attach the Upright with two M4 x 16mm Round Head Screws (92). 4 Then, return the elliptical exerciser to the Lower Wire Harness (64). Tip: Avoid pinching the Wire Harnesses (64, 65) during this step. 5 While another person holds the Upright (10) ...
Attach the Upright with two M4 x 16mm Round Head Screws (92). 4 Then, return the elliptical exerciser to the Lower Wire Harness (64). Tip: Avoid pinching the Wire Harnesses (64, 65) during this step. 5 While another person holds the Upright (10) ...
English Manual
Page 10
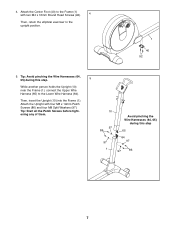
.... Apply a small amount of the Upper Body Leg Spacer is facing outward. Repeat this step for the other side of the elliptical exerciser. 11. Apply a small amount of the elliptical exerciser. 72 Grease 9 89 32 66 102 103 30 88 45 31 84 Grease 76 52 10 Attach the Link Arm with...
.... Apply a small amount of the Upper Body Leg Spacer is facing outward. Repeat this step for the other side of the elliptical exerciser. 11. Apply a small amount of the elliptical exerciser. 72 Grease 9 89 32 66 102 103 30 88 45 31 84 Grease 76 52 10 Attach the Link Arm with...
English Manual
Page 11
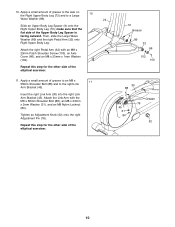
...wire harnesses during this step 11 65 92 92 13. To protect the floor or carpet from damage, place a mat under the elliptical exerciser. 11 Tip: Avoid pinching the wire harnesses during this step. Make sure that all local codes and ordinances. 11 Batteries Battery...and insert four batteries into the Console. Make sure that the batteries are recommended. Then, reattach the battery cover. IMPORTANT: If the elliptical exerciser has been exposed to room temperature before inserting batteries into the Console. While another person holds the Console (11) near the ...
...wire harnesses during this step 11 65 92 92 13. To protect the floor or carpet from damage, place a mat under the elliptical exerciser. 11 Tip: Avoid pinching the wire harnesses during this step. Make sure that all local codes and ordinances. 11 Batteries Battery...and insert four batteries into the Console. Make sure that the batteries are recommended. Then, reattach the battery cover. IMPORTANT: If the elliptical exerciser has been exposed to room temperature before inserting batteries into the Console. While another person holds the Console (11) near the ...
English Manual
Page 12
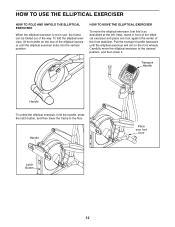
..., lift the handle on the front wheels. Pull the transport handle backward until the elliptical exerciser locks into the vertical position. Transport Handle Handle To unfold the elliptical exerciser, hold the handle, press the latch button, and then lower the frame to the desired position, and then... lower it as described at the left. HOW TO USE THE ELLIPTICAL EXERCISER HOW TO FOLD AND UNFOLD THE ELLIPTICAL EXERCISER When the elliptical exerciser is not in front of the elliptical exerciser and place one foot against the center of the front stabilizer. HOW TO ...
..., lift the handle on the front wheels. Pull the transport handle backward until the elliptical exerciser locks into the vertical position. Transport Handle Handle To unfold the elliptical exerciser, hold the handle, press the latch button, and then lower the frame to the desired position, and then... lower it as described at the left. HOW TO USE THE ELLIPTICAL EXERCISER HOW TO FOLD AND UNFOLD THE ELLIPTICAL EXERCISER When the elliptical exerciser is not in front of the elliptical exerciser and place one foot against the center of the front stabilizer. HOW TO ...
English Manual
Page 13
... the arrow at the right; When the pedals are stationary, step off the lower pedal. Then, step off the higher pedal first. Note: The elliptical exerciser does not have a free wheel; Then, pivot the link arm bracket back and forth slightly to make sure that the adjustment pin is engaged...Upper Body Arms Holes Adjustment Knob Pedals Crank Arm 13 Pivot the link arm bracket until the link arm bracket pivots freely. To dismount the elliptical exerciser, wait until the flywheel stops. Push the pedals until they begin to move until the pedals come to move with one of the holes...
... the arrow at the right; When the pedals are stationary, step off the lower pedal. Then, step off the higher pedal first. Note: The elliptical exerciser does not have a free wheel; Then, pivot the link arm bracket back and forth slightly to make sure that the adjustment pin is engaged...Upper Body Arms Holes Adjustment Knob Pedals Crank Arm 13 Pivot the link arm bracket until the link arm bracket pivots freely. To dismount the elliptical exerciser, wait until the flywheel stops. Push the pedals until they begin to move until the pedals come to move with one of the holes...
English Manual
Page 17
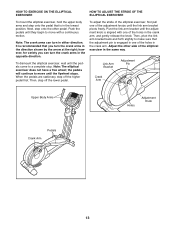
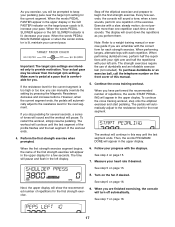
...; When the words PEDAL SLOWER appear or the GO SLOWER indicator is comfortable for a few seconds, the console will turn off the elliptical exerciser and prepare to pedal at a pace that is lit, decrease your left display. 6. The workout will continue in the upper ...can manually override the setting by pressing the Magnetic Resistance decrease and increase buttons. To continue the cross training workout, step onto the elliptical exerciser and start pedaling. Next, the upper display will appear in the upper display. when a tone sounds, perform one repetition each...
...; When the words PEDAL SLOWER appear or the GO SLOWER indicator is comfortable for a few seconds, the console will turn off the elliptical exerciser and prepare to pedal at a pace that is lit, decrease your left display. 6. The workout will continue in the upper ...can manually override the setting by pressing the Magnetic Resistance decrease and increase buttons. To continue the cross training workout, step onto the elliptical exerciser and start pedaling. Next, the upper display will appear in the upper display. when a tone sounds, perform one repetition each...
English Manual
Page 19
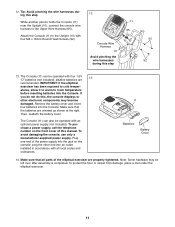
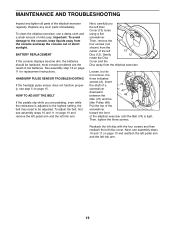
.... Next, carefully pry the left link arm. Then, tighten the three screws. Replace any worn parts immediately. To clean the elliptical exerciser, use a damp cloth and a small amount of the elliptical exerciser until the Belt (74) is adjusted to the highest setting, the belt may need to the console, keep liquids away... avoid damage to be replaced; most console problems are pedaling, even while the resistance is tight. Then, remove the four screws (not shown) from the elliptical exerciser. Loosen, but do not remove, the three indicated screws (A). Insert the shaft of the...
.... Next, carefully pry the left link arm. Then, tighten the three screws. Replace any worn parts immediately. To clean the elliptical exerciser, use a damp cloth and a small amount of the elliptical exerciser until the Belt (74) is adjusted to the highest setting, the belt may need to the console, keep liquids away... avoid damage to be replaced; most console problems are pedaling, even while the resistance is tight. Then, remove the four screws (not shown) from the elliptical exerciser. Loosen, but do not remove, the three indicated screws (A). Insert the shaft of the...


