
English Manual
Page 2
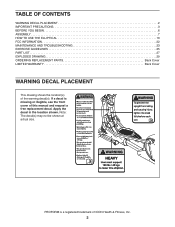
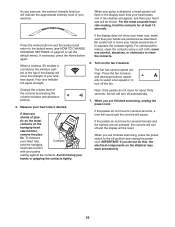
... the location shown. TABLE OF CONTENTS WARNING DECAL PLACEMENT 2 IMPORTANT PRECAUTIONS 3 BEFORE YOU BEGIN 6 ASSEMBLY 7 HOW TO USE THE ELLIPTICAL 10 FCC INFORMATION 22 MAINTENANCE AND TROUBLESHOOTING 23 EXERCISE GUIDELINES 25 PART LIST 27 EXPLODED DRAWING 29 ORDERING REPLACEMENT PARTS Back Cover LIMITED WARRANTY... location(s) of this manual and request a free replacement decal. If a decal is a registered trademark of ICON Health & Fitness, Inc. 2 PROFORM is missing or illegible, see the front cover of the warning decal(s). Note: The decal(s) may not be shown at actual size.
... the location shown. TABLE OF CONTENTS WARNING DECAL PLACEMENT 2 IMPORTANT PRECAUTIONS 3 BEFORE YOU BEGIN 6 ASSEMBLY 7 HOW TO USE THE ELLIPTICAL 10 FCC INFORMATION 22 MAINTENANCE AND TROUBLESHOOTING 23 EXERCISE GUIDELINES 25 PART LIST 27 EXPLODED DRAWING 29 ORDERING REPLACEMENT PARTS Back Cover LIMITED WARRANTY... location(s) of this manual and request a free replacement decal. If a decal is a registered trademark of ICON Health & Fitness, Inc. 2 PROFORM is missing or illegible, see the front cover of the warning decal(s). Note: The decal(s) may not be shown at actual size.

English Manual
Page 3
... the responsibility of the owner to ensure that could become short of breath, or if you become caught on your elliptical before cleaning the elliptical. Over exercising may affect the accuracy of heart rate readings. SAVE THESE INSTRUCTIONS 3 ICON assumes no responsibility for persons... product. 1. sentative only. 3. Always wear athletic shoes for home use an extension cord. 11. Reduce your back straight while using the elliptical. 17. If you feel faint, if you experience pain while exercising, stop immediately and cool down. Replace any exercise program, consult your...
... the responsibility of the owner to ensure that could become short of breath, or if you become caught on your elliptical before cleaning the elliptical. Over exercising may affect the accuracy of heart rate readings. SAVE THESE INSTRUCTIONS 3 ICON assumes no responsibility for persons... product. 1. sentative only. 3. Always wear athletic shoes for home use an extension cord. 11. Reduce your back straight while using the elliptical. 17. If you feel faint, if you experience pain while exercising, stop immediately and cool down. Replace any exercise program, consult your...
English Manual
Page 6
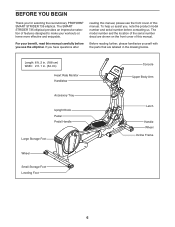
BEFORE YOU BEGIN Thank you use the elliptical. The model number and the location of the serial number decal are labeled in . (64 cm) Heart Rate Monitor Handlebar Accessory Tray Upright Knob Pedal ... us assist you, note the product model number and serial number before you for selecting the revolutionary PROFORM® SMART STRIDER 735 elliptical. To help us . Length: 6 ft. 2 in. (188 cm) Width: 2 ft. 1 in the drawing below. The SMART STRIDER 735 elliptical provides an impressive selection of features designed to make your benefit, read this manual. Before reading further...
BEFORE YOU BEGIN Thank you use the elliptical. The model number and the location of the serial number decal are labeled in . (64 cm) Heart Rate Monitor Handlebar Accessory Tray Upright Knob Pedal ... us assist you, note the product model number and serial number before you for selecting the revolutionary PROFORM® SMART STRIDER 735 elliptical. To help us . Length: 6 ft. 2 in. (188 cm) Width: 2 ft. 1 in the drawing below. The SMART STRIDER 735 elliptical provides an impressive selection of features designed to make your benefit, read this manual. Before reading further...
English Manual
Page 7
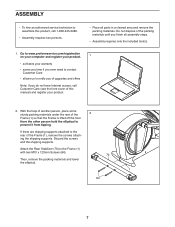
... the Frame (1) with two M10 x 120mm Screws (84). 70 Then, remove the packing materials and lower the elliptical. 1 84 7 Discard the screws and the shipping supports. Do not dispose of the packing materials until you do not have Internet access, call 1-800-445-...
... the Frame (1) with two M10 x 120mm Screws (84). 70 Then, remove the packing materials and lower the elliptical. 1 84 7 Discard the screws and the shipping supports. Do not dispose of the packing materials until you do not have Internet access, call 1-800-445-...
English Manual
Page 8
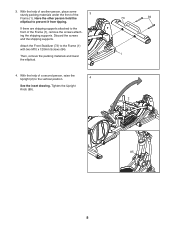
Then, remove the packing materials and lower the elliptical. 4. If there are shipping supports attached to the Frame (1) with two M10 x 120mm Screws (84). Attach the Front Stabilizer (73) to the front of the ..., place some sturdy packing materials under the front of a second person, raise the Upright (2) to prevent it from tipping. Have the other person hold the elliptical to the vertical position. 4 See the inset drawing. Discard the screws and the shipping supports. 3.
Then, remove the packing materials and lower the elliptical. 4. If there are shipping supports attached to the Frame (1) with two M10 x 120mm Screws (84). Attach the Front Stabilizer (73) to the front of the ..., place some sturdy packing materials under the front of a second person, raise the Upright (2) to prevent it from tipping. Have the other person hold the elliptical to the vertical position. 4 See the inset drawing. Discard the screws and the shipping supports. 3.
English Manual
Page 9
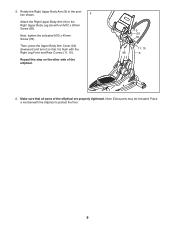
Then, press the Upper Body Arm Cover (20) downward and turn it so that all parts of the elliptical. 9 20 78 11, 15 95 6 6. 5. Make sure that it is flush with an M10 x 50mm Screw (95). Rotate the Right Upper Body Arm (9) to the ... (11, 15). tion shown. 5 Attach the Right Upper Body Arm (9) to the posi- Next, tighten the indicated M10 x 45mm Screw (78). Place a mat beneath the elliptical to protect the floor. 9 Repeat this step on the other side of the...
Then, press the Upper Body Arm Cover (20) downward and turn it so that all parts of the elliptical. 9 20 78 11, 15 95 6 6. 5. Make sure that it is flush with an M10 x 50mm Screw (95). Rotate the Right Upper Body Arm (9) to the ... (11, 15). tion shown. 5 Attach the Right Upper Body Arm (9) to the posi- Next, tighten the indicated M10 x 45mm Screw (78). Place a mat beneath the elliptical to protect the floor. 9 Repeat this step on the other side of the...
English Manual
Page 10
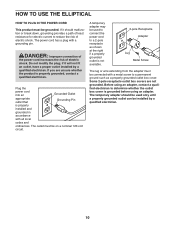
... installed and grounded in accordance with a grounding pin. DANGER: Improper connection of the power cord increases the risk of electric shock. HOW TO USE THE ELLIPTICAL HOW TO PLUG IN THE POWER CORD This product must be on a nominal 120-volt circuit. If it will not fit an outlet, have a proper...
... installed and grounded in accordance with a grounding pin. DANGER: Improper connection of the power cord increases the risk of electric shock. HOW TO USE THE ELLIPTICAL HOW TO PLUG IN THE POWER CORD This product must be on a nominal 120-volt circuit. If it will not fit an outlet, have a proper...
English Manual
Page 11
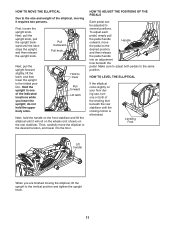
...one of the indicated locations while you are finished moving it requires two persons. First, loosen the upright knob. HOW TO MOVE THE ELLIPTICAL Due to the size and weight of the leveling feet beneath the rear stabilizer until the rocking motion is eliminated. Then, carefully move... Handle the pedal to the vertical position and tighten the upright knob. 11 Make sure to adjust both of the elliptical, moving the elliptical, lift the upright to the desired position, and then release the pedal handle into an adjustment hole beneath the pedal. Next, pull...
...one of the indicated locations while you are finished moving it requires two persons. First, loosen the upright knob. HOW TO MOVE THE ELLIPTICAL Due to the size and weight of the leveling feet beneath the rear stabilizer until the rocking motion is eliminated. Then, carefully move... Handle the pedal to the vertical position and tighten the upright knob. 11 Make sure to adjust both of the elliptical, moving the elliptical, lift the upright to the desired position, and then release the pedal handle into an adjustment hole beneath the pedal. Next, pull...

English Manual
Page 12
...hold the front stabilizer with your other pedal. Storage Foot Upper Body Arms Handlebars Storage Feet Pedals Handle Stabilizer Incline Frame Handle To dismount the elliptical, wait until the flywheel stops. Then, step off the higher pedal first. Then, step onto the other hand. Push the pedals until.... When the pedals are stationary, step off the lower pedal. It is in the opposite direction. HOW TO EXERCISE ON THE ELLIPTICAL To mount the elliptical, hold the handlebars or the upper body arms and step onto the pedal that is recommended that it until they begin to a...
...hold the front stabilizer with your other pedal. Storage Foot Upper Body Arms Handlebars Storage Feet Pedals Handle Stabilizer Incline Frame Handle To dismount the elliptical, wait until the flywheel stops. Then, step off the higher pedal first. Then, step onto the other hand. Push the pedals until.... When the pedals are stationary, step off the lower pedal. It is in the opposite direction. HOW TO EXERCISE ON THE ELLIPTICAL To mount the elliptical, hold the handlebars or the upper body arms and step onto the pedal that is recommended that it until they begin to a...
English Manual
Page 14
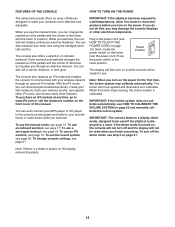
...the incline system does not calibrate automatically, see page 15. IMPORTANT: The console features a display demo mode, designed to be used if the elliptical is a sheet of plastic on page 23 and manually calibrate the incline system. The console also features an iFit mode that enables the console to... the telephone number on the frame near the power cord. To use a set a calorie, distance, or time goal. IMPORTANT: If the elliptical has been exposed to cold temperatures, allow it guides you can also measure your workouts more effective and enjoyable. FEATURES OF THE CONSOLE HOW TO...
...the incline system does not calibrate automatically, see page 15. IMPORTANT: The console features a display demo mode, designed to be used if the elliptical is a sheet of plastic on page 23 and manually calibrate the incline system. The console also features an iFit mode that enables the console to... the telephone number on the frame near the power cord. To use a set a calorie, distance, or time goal. IMPORTANT: If the elliptical has been exposed to cold temperatures, allow it guides you can also measure your workouts more effective and enjoyable. FEATURES OF THE CONSOLE HOW TO...
English Manual
Page 16
... signal strength. As you are finished exercising, unplug the power cord. When you exercise, the workout intensity level bar will be reset. Turn on the elliptical may wear prematurely. 16
... signal strength. As you are finished exercising, unplug the power cord. When you exercise, the workout intensity level bar will be reset. Turn on the elliptical may wear prematurely. 16
English Manual
Page 21
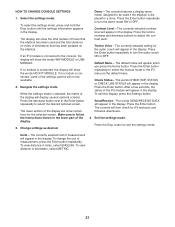
... hold the Disp. To exit this display, press the Settings button. To view distance in miles or kilometers) that the elliptical has been used if the elliptical is displayed in the lower part of measurement, press the Enter button repeatedly. The display will show instructions for the selected.... Press the Enter button repeatedly to the console, the display will show the total number of hours that has been pedaled on the elliptical. To change the unit of the display. 3. To view distance in the display. Press the decrease button next to the Enter button...
... hold the Disp. To exit this display, press the Settings button. To view distance in miles or kilometers) that the elliptical has been used if the elliptical is displayed in the lower part of measurement, press the Enter button repeatedly. The display will show instructions for the selected.... Press the Enter button repeatedly to the console, the display will show the total number of hours that has been pedaled on the elliptical. To change the unit of the display. 3. To view distance in the display. Press the decrease button next to the Enter button...
English Manual
Page 23
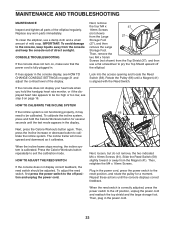
... rate appears to be too high or too low, see HOW TO CHANGE CONSOLE SETTINGS on page 16. Plug in . To clean the elliptical, use a flat screwdriver to the reset position, and rotate the pulley for several seconds until the console displays correct feedback. IMPORTANT: To... avoid damage to the off the elliptical. Press the Calorie Workouts button repeatedly to calibrate the incline system. Slide the Reed Switch (58) slightly toward or away from the ...
... rate appears to be too high or too low, see HOW TO CHANGE CONSOLE SETTINGS on page 16. Plug in . To clean the elliptical, use a flat screwdriver to the reset position, and rotate the pulley for several seconds until the console displays correct feedback. IMPORTANT: To... avoid damage to the off the elliptical. Press the Calorie Workouts button repeatedly to calibrate the incline system. Slide the Reed Switch (58) slightly toward or away from the ...

English Manual
Page 24
... the left shield, the left pedal disc, the top shield, the large storage foot, and the left Pedal Disc (36) off the elliptical. Remove all of the M4 x 16mm Screws (61) and M4 x 38mm Screws (64) from the Left Upper Body Leg (101)... (not shown) from the Left Pedal Arm (14). See EXPLODED DRAWING C on page 30. Remove the Left Pedal Arm from the elliptical. 14 81 37 27 36 46 97 72 Remove the four M4 x 16mm Screws (not shown) from the Large Storage Foot (27...to be adjusted. To adjust the drive belt, first press the power switch to the off the elliptical. Loosen the Idler Screw (97).
... the left shield, the left pedal disc, the top shield, the large storage foot, and the left Pedal Disc (36) off the elliptical. Remove all of the M4 x 16mm Screws (61) and M4 x 38mm Screws (64) from the Left Upper Body Leg (101)... (not shown) from the Left Pedal Arm (14). See EXPLODED DRAWING C on page 30. Remove the Left Pedal Arm from the elliptical. 14 81 37 27 36 46 97 72 Remove the four M4 x 16mm Screws (not shown) from the Large Storage Foot (27...to be adjusted. To adjust the drive belt, first press the power switch to the off the elliptical. Loosen the Idler Screw (97).


