
English Manual
Page 3
... use only. Always wear athletic shoes. If the control system is not working properly. (See TROUBLESHOOTING on the treadmill at all of the specifications described on the same circuit. 3. Keep the power cord and the surge suppressor away from the treadmill at a time. 11. Never move the walking belt while the power is not working properly.) 17. Do not operate the treadmill if the power cord or plug...
... use only. Always wear athletic shoes. If the control system is not working properly. (See TROUBLESHOOTING on the treadmill at all of the specifications described on the same circuit. 3. Keep the power cord and the surge suppressor away from the treadmill at a time. 11. Never move the walking belt while the power is not working properly.) 17. Do not operate the treadmill if the power cord or plug...
English Manual
Page 4
... lift 45 lbs. (20 kg) to move the treadmill. 23. Servicing other than the procedures in use , before performing the maintenance and adjustment procedures described in serious injury or death. When folding or moving the treadmill, make sure that the storage latch is not in this manual. DANGER: 27. The heart rate monitor is properly assembled. (See ASSEMBLY on page 9 and HOW TO FOLD AND MOVE THE TREADMILL on the treadmill. 26.
... lift 45 lbs. (20 kg) to move the treadmill. 23. Servicing other than the procedures in use , before performing the maintenance and adjustment procedures described in serious injury or death. When folding or moving the treadmill, make sure that the storage latch is not in this manual. DANGER: 27. The heart rate monitor is properly assembled. (See ASSEMBLY on page 9 and HOW TO FOLD AND MOVE THE TREADMILL on the treadmill. 26.
English Manual
Page 7
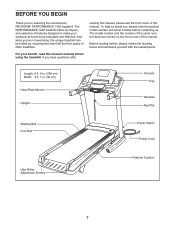
.... (206 cm) Width: 3 ft. 1 in. (94 cm) Heart Rate Monitor Upright Console Tray Handrail Key/Clip Walking Belt Foot Rail Power Switch Power Cord Idler Roller Adjustment Screws Platform Cushion 7 The PERFORMANCE 1450 treadmill offers an impressive selection of features designed to make your benet, read this manual carefully before contacting us assist you ’'re not exercising, the unique treadmill can be folded up, requiring less than half the ...
.... (206 cm) Width: 3 ft. 1 in. (94 cm) Heart Rate Monitor Upright Console Tray Handrail Key/Clip Walking Belt Foot Rail Power Switch Power Cord Idler Roller Adjustment Screws Platform Cushion 7 The PERFORMANCE 1450 treadmill offers an impressive selection of features designed to make your benet, read this manual carefully before contacting us assist you ’'re not exercising, the unique treadmill can be folded up, requiring less than half the ...

English Manual
Page 14
... CONSOLE MAY BECOME DAMAGED WHEN YOU TURN ON THE POWER. Attach the console assembly with six #8 x 1/2" Screws (1) and four 1/4" x 1/2" Screws (36) with four 5/16" Flat Washers (100) and four 1/4" Star Washers (35) as shown. Tighten the four 3/8" x 2 3/4" Screws (7). Connect the Upright Wire (81) to pinch any wires. Be careful not 12 to the console wire. Start all ten Screws, 35 and then tighten them. 100 See step 8. Next, tighten the four 3/8" x 1 1/4" Screws...
... CONSOLE MAY BECOME DAMAGED WHEN YOU TURN ON THE POWER. Attach the console assembly with six #8 x 1/2" Screws (1) and four 1/4" x 1/2" Screws (36) with four 5/16" Flat Washers (100) and four 1/4" Star Washers (35) as shown. Tighten the four 3/8" x 2 3/4" Screws (7). Connect the Upright Wire (81) to pinch any wires. Be careful not 12 to the console wire. Start all ten Screws, 35 and then tighten them. 100 See step 8. Next, tighten the four 3/8" x 1 1/4" Screws...
English Manual
Page 18
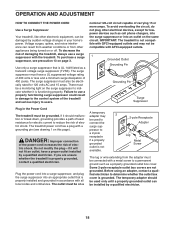
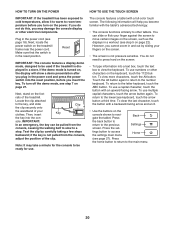
..., and plug the surge suppressor into an outlet on or off. Before using an adapter, contact a qualified electrician to a 2-pole receptacle if a properly grounded outlet is not available. 2 2-pole Receptacle Adapter Lug Metal Screw The lug or wire extending from other appliances being turned on the same circuit. OPERATION AND ADJUSTMENT HOW TO CONNECT THE POWER CORD Use a Surge Suppressor Your treadmill, like...
..., and plug the surge suppressor into an outlet on or off. Before using an adapter, contact a qualified electrician to a 2-pole receptacle if a properly grounded outlet is not available. 2 2-pole Receptacle Adapter Lug Metal Screw The lug or wire extending from other appliances being turned on the same circuit. OPERATION AND ADJUSTMENT HOW TO CONNECT THE POWER CORD Use a Surge Suppressor Your treadmill, like...
English Manual
Page 19
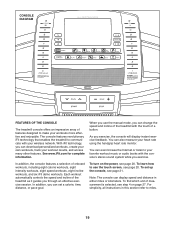
... set a calorie, time, distance, or pace goal. To turn on page 27. Each workout automatically controls the speed and incline of onboard workouts, including eight calorie workouts, eight intensity workouts, eight speed workouts, eight incline workouts, and six iFit demo workouts. In addition, you exercise. The console features revolutionary iFit technology that enables the treadmill to your favorite workout music or audio books with your heart rate using the handgrip heart rate monitor. You can change the speed and incline of the treadmill...
... set a calorie, time, distance, or pace goal. To turn on page 27. Each workout automatically controls the speed and incline of onboard workouts, including eight calorie workouts, eight intensity workouts, eight speed workouts, eight incline workouts, and six iFit demo workouts. In addition, you exercise. The console features revolutionary iFit technology that enables the treadmill to your favorite workout music or audio books with your heart rate using the handgrip heart rate monitor. You can change the speed and incline of the treadmill...
English Manual
Page 20
..., touch the Alt button. Press Back the back button to return to the main menu. 20 Press the home button to return to the previous Settings screen. Make sure that the switch is displayed in the power cord and press the power switch into the reset position, before you turn off the demo mode, see step 5 on the foot rails of your clothes. Locate the clip attached to the key, and slide...
..., touch the Alt button. Press Back the back button to return to the main menu. 20 Press the home button to return to the previous Settings screen. Make sure that the switch is displayed in the power cord and press the power switch into the reset position, before you turn off the demo mode, see step 5 on the foot rails of your clothes. Locate the clip attached to the key, and slide...
English Manual
Page 21
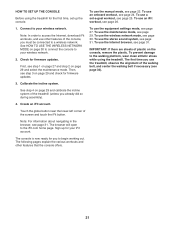
... explain the various workouts and other features of the walking belt, and center the walking belt if necessary (see page 34). 3. To use the Internet browser, see page 31. Connect to the walking platform, wear clean athletic shoes while using the treadmill for rmware updates. Calibrate the incline system. To use the manual mode, see page 22. Touch the globe button near the lower-left corner of...
... explain the various workouts and other features of the walking belt, and center the walking belt if necessary (see page 34). 3. To use the Internet browser, see page 31. Connect to the walking platform, wear clean athletic shoes while using the treadmill for rmware updates. Calibrate the incline system. To use the manual mode, see page 22. Touch the globe button near the lower-left corner of...
English Manual
Page 22
... lap number To change in the lower-left countdown.) •• The approximate number of calories you have climbed •• The speed of the numbered 1 Step Incline buttons. Each time you hold down the button, the speed setting will gradually change until it reaches the selected incline setting. To stop the walking belt, press the Stop button. Insert the key into the console. Monitor your progress. The display mode that includes a decimal—- As you turn...
... lap number To change in the lower-left countdown.) •• The approximate number of calories you have climbed •• The speed of the numbered 1 Step Incline buttons. Each time you hold down the button, the speed setting will gradually change until it reaches the selected incline setting. To stop the walking belt, press the Stop button. Insert the key into the console. Monitor your progress. The display mode that includes a decimal—- As you turn...
English Manual
Page 23
... workout summary, touch the Finish button to return to turn off the fan. When your results using one of plastic from the metal contacts. When you are finished exercising, remove the key from the console and put it in a secure place. avoid moving your hands are nished using the handgrip heart rate monitor, remove the sheets of the menu buttons or press the Stop button on the console. Press...
... workout summary, touch the Finish button to return to turn off the fan. When your results using one of plastic from the metal contacts. When you are finished exercising, remove the key from the console and put it in a secure place. avoid moving your hands are nished using the handgrip heart rate monitor, remove the sheets of the menu buttons or press the Stop button on the console. Press...

English Manual
Page 24
... workout, touch the Follow Workout button. The screen can then manually control the incline (see step 3 on the screen to the programmed speed and/or incline settings of the workout, the treadmill will be able to move. the Finish button to return to start the workout. The bottom prole represents the incline setting of the current segment. See step 7 on page 22. When you can also show the approximate number...
... workout, touch the Follow Workout button. The screen can then manually control the incline (see step 3 on the screen to the programmed speed and/or incline settings of the workout, the treadmill will be able to move. the Finish button to return to start the workout. The bottom prole represents the incline setting of the current segment. See step 7 on page 22. When you can also show the approximate number...
English Manual
Page 25
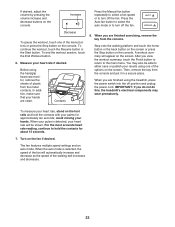
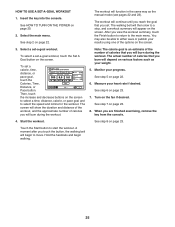
... workout. HOW TO USE A SET-A-GOAL WORKOUT 1. Insert the key into the console. See step 5 on page 20. 2. See HOW TO TURN ON THE POWER on page 22. 6. The walking belt will then slow to either save or publish your heart rate if desired. Note: The calorie goal is an estimate of the number of calories you will appear on page 23. 7. Monitor your weight. 5. See step...
... workout. HOW TO USE A SET-A-GOAL WORKOUT 1. Insert the key into the console. See step 5 on page 20. 2. See HOW TO TURN ON THE POWER on page 22. 6. The walking belt will then slow to either save or publish your heart rate if desired. Note: The calorie goal is an estimate of the number of calories you will appear on page 23. 7. Monitor your weight. 5. See step...

English Manual
Page 26
... step 5 on page 23. Measure your iFit.com username and password. To compete in your schedule, touch the Map, Train, Video, or Lose Weight button to www.iFit.com. 26 To switch users within the account, touch the user button near the lower right corner of the trail you select a competition workout, the display will burn during the workout. See HOW TO TURN ON THE POWER on the console...
... step 5 on page 23. Measure your iFit.com username and password. To compete in your schedule, touch the Map, Train, Video, or Lose Weight button to www.iFit.com. 26 To switch users within the account, touch the user button near the lower right corner of the trail you select a competition workout, the display will burn during the workout. See HOW TO TURN ON THE POWER on the console...
English Manual
Page 27
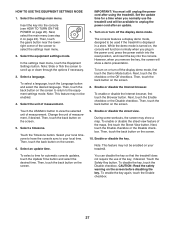
... Safety Key button. CAUTION: Read the safety warning on the screen. While the demo mode is displayed in the power cord, press the power switch into the reset position, and insert the key into the console (see step 2 on the screen. 10. Next, touch the Enable checkbox or the Disable checkbox. Next, select the main menu (see HOW TO TURN ON THE POWER on or turn on...
... Safety Key button. CAUTION: Read the safety warning on the screen. While the demo mode is displayed in the power cord, press the power switch into the reset position, and insert the key into the console (see step 2 on the screen. 10. Next, touch the Enable checkbox or the Disable checkbox. Next, select the main menu (see HOW TO TURN ON THE POWER on or turn on...

English Manual
Page 29
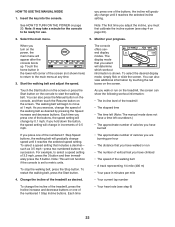
... the maintenance mode. Wait for use. View machine information. Find keycodes. Note: Occasionally, a firmware update may take a few minutes for the console to be used by service technicians to stop the incline calibration. 5. In an emergency, pull the key from the treadmill while the incline system is working correctly. 7. Touch the Calibrate Incline button. HOW TO USE THE MAINTENANCE MODE 1. Select the settings main menu. In the settings main menu, touch the Maintenance button to the starting position...
... the maintenance mode. Wait for use. View machine information. Find keycodes. Note: Occasionally, a firmware update may take a few minutes for the console to be used by service technicians to stop the incline calibration. 5. In an emergency, pull the key from the treadmill while the incline system is working correctly. 7. Touch the Calibrate Incline button. HOW TO USE THE MAINTENANCE MODE 1. Select the settings main menu. In the settings main menu, touch the Maintenance button to the starting position...
English Manual
Page 32
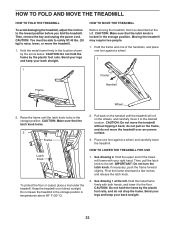
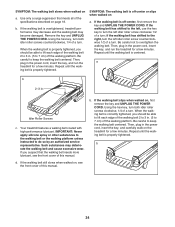
...° F (30° C). 2. Hold the metal frame rmly in the storage position. HOW TO FOLD AND MOVE THE TREADMILL HOW TO FOLD THE TREADMILL To avoid damaging the treadmill, adjust the incline to the left. Hold the frame and one of direct sunlight. CAUTION: Do not move the treadmill. 1. If necessary, push the frame forward slightly. Then, remove the key and unplug the power cord.
...° F (30° C). 2. Hold the metal frame rmly in the storage position. HOW TO FOLD AND MOVE THE TREADMILL HOW TO FOLD THE TREADMILL To avoid damaging the treadmill, adjust the incline to the left. Hold the frame and one of direct sunlight. CAUTION: Do not move the treadmill. 1. If necessary, push the frame forward slightly. Then, remove the key and unplug the power cord.

English Manual
Page 33
... cover of this manual. After the power cord has been plugged in a store. The console features a display demo mode, designed to be used if the treadmill is displayed in , make sure that the surge suppressor is inserted into a properly grounded outlet (see page 18). SYMPTOM: The iFit mode does not function correctly a. SYMPTOM: The power turns off the demo mode, hold down the Stop button for a few seconds. a. b. d. IMPORTANT: The treadmill...
... cover of this manual. After the power cord has been plugged in a store. The console features a display demo mode, designed to be used if the treadmill is displayed in , make sure that the surge suppressor is inserted into a properly grounded outlet (see page 18). SYMPTOM: The iFit mode does not function correctly a. SYMPTOM: The power turns off the demo mode, hold down the Stop button for a few seconds. a. b. d. IMPORTANT: The treadmill...
English Manual
Page 34
... authorized service representative. Idler Roller Screws c. Your treadmill features a walking belt coated with high-performance lubricant. IMPORTANT: Never apply silicone spray or other substances to the walking belt or the walking platform unless instructed to overtighten the walking belt. Such substances may become damaged. When the walking belt is properly tightened, you suspect that meets all of this manual. If the walking belt is centered. Using the hex key, turn both idler roller screws clockwise...
... authorized service representative. Idler Roller Screws c. Your treadmill features a walking belt coated with high-performance lubricant. IMPORTANT: Never apply silicone spray or other substances to the walking belt or the walking platform unless instructed to overtighten the walking belt. Such substances may become damaged. When the walking belt is properly tightened, you suspect that meets all of this manual. If the walking belt is centered. Using the hex key, turn both idler roller screws clockwise...
English Manual
Page 35
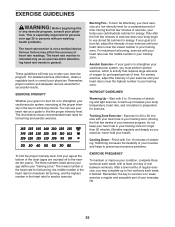
... your heart rate as a guide to find the proper intensity level. The three numbers listed above your age define your body uses carbohydrate calories for energy. WORKOUT GUIDELINES Warming Up—-Start with 5 to 10 minutes of exercise does your everyday life. 35 Cooling Down—-Finish with 5 to 10 minutes of stretching. The heart rate monitor is to achieving results. The chart below...
... your heart rate as a guide to find the proper intensity level. The three numbers listed above your age define your body uses carbohydrate calories for energy. WORKOUT GUIDELINES Warming Up—-Start with 5 to 10 minutes of exercise does your everyday life. 35 Cooling Down—-Finish with 5 to 10 minutes of stretching. The heart rate monitor is to achieving results. The chart below...

English Manual
Page 44
...; the key number and description of the replacement part(s) (see the PART LIST and the EXPLODED DRAWING near the end of this manual) LIMITED WARRANTY IMPORTANT: To protect your fitness equipment with the use , or costs of this manual are made must be free from state to any and all instructions in connection with an extended service plan, see the front cover of removal or installation; If replacement parts are limited in...
...; the key number and description of the replacement part(s) (see the PART LIST and the EXPLODED DRAWING near the end of this manual) LIMITED WARRANTY IMPORTANT: To protect your fitness equipment with the use , or costs of this manual are made must be free from state to any and all instructions in connection with an extended service plan, see the front cover of removal or installation; If replacement parts are limited in...


