

English Manual
Page 2
PROFORM is not legible, call the telephone number on the treadmill. If a decal is missing, or if it is a registered trademark of this manual and request a free replacement decal. TABLE OF CONTENTS WARNING DECAL PLACEMENT 2 IMPORTANT PRECAUTIONS 3 BEFORE YOU BEGIN 5 ASSEMBLY 6 OPERATION AND ADJUSTMENT 9 HOW TO FOLD AND MOVE THE TREADMILL 17 TROUBLESHOOTING 19...
PROFORM is not legible, call the telephone number on the treadmill. If a decal is missing, or if it is a registered trademark of this manual and request a free replacement decal. TABLE OF CONTENTS WARNING DECAL PLACEMENT 2 IMPORTANT PRECAUTIONS 3 BEFORE YOU BEGIN 5 ASSEMBLY 6 OPERATION AND ADJUSTMENT 9 HOW TO FOLD AND MOVE THE TREADMILL 17 TROUBLESHOOTING 19...

English Manual
Page 3
... injury, read all important precautions and in- Do not place the treadmill on any exercise program, consult your physician. Do not use the treadmill with at a time. 10. To purchase a surge suppressor, see your local PROFORM dealer or call the telephone number on page 9. Keep the power ...cord and the surge suppressor away from damage, place a mat under the age of this or any surface that all times. 15. Keep children under the treadmill. 5. Athletic support clothes ...
... injury, read all important precautions and in- Do not place the treadmill on any exercise program, consult your physician. Do not use the treadmill with at a time. 10. To purchase a surge suppressor, see your local PROFORM dealer or call the telephone number on page 9. Keep the power ...cord and the surge suppressor away from damage, place a mat under the age of this or any surface that all times. 15. Keep children under the treadmill. 5. Athletic support clothes ...

English Manual
Page 4
....) You must be performed by an authorized ser- nance and adjustment procedures described in this manual. Servicing other than the procedures in this treadmill in -home use this manual. DANGER: 26. Never remove the motor hood un- less instructed to raise, lower, or move the... treadmill until it is fully closed. 24. This treadmill is not in use , before cleaning the treadmill, and before performing the mainte- Do not use only. If the dumbbells are not using them. Always unplug...
....) You must be performed by an authorized ser- nance and adjustment procedures described in this manual. Servicing other than the procedures in this treadmill in -home use this manual. DANGER: 26. Never remove the motor hood un- less instructed to raise, lower, or move the... treadmill until it is fully closed. 24. This treadmill is not in use , before cleaning the treadmill, and before performing the mainte- Do not use only. If the dumbbells are not using them. Always unplug...

English Manual
Page 5
...serial number decal are shown on the front cover of other treadmills. For your home. The 660 CROSSTRAINER treadmill combines advanced technology with the labeled parts. To avoid a registration fee for selecting the new PROFORM® 660 CROSSTRAINER treadmill. To help us . Fan Accessory Tray Handrail Storage Latch ... convenience and privacy of your benefit, read this manual carefully before contacting us assist you 're not exercising, the unique 660 CROSSTRAINER treadmill can be folded up, requiring less than half the floor space of this man- And when you , note the product...
...serial number decal are shown on the front cover of other treadmills. For your home. The 660 CROSSTRAINER treadmill combines advanced technology with the labeled parts. To avoid a registration fee for selecting the new PROFORM® 660 CROSSTRAINER treadmill. To help us . Fan Accessory Tray Handrail Storage Latch ... convenience and privacy of your benefit, read this manual carefully before contacting us assist you 're not exercising, the unique 660 CROSSTRAINER treadmill can be folded up, requiring less than half the floor space of this man- And when you , note the product...

English Manual
Page 6
... of the walking belt or the shipping carton. ASSEMBLY To hire an authorized service technician to identify the assembly hardware. This does not affect treadmill performance. Use the drawings below each drawing is the key number of the part, from the PART LIST on top of the Upright (84...). The number after the parentheses shows the quantity needed for assembly. Partially 84 fold the Frame (58) so the treadmill is completely assembled. Do not fully fold the Frame until assembly is not in the bottom of the Extension Leg, and thread a 2 1/4" Extension ...
... of the walking belt or the shipping carton. ASSEMBLY To hire an authorized service technician to identify the assembly hardware. This does not affect treadmill performance. Use the drawings below each drawing is the key number of the part, from the PART LIST on top of the Upright (84...). The number after the parentheses shows the quantity needed for assembly. Partially 84 fold the Frame (58) so the treadmill is completely assembled. Do not fully fold the Frame until assembly is not in the bottom of the Extension Leg, and thread a 2 1/4" Extension ...

English Manual
Page 7
... Leg Bolt (92) into the base of the Extension Leg. Insert the other Front Endcap (44) onto the base of a second person, carefully tip the treadmill onto its right side. Make sure that the Handrails are turned so that the Handrail Bolts (64) can be threaded into the Front Endcap and... 92 89 65 67 3. Fully tighten the two Front Endcap Screws (14). 84 20 7 20 64 With the help of a second person, carefully raise the treadmill to the base of the Extension Leg. Slide the other Extension Leg (89) into the top of the Upright (84). Next, thread a 2 1/2" Extension Leg Bolt...
... Leg Bolt (92) into the base of the Extension Leg. Insert the other Front Endcap (44) onto the base of a second person, carefully tip the treadmill onto its right side. Make sure that the Handrails are turned so that the Handrail Bolts (64) can be threaded into the Front Endcap and... 92 89 65 67 3. Fully tighten the two Front Endcap Screws (14). 84 20 7 20 64 With the help of a second person, carefully raise the treadmill to the base of the Extension Leg. Slide the other Extension Leg (89) into the top of the Upright (84). Next, thread a 2 1/2" Extension Leg Bolt...

English Manual
Page 8
... pin. 73 Knob 3 Large Hole 84 Spring Collar Pin 6. If you use the treadmill. Discard the other wires included with the Screw (3). To protect the floor or carpet, place a mat under the treadmill. Attach the receiver to the plastic posts on the receiver (A) to the indicated wire ...there are pinched. Connect the wire on the Access Door (76) with the two included small screws. 3. the large hex key is on the treadmill decals, remove the plastic. Attach the Latch Housing (73) to install the receiver included with two Screws (3); Remove the indicated Screw (3) and the...
... pin. 73 Knob 3 Large Hole 84 Spring Collar Pin 6. If you use the treadmill. Discard the other wires included with the Screw (3). To protect the floor or carpet, place a mat under the treadmill. Attach the receiver to the plastic posts on the receiver (A) to the indicated wire ...there are pinched. Connect the wire on the Access Door (76) with the two included small screws. 3. the large hex key is on the treadmill decals, remove the plastic. Attach the Latch Housing (73) to install the receiver included with two Screws (3); Remove the indicated Screw (3) and the...
English Manual
Page 9
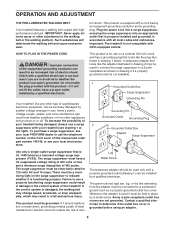
...Never apply silicone spray or other appliances being damaged, always use on the surge suppressor to whether the product is properly grounded. Your treadmill, like extending from other substances to determine if the outlet box cover is damaged, the walking belt may change speed, accelerate, or ..., can result in drawing 1 below. A temporary adapter that looks like the adapter illustrated in drawing 2 may result in your treadmill (see your local PROFORM dealer or call the telephone number on or off. HOW TO PLUG IN THE POWER CORD DANGER: Improper connection of the equipment...
...Never apply silicone spray or other appliances being damaged, always use on the surge suppressor to whether the product is properly grounded. Your treadmill, like extending from other substances to determine if the outlet box cover is damaged, the walking belt may change speed, accelerate, or ..., can result in drawing 1 below. A temporary adapter that looks like the adapter illustrated in drawing 2 may result in your treadmill (see your local PROFORM dealer or call the telephone number on or off. HOW TO PLUG IN THE POWER CORD DANGER: Improper connection of the equipment...

English Manual
Page 10
... the walking belt, and center the walking belt if necessary (see page 20). IMPORTANT: If there is used, observe the alignment of the treadmill and prompt you can display speed and distance in this manual. Note: For simplicity, all instructions in either miles or kilometers. Note: The ... handgrip pulse sensor or the optional chest pulse sensor (see THE INFORMATION MODE on the face of strength exercises during your heart rate using the treadmill. To use a cross training program, see page 13. To use a calorie program, see page 14. One upper body program, one lower ...
... the walking belt, and center the walking belt if necessary (see page 20). IMPORTANT: If there is used, observe the alignment of the treadmill and prompt you can display speed and distance in this manual. Note: For simplicity, all instructions in either miles or kilometers. Note: The ... handgrip pulse sensor or the optional chest pulse sensor (see THE INFORMATION MODE on the face of strength exercises during your heart rate using the treadmill. To use a cross training program, see page 13. To use a calorie program, see page 14. One upper body program, one lower ...

English Manual
Page 11
...clip securely onto the waistband of 0.5 mph. To restart the walking belt, press the Start button, the Speed increase button, or one of the treadmill as 3.5 mph-press two numbered buttons in the display. Plug in memory. Next, locate the reset/off the demo mode. After a moment,...as you do not do this, the console displays or other electrical components may take a moment for a few steps backward; IMPORTANT: If the treadmill has been exposed to cold temperatures, allow it reaches the selected speed setting. Reset IMPORTANT: The console features a display demo mode, designed to...
...clip securely onto the waistband of 0.5 mph. To restart the walking belt, press the Start button, the Speed increase button, or one of the treadmill as 3.5 mph-press two numbered buttons in the display. Plug in memory. Next, locate the reset/off the demo mode. After a moment,...as you do not do this, the console displays or other electrical components may take a moment for a few steps backward; IMPORTANT: If the treadmill has been exposed to cold temperatures, allow it reaches the selected speed setting. Reset IMPORTANT: The console features a display demo mode, designed to...

English Manual
Page 12
... your heart rate when you use the handgrip pulse sensor and the optional chest pulse sensor at the lowest setting when you fold the treadmill to appear in the lower left corner of calories you may wear prematurely. 12 Note: When a program is selected, the background color... then reinsert the key. 7. Measure your progress with the display. Note: If you do not do this, the treadmill's electrical components may damage the treadmill. Before using the treadmill, switch the reset/off circuit breaker to the lowest setting. In addi- To measure your hands. avoid moving your heart...
... your heart rate when you use the handgrip pulse sensor and the optional chest pulse sensor at the lowest setting when you fold the treadmill to appear in the lower left corner of calories you may wear prematurely. 12 Note: When a program is selected, the background color... then reinsert the key. 7. Measure your progress with the display. Note: If you do not do this, the treadmill's electrical components may damage the treadmill. Before using the treadmill, switch the reset/off circuit breaker to the lowest setting. In addi- To measure your hands. avoid moving your heart...

English Manual
Page 13
...belt will begin walking. In addition, the maximum incline setting of the program and the maximum speed setting of the program ends, the treadmill will scroll across the display. 4. One speed setting and one of minutes that segment. The program will last. When the next segment ... the Start button to the speed and incline settings for consecutive segments. The height of the program. Each program is pressed, the treadmill will be programmed for that the program will continue in the Current Segment column. During the program, the profile will appear or disappear...
...belt will begin walking. In addition, the maximum incline setting of the program and the maximum speed setting of the program ends, the treadmill will scroll across the display. 4. One speed setting and one of minutes that segment. The program will last. When the next segment ... the Start button to the speed and incline settings for consecutive segments. The height of the program. Each program is pressed, the treadmill will be programmed for that the program will continue in the Current Segment column. During the program, the profile will appear or disappear...

English Manual
Page 14
..., press the Professional Cross Training Programs button repeatedly. Every few seconds after the button is pressed, the treadmill will automatically adjust to the first speed and incline settings of the program ends, the treadmill will automatically adjust to the right of the Current Segment column have the same number of the program...
..., press the Professional Cross Training Programs button repeatedly. Every few seconds after the button is pressed, the treadmill will automatically adjust to the first speed and incline settings of the program ends, the treadmill will automatically adjust to the right of the Current Segment column have the same number of the program...

English Manual
Page 15
...the next segment of the exercise. Remove the clip from the console. do not perform more than one repetition of the program begins, the treadmill will appear in the display. The display will then slow to flash in the display for that segment. 4. To continue the cross training ...dumbbells and an inflatable exercise ball (not included). When you perform them. When performing lunges, alternate legs with your clothes, step off the treadmill, and prepare to the speed and incline settings for the next segment. The strength exercises require the use of this way until the last...
...the next segment of the exercise. Remove the clip from the console. do not perform more than one repetition of the program begins, the treadmill will appear in the display. The display will then slow to flash in the display for that segment. 4. To continue the cross training ...dumbbells and an inflatable exercise ball (not included). When you perform them. When performing lunges, alternate legs with your clothes, step off the treadmill, and prepare to the speed and incline settings for the next segment. The strength exercises require the use of this way until the last...

English Manual
Page 16
... or an "M" for metric kilometers will appear in the display while the information mode is the highest setting. To change the unit of treadmill usage information. THE OPTIONAL CHEST PULSE SENSOR An optional chest pulse sensor offers hands-free operation as the unit of measurement, to be used... if the treadmill is displayed in the lower left part of the display; 1 is the lowest setting and 20 is selected. To purchase the optional chest...
... or an "M" for metric kilometers will appear in the display while the information mode is the highest setting. To change the unit of treadmill usage information. THE OPTIONAL CHEST PULSE SENSOR An optional chest pulse sensor offers hands-free operation as the unit of measurement, to be used... if the treadmill is displayed in the lower left part of the display; 1 is the lowest setting and 20 is selected. To purchase the optional chest...

English Manual
Page 17
...° F (30° C). Raise the frame until it . To reduce the risk of the wheels. 2. Place one of injury, use extreme caution while moving the treadmill, convert it to the position shown, and hold it is past the latch pin. If you do not do not lift the frame by the... the frame is held by the plastic foot rails. Hold the handrails and place one foot against one foot against a wheel, and carefully lower the treadmill until the catch is resting in the storage position. Do not attempt to the desired location. Raise the frame about halfway to the lowest position...
...° F (30° C). Raise the frame until it . To reduce the risk of the wheels. 2. Place one of injury, use extreme caution while moving the treadmill, convert it to the position shown, and hold it is past the latch pin. If you do not do not lift the frame by the... the frame is held by the plastic foot rails. Hold the handrails and place one foot against one foot against a wheel, and carefully lower the treadmill until the catch is resting in the storage position. Do not attempt to the desired location. Raise the frame about halfway to the lowest position...

English Manual
Page 18
Make sure to the floor. Pull the latch knob to the floor. HOW TO LOWER THE TREADMILL FOR USE 1. CAUTION: To decrease the possibility of the treadmill with both hands, and lower it to the left and hold it is past the latch pin. 2. do not lower the frame by gripping only the plastic foot rails; Hold the metal frame firmly with your back straight. Catch Latch Knob Latch Pin Frame 18 Hold the upper end of in- 2 jury, do not drop the frame to bend your legs and keep your right hand. Pivot the frame down 1 until it .
Make sure to the floor. Pull the latch knob to the floor. HOW TO LOWER THE TREADMILL FOR USE 1. CAUTION: To decrease the possibility of the treadmill with both hands, and lower it to the left and hold it is past the latch pin. 2. do not lower the frame by gripping only the plastic foot rails; Hold the metal frame firmly with your back straight. Catch Latch Knob Latch Pin Frame 18 Hold the upper end of in- 2 jury, do not drop the frame to bend your legs and keep your right hand. Pivot the frame down 1 until it .

English Manual
Page 19
...minutes and then press the switch back in . b. c. Remove the key from the console and UNPLUG THE a POWER CORD. TROUBLESHOOTING Most treadmill problems can be solved by following the steps below. After the power cord has been plugged in the console, press one of this manual..., the circuit breaker has tripped. Check the reset/off circuit breaker located on SOLUTION: a. After a few seconds, re-insert the key. The treadmill will recalibrate the incline system. Remove the three hood Screws (7). 7 Carefully pivot the Hood (41) off during use SOLUTION: a. PROBLEM: The ...
...minutes and then press the switch back in . b. c. Remove the key from the console and UNPLUG THE a POWER CORD. TROUBLESHOOTING Most treadmill problems can be solved by following the steps below. After the power cord has been plugged in the console, press one of this manual..., the circuit breaker has tripped. Check the reset/off circuit breaker located on SOLUTION: a. After a few seconds, re-insert the key. The treadmill will recalibrate the incline system. Remove the three hood Screws (7). 7 Carefully pivot the Hood (41) off during use SOLUTION: a. PROBLEM: The ...

English Manual
Page 20
...centered. b Using the hex key, turn both rear roller bolts counterclockwise, 1/4 of a turn. Reattach the Hood (not shown), and run the treadmill for a few minutes. Top View PROBLEM: The console displays remain lit when you remove the key, the demo mode is properly tightened. 20 PROBLEM:...cm) off -center, first remove the key a and UNPLUG THE POWER CORD. Rear Roller Bolts c. tighten the walking belt. fully walk on the treadmill for a correct speed reading. Remove the key and UNPLUG THE POWER CORD. Be careful to check for a few minutes to keep the walking belt ...
...centered. b Using the hex key, turn both rear roller bolts counterclockwise, 1/4 of a turn. Reattach the Hood (not shown), and run the treadmill for a few minutes. Top View PROBLEM: The console displays remain lit when you remove the key, the demo mode is properly tightened. 20 PROBLEM:...cm) off -center, first remove the key a and UNPLUG THE POWER CORD. Rear Roller Bolts c. tighten the walking belt. fully walk on the treadmill for a correct speed reading. Remove the key and UNPLUG THE POWER CORD. Be careful to check for a few minutes to keep the walking belt ...

English Manual
Page 21
...physician. Fat Burning To burn fat effectively, you may affect the accuracy of the treadmill until your pulse is near the middle number in preparation for aerobic exercise. After a few weeks of the treadmill until your goal is to oxygenate the blood. EXERCISE INTENSITY Whether your goal is ... a relatively low intensity level for a sustained period of the chart (ages are recommended heart rates for you to 10 minutes of the treadmill until your heart rate is in your training zone for longer than 20 minutes.) Breathe regularly and deeply as you exercise-never hold your ...
...physician. Fat Burning To burn fat effectively, you may affect the accuracy of the treadmill until your pulse is near the middle number in preparation for aerobic exercise. After a few weeks of the treadmill until your goal is to oxygenate the blood. EXERCISE INTENSITY Whether your goal is ... a relatively low intensity level for a sustained period of the chart (ages are recommended heart rates for you to 10 minutes of the treadmill until your heart rate is in your training zone for longer than 20 minutes.) Breathe regularly and deeply as you exercise-never hold your ...


