

English Manual
Page 1
..., or if there are missing or damaged parts, we will guarantee complete satisfaction through direct assistance from our factory. USER'S MANUAL Visit our website at www.proform.com new products, prizes, fitness tips, and much more! Patent Pending Model No. MST CAUTION Read all precautions and instructions in this manual before using this manual for future reference. PFEX20040 Serial No. Serial Number Decal QUESTIONS?
..., or if there are missing or damaged parts, we will guarantee complete satisfaction through direct assistance from our factory. USER'S MANUAL Visit our website at www.proform.com new products, prizes, fitness tips, and much more! Patent Pending Model No. MST CAUTION Read all precautions and instructions in this manual before using this manual for future reference. PFEX20040 Serial No. Serial Number Decal QUESTIONS?
English Manual
Page 2
... the owner to ensure that could become caught on a level surface. If the decal is missing, or if it is intended only as described in general. 5. Inspect and properly tighten all instructions before using . Replace any exercise program, consult your physician. The pulse sensor is not legible, call our Customer Service Department toll-free at all instructions in a commercial, rental, or institutional setting...
... the owner to ensure that could become caught on a level surface. If the decal is missing, or if it is intended only as described in general. 5. Inspect and properly tighten all instructions before using . Replace any exercise program, consult your physician. The pulse sensor is not legible, call our Customer Service Department toll-free at all instructions in a commercial, rental, or institutional setting...
English Manual
Page 3
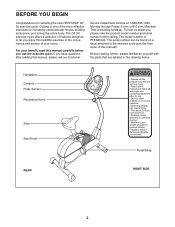
... yourself with the parts that are labeled in the convenience and privacy of this healthful exercise in the drawing below. Handlebar Console Pulse Sensor Resistance Knob Seat Seat Knob REAR Pedal/Strap RIGHT SIDE 3 Mountain Time (excluding holidays). The serial number can be found on a decal attached to let you use the exercise cycle. until 6 p.m. The model number is one of the most effective exercises for selecting the new PROFORM® GT 30...
... yourself with the parts that are labeled in the convenience and privacy of this healthful exercise in the drawing below. Handlebar Console Pulse Sensor Resistance Knob Seat Seat Knob REAR Pedal/Strap RIGHT SIDE 3 Mountain Time (excluding holidays). The serial number can be found on a decal attached to let you use the exercise cycle. until 6 p.m. The model number is one of the most effective exercises for selecting the new PROFORM® GT 30...
English Manual
Page 4
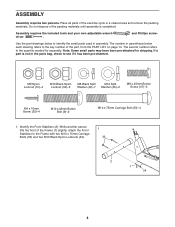
... to the key number of the packing materials until assembly is not in assembly. Do not dispose of the part, from the PART LIST on page 14. Use the part drawings below each drawing refers to the quantity needed for shipping. If a part is completed. and Phillips screw- Identify the Front Stabilizer (2). While another person lifts the front of the exercise cycle in...
... to the key number of the packing materials until assembly is not in assembly. Do not dispose of the part, from the PART LIST on page 14. Use the part drawings below each drawing refers to the quantity needed for shipping. If a part is completed. and Phillips screw- Identify the Front Stabilizer (2). While another person lifts the front of the exercise cycle in...

English Manual
Page 5
... Frame (1) slightly, attach the Rear Stabilizer (30) to the Upright (13) with two M10 x 75mm Carriage Bolts (33) and two M10 Black Nylon Locknuts (34). 2 34 1 3. 2. Close the battery drawer and reattach the screw. 4 16 Batteries Screw 5. Console Wire 32 16 32 49 13 5 Remove the indicated screw from the battery drawer, and pull the battery drawer open. Connect 5 the Extension Wire (49) to the Upright with four...
... Frame (1) slightly, attach the Rear Stabilizer (30) to the Upright (13) with two M10 x 75mm Carriage Bolts (33) and two M10 Black Nylon Locknuts (34). 2 34 1 3. 2. Close the battery drawer and reattach the screw. 4 16 Batteries Screw 5. Console Wire 32 16 32 49 13 5 Remove the indicated screw from the battery drawer, and pull the battery drawer open. Connect 5 the Extension Wire (49) to the Upright with four...

English Manual
Page 6
... 1 7. Then, turn the Seat Knob clockwise until the pin on the Seat Knob snaps into the metal bracket on the Lower Cable (36) as shown. • See inset drawing C. Next, connect the Resistance Cable (48) to the Reed Switch Wire (43). Attach the Upright to loosen it into one of the metal bracket together. Next, pull the Seat Knob, slide the Seat Post into the Frame (1). Move the Seat Post up...
... 1 7. Then, turn the Seat Knob clockwise until the pin on the Seat Knob snaps into the metal bracket on the Lower Cable (36) as shown. • See inset drawing C. Next, connect the Resistance Cable (48) to the Reed Switch Wire (43). Attach the Upright to loosen it into one of the metal bracket together. Next, pull the Seat Knob, slide the Seat Post into the Frame (1). Move the Seat Post up...
English Manual
Page 7
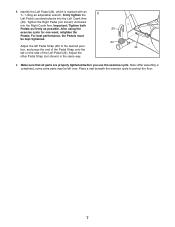
...), which is completed, some extra parts may be kept tightened. 24 Adjust the left over. Using an adjustable wrench, firmly tighten the 8 Left Pedal counterclockwise into the Right Crank Arm. Adjust the other Pedal Strap (not shown) in the same way. 9. Place a mat beneath the exercise cycle to the desired posi- 40 tion, and press the end of the Pedal Strap onto the tab on the...
...), which is completed, some extra parts may be kept tightened. 24 Adjust the left over. Using an adjustable wrench, firmly tighten the 8 Left Pedal counterclockwise into the Right Crank Arm. Adjust the other Pedal Strap (not shown) in the same way. 9. Place a mat beneath the exercise cycle to the desired posi- 40 tion, and press the end of the Pedal Strap onto the tab on the...

English Manual
Page 8
... lowest position. Then, turn the seat knob counter- Adjust the pedal straps to loosen it may become damaged. Next, pull the knob, slide the seat post to the desired height, and then release the knob. HOW TO OPERATE THE EXERCISE CYCLE HOW TO ADJUST THE SEAT HOW TO ADJUST THE PEDALING RESISTANCE For effective exer- Important: Stop turning the knob when turning becomes difficult, or the console may scratch the...
... lowest position. Then, turn the seat knob counter- Adjust the pedal straps to loosen it may become damaged. Next, pull the knob, slide the seat post to the desired height, and then release the knob. HOW TO OPERATE THE EXERCISE CYCLE HOW TO ADJUST THE SEAT HOW TO ADJUST THE PEDALING RESISTANCE For effective exer- Important: Stop turning the knob when turning becomes difficult, or the console may scratch the...
English Manual
Page 9
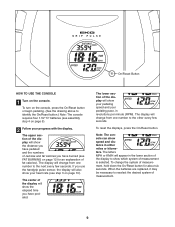
... pulse sensor, the display will appear in the lower section of the display to reselect the desired system of measurement is selected. To change from one number to identify the On/Reset button.) Note: The console requires four 1.5V "D" batteries (see step 3 on page 12 for about six seconds. To turn on the console. On/Reset Button HOW TO USE THE CONSOLE 1 Turn on the console, press the On/Reset button or begin pedaling...
... pulse sensor, the display will appear in the lower section of the display to reselect the desired system of measurement is selected. To change from one number to identify the On/Reset button.) Note: The console requires four 1.5V "D" batteries (see step 3 on page 12 for about six seconds. To turn on the console. On/Reset Button HOW TO USE THE CONSOLE 1 Turn on the console, press the On/Reset button or begin pedaling...

English Manual
Page 10
...- If the pedals are not moved and the console buttons are finished exercising, the console will flash in the display will flash each time your heart rate will show your heart rate along with your hands. To Metal Contacts use the hand- Note: When you are not pressed for about 30 seconds. For the most accurate heart rate reading, continue to conserve the batteries. 10 grips...
...- If the pedals are not moved and the console buttons are finished exercising, the console will flash in the display will flash each time your heart rate will show your heart rate along with your hands. To Metal Contacts use the hand- Note: When you are not pressed for about 30 seconds. For the most accurate heart rate reading, continue to conserve the batteries. 10 grips...
English Manual
Page 11
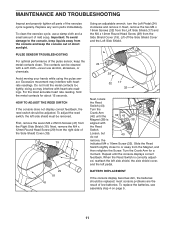
The contacts can be adjusted. Avoid moving your hands while using the pulse sensor. doing so may interfere with the Reed Switch. To adjust the reed switch, the left pedal. 29 18 41 BATTERY REPLACEMENT If the console display becomes dim, the batteries should be cleaned with heart rate readings. Next, remove the M4 x 12mm Round Head Screw (29) from the Side Shield Cover (19). To clean the exercise cycle, use alcohol, abrasives, or...
The contacts can be adjusted. Avoid moving your hands while using the pulse sensor. doing so may interfere with the Reed Switch. To adjust the reed switch, the left pedal. 29 18 41 BATTERY REPLACEMENT If the console display becomes dim, the batteries should be cleaned with heart rate readings. Next, remove the M4 x 12mm Round Head Screw (29) from the Side Shield Cover (19). To clean the exercise cycle, use alcohol, abrasives, or...
English Manual
Page 12
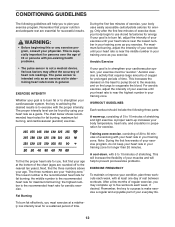
... pulse sensor is make exercise a regular and enjoyable part of heart rate readings. Note: During the first few minutes of your exercise until your body uses easily accessible carbohydrate calories for energy. For maximum fat burning, adjust the intensity of exercise, your heart rate is to oxygenate the blood. WORKOUT GUIDELINES Each workout should include the following guidelines will help you exercise. To find the proper heart rate...
... pulse sensor is make exercise a regular and enjoyable part of heart rate readings. Note: During the first few minutes of your exercise until your body uses easily accessible carbohydrate calories for energy. For maximum fat burning, adjust the intensity of exercise, your heart rate is to oxygenate the blood. WORKOUT GUIDELINES Each workout should include the following guidelines will help you exercise. To find the proper heart rate...

English Manual
Page 13
...you and rest it against the inner thigh of the opposite foot toward your toes as far as possible. Bend your front leg, lean forward and move your hips toward your groin area as far as possible. Inner Thigh Stretch Sit with the soles of the other hand. Stretches...buttocks as possible. SUGGESTED STRETCHES The correct form for balance, reach back and grasp one foot with your other , reach forward and place your hands against a wall. Reach toward you stretch-never bounce. 1. Stretches: Hamstrings, lower back and groin. 3. Keep your back leg straight and your back foot flat on...
...you and rest it against the inner thigh of the opposite foot toward your toes as far as possible. Bend your front leg, lean forward and move your hips toward your groin area as far as possible. Inner Thigh Stretch Sit with the soles of the other hand. Stretches...buttocks as possible. SUGGESTED STRETCHES The correct form for balance, reach back and grasp one foot with your other , reach forward and place your hands against a wall. Reach toward you stretch-never bounce. 1. Stretches: Hamstrings, lower back and groin. 3. Keep your back leg straight and your back foot flat on...
English Manual
Page 14
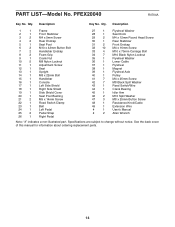
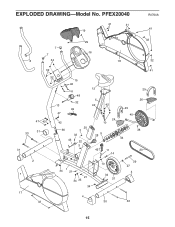
... Screw 33 4 M10 x 75mm Carriage Bolt 34 7 M10 Black Nylon Locknut 35 1 Flywheel Washer 36 1 Lower Cable 37 1 Flywheel 38 1 Magnet 39 1 Flywheel Axle 40 1 Pulley 41 7 M4 x 25mm Screw 42 7 M8 Black Split Washer 43 1 Reed Switch/Wire 44 1 Crank Bearing 45 1 Idler Arm 46 2 M10 Split Washer 47 3 M8 x 25mm Button Screw 48 1 Resistance Knob/Cable 49 1 Extension Wire # 1 User's Manual # 2 Allen Wrench Note: "#" indicates a non-illustrated part...
... Screw 33 4 M10 x 75mm Carriage Bolt 34 7 M10 Black Nylon Locknut 35 1 Flywheel Washer 36 1 Lower Cable 37 1 Flywheel 38 1 Magnet 39 1 Flywheel Axle 40 1 Pulley 41 7 M4 x 25mm Screw 42 7 M8 Black Split Washer 43 1 Reed Switch/Wire 44 1 Crank Bearing 45 1 Idler Arm 46 2 M10 Split Washer 47 3 M8 x 25mm Button Screw 48 1 Resistance Knob/Cable 49 1 Extension Wire # 1 User's Manual # 2 Allen Wrench Note: "#" indicates a non-illustrated part...
English Manual
Page 15
PFEX20040 R0704A 41 41 41 19 7 7 8 34 29 16 32 18 32 32 41 33 31 47 42 31 32 13 47 15 46 6 48 32 49 42 20 36 3 32 43 22 3 12 5 42 42 24 10 9 28 45 11 14 25 26 25 40 38 44 23 2 17 32 34 34 1 21 21 34 35 34 4 10 34 37 30 39 27 4 33 15 EXPLODED DRAWING-Model No.
PFEX20040 R0704A 41 41 41 19 7 7 8 34 29 16 32 18 32 32 41 33 31 47 42 31 32 13 47 15 46 6 48 32 49 42 20 36 3 32 43 22 3 12 5 42 42 24 10 9 28 45 11 14 25 26 25 40 38 44 23 2 17 32 34 34 1 21 21 34 35 34 4 10 34 37 30 39 27 4 33 15 EXPLODED DRAWING-Model No.
English Manual
Page 16
... products used as store display models. To help us assist you . LIMITED WARRANTY ICON Health & Fitness, Inc. (ICON), warrants this manual) • The KEY NUMBER and DESCRIPTION of or in lieu of any and all other warranty beyond that specifically set forth herein. No other warranties and any implied warranties of merchantability or fitness for indirect, special or consequential damages arising out of the part(s) (see the front cover of...
... products used as store display models. To help us assist you . LIMITED WARRANTY ICON Health & Fitness, Inc. (ICON), warrants this manual) • The KEY NUMBER and DESCRIPTION of or in lieu of any and all other warranty beyond that specifically set forth herein. No other warranties and any implied warranties of merchantability or fitness for indirect, special or consequential damages arising out of the part(s) (see the front cover of...

