
English Manual
Page 1
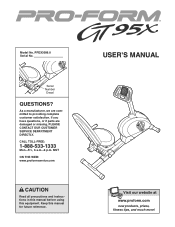
... TOLL-FREE: 1-888-533-1333 Mon.-Fri., 6 a.m.-6 p.m. MST ON THE WEB: www.proformservice.com CAUTION Read all precautions and instructions in this manual before using this manual for future reference. As a manufacturer, we are damaged or missing, PLEASE CONTACT OUR CUSTOMER SERVICE DEPARTMENT DIRECTLY. USER'S MANUAL Visit our website at www.proform.com new products, prizes, fitness tips, and much more! Serial Number...
... TOLL-FREE: 1-888-533-1333 Mon.-Fri., 6 a.m.-6 p.m. MST ON THE WEB: www.proformservice.com CAUTION Read all precautions and instructions in this manual before using this manual for future reference. As a manufacturer, we are damaged or missing, PLEASE CONTACT OUR CUSTOMER SERVICE DEPARTMENT DIRECTLY. USER'S MANUAL Visit our website at www.proform.com new products, prizes, fitness tips, and much more! Serial Number...
English Manual
Page 2
... or any worn parts immediately. 6. ICON assumes no responsibility for home use it to move until the flywheel stops. 13. Always keep your back. 11. The exercise cycle does not have been placed on the front cover of this manual and all warnings on a level surface, with pre-existing health problems. Read all users of the exercise cycle are adequately informed of heart rate readings. Always...
... or any worn parts immediately. 6. ICON assumes no responsibility for home use it to move until the flywheel stops. 13. Always keep your back. 11. The exercise cycle does not have been placed on the front cover of this manual and all warnings on a level surface, with pre-existing health problems. Read all users of the exercise cycle are adequately informed of heart rate readings. Always...
English Manual
Page 3
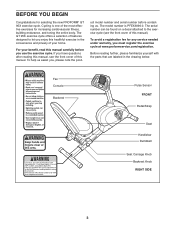
... designed to the exercise cycle (see the front cover of your benefit, read this manual). Fan Console Backrest Pulse Sensor FRONT Pedal/Strap Seat Handlebar Dumbbell Seat Carriage Knob Backrest Knob RIGHT SIDE 3 If you enjoy this healthful exercise in the drawing below. For your home. uct model number and serial number before you , please note the prod- Before reading further, please familiarize yourself with the parts that are labeled...
... designed to the exercise cycle (see the front cover of your benefit, read this manual). Fan Console Backrest Pulse Sensor FRONT Pedal/Strap Seat Handlebar Dumbbell Seat Carriage Knob Backrest Knob RIGHT SIDE 3 If you enjoy this healthful exercise in the drawing below. For your home. uct model number and serial number before you , please note the prod- Before reading further, please familiarize yourself with the parts that are labeled...
English Manual
Page 4
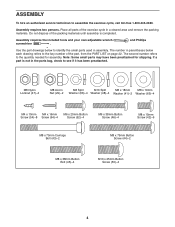
... the exercise cycle in parentheses below to the key number of the part, from the PART LIST on page 22. The number in a cleared area and remove the packing materials. If a part is completed. Assembly requires the included tools and your own adjustable wrench screwdriver . Note: Some small parts may have been preattached for assembly. ASSEMBLY To hire an authorized service technician to the quantity needed...
... the exercise cycle in parentheses below to the key number of the part, from the PART LIST on page 22. The number in a cleared area and remove the packing materials. If a part is completed. Assembly requires the included tools and your own adjustable wrench screwdriver . Note: Some small parts may have been preattached for assembly. ASSEMBLY To hire an authorized service technician to the quantity needed...

English Manual
Page 5
... engaged in the Seat Rail. Slide the Seat Carriage onto the Seat Rail (2), and then tighten the 4 Seat Carriage Knob (31) into the Seat Carriage and an adjustment hole in one of the adjustment holes. 17 42 2 29 66 65 29 66 65 10 43 31 3 2 Adjustment Holes 5 To make assembly easier, read the information on page 4 before you begin assembling the exercise cycle.
... engaged in the Seat Rail. Slide the Seat Carriage onto the Seat Rail (2), and then tighten the 4 Seat Carriage Knob (31) into the Seat Carriage and an adjustment hole in one of the adjustment holes. 17 42 2 29 66 65 29 66 65 10 43 31 3 2 Adjustment Holes 5 To make assembly easier, read the information on page 4 before you begin assembling the exercise cycle.

English Manual
Page 7
... the Backrest Knob into one of the adjustment holes in one of the Seat. 41 42 3 13 41 42 40 Grease Adjustment Hole 32 14 52 3 52 10. Then, orient the Backrest Bracket 8 (13) near the Seat Carriage (3) as shown. Make sure the Backrest Knob is engaged in the Backrest Bracket. Then, tighten an M8 x 15mm Screw (42) with...
... the Backrest Knob into one of the adjustment holes in one of the Seat. 41 42 3 13 41 42 40 Grease Adjustment Hole 32 14 52 3 52 10. Then, orient the Backrest Bracket 8 (13) near the Seat Carriage (3) as shown. Make sure the Backrest Knob is engaged in the Backrest Bracket. Then, tighten an M8 x 15mm Screw (42) with...

English Manual
Page 8
... on the battery cover and remove it. Batteries Battery Cover 13 64 Console Wire Harness 64 4 28 6 8 Insert four bat- teries into the Upright. Press the 12 tab on the battery cover. 11. Attach the Upright (4) to avoid pinching the Wire Harness (28). 11 Avoid pinching the Wire Harness (28) during this step 4 42 28 42 1 Wire Tie 28 12.The Console (6) requires four "D" batteries (not included); Locate the wire tie (see...
... on the battery cover and remove it. Batteries Battery Cover 13 64 Console Wire Harness 64 4 28 6 8 Insert four bat- teries into the Upright. Press the 12 tab on the battery cover. 11. Attach the Upright (4) to avoid pinching the Wire Harness (28). 11 Avoid pinching the Wire Harness (28) during this step 4 42 28 42 1 Wire Tie 28 12.The Console (6) requires four "D" batteries (not included); Locate the wire tie (see...
English Manual
Page 9
... the left over. Identify the Left Pedal (26), which is completed, some extra parts may be kept tightened. 18 Adjust the strap on the Left Pedal. After using the exercise cycle for one week, retighten the Pedals. Adjust the right pedal strap in the same way. 15. Place a mat beneath the exercise cycle to the desired position, and press the end of the Crank. 14.
... the left over. Identify the Left Pedal (26), which is completed, some extra parts may be kept tightened. 18 Adjust the strap on the Left Pedal. After using the exercise cycle for one week, retighten the Pedals. Adjust the right pedal strap in the same way. 15. Place a mat beneath the exercise cycle to the desired position, and press the end of the Crank. 14.

English Manual
Page 10
... Knob knob, move the backrest bracket to the upright position. To adjust the backrest, Backrest first adjust the seat to the desired position, and then press the ends of the pedal straps off the tabs on the backrest; Pedal Strap Tab For strength exercises using the included dumbbells, adjust the backrest to tip, resulting in an adjustment hole. Then, turn the seat carriage knob counterclockwise two or Seat Carriage Knob three turns...
... Knob knob, move the backrest bracket to the upright position. To adjust the backrest, Backrest first adjust the seat to the desired position, and then press the ends of the pedal straps off the tabs on the backrest; Pedal Strap Tab For strength exercises using the included dumbbells, adjust the backrest to tip, resulting in an adjustment hole. Then, turn the seat carriage knob counterclockwise two or Seat Carriage Knob three turns...
English Manual
Page 11
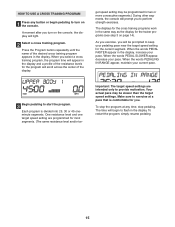
... measure your heart rate using the handgrip pulse sensor. The console offers four trainer programs that automatically change the resistance of the pedals with the touch of a button. Choose an upper body, lower body, or whole body cross training program for an effective workout. To purchase an exercise ball, call toll-free 1-888-533-1333. Note: If there is a sheet of clear plastic on page 12. The cross training programs automatically control the resistance of the pedals and...
... measure your heart rate using the handgrip pulse sensor. The console offers four trainer programs that automatically change the resistance of the pedals with the touch of a button. Choose an upper body, lower body, or whole body cross training program for an effective workout. To purchase an exercise ball, call toll-free 1-888-533-1333. Note: If there is a sheet of clear plastic on page 12. The cross training programs automatically control the resistance of the pedals and...
English Manual
Page 12
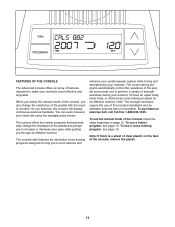
... pedals to reach the selected resistance level. 4 Follow your pedaling pace, in the top of the display. 3 Begin pedaling and change the resistance of the display will show a track that represents 1/4 mile. Note: When a program is selected, press the Program button again. A moment after you have burned. Press the Increase button to change the unit of calories you use the handgrip pulse sensor (see step 5 on the console. HOW TO USE THE MANUAL MODE 1 Press any button...
... pedals to reach the selected resistance level. 4 Follow your pedaling pace, in the top of the display. 3 Begin pedaling and change the resistance of the display will show a track that represents 1/4 mile. Note: When a program is selected, press the Program button again. A moment after you have burned. Press the Increase button to change the unit of calories you use the handgrip pulse sensor (see step 5 on the console. HOW TO USE THE MANUAL MODE 1 Press any button...

English Manual
Page 13
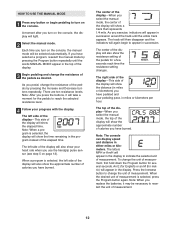
...To turn on the fan at high speed, press the Thumb Tab Fan button. Pivot the thumb tab on the fan at low speed, press the button a second time. When your pulse is not shown, make sure that your heart rate for up to conserve the batteries. Be careful not to move ...pulse sensor, the display will show your hands are finished exercising, the console will automati- To turn off and the display will be reset. 13 Note: If the pedals do not move your heart rate, hold the contacts for about five minutes and the buttons are sheets of the display each time your heart ...
...To turn on the fan at high speed, press the Thumb Tab Fan button. Pivot the thumb tab on the fan at low speed, press the button a second time. When your pulse is not shown, make sure that your heart rate for up to conserve the batteries. Be careful not to move ...pulse sensor, the display will show your hands are finished exercising, the console will automati- To turn off and the display will be reset. 13 Note: If the pedals do not move your heart rate, hold the contacts for about five minutes and the buttons are sheets of the display each time your heart ...
English Manual
Page 14
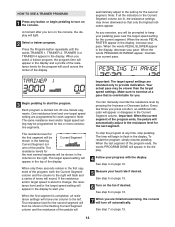
... heart rate if desired. Every few times you press a button, an additional indicator will appear in the display to change, the resistance level and/or the target speed setting will appear or disappear in the flashing Current Segment column and the resistance of the program ends, the pedals will light. 2 Select a trainer program. See step 5 on page 13. 6 Turn on the console. If the resistance and/or target speed...
... heart rate if desired. Every few times you press a button, an additional indicator will appear in the display to change, the resistance level and/or the target speed setting will appear or disappear in the flashing Current Segment column and the resistance of the program ends, the pedals will light. 2 Select a trainer program. See step 5 on page 13. 6 Turn on the console. If the resistance and/or target speed...
English Manual
Page 15
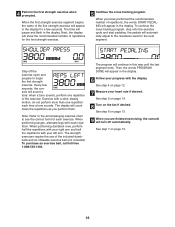
.... 2 Select a cross training program. One resistance level and one target speed setting are intended only to start the program. Make sure to turn on the console, the display will scroll across the center of the display. Press the Program button repeatedly until the name of the resistance levels for two or more consecutive segments.) During other segments, the console will begin pedaling to exercise at any time, stop the program at...
.... 2 Select a cross training program. One resistance level and one target speed setting are intended only to start the program. Make sure to turn on the console, the display will scroll across the center of the display. Press the Program button repeatedly until the name of the resistance levels for two or more consecutive segments.) During other segments, the console will begin pedaling to exercise at any time, stop the program at...
English Manual
Page 16
... arm. When performing lunges, alternate legs with a slow, steady motion; The strength exercises require the use of repetitions for each repetition. See step 4 on page 13. 16 Note: Refer to the accompanying exercise chart to begin the first strength exercise. Next, the display will turn off the exercise cycle and prepare to see the correct form for the first strength exercise. 5 Continue the cross training program. Step...
... arm. When performing lunges, alternate legs with a slow, steady motion; The strength exercises require the use of repetitions for each repetition. See step 4 on page 13. 16 Note: Refer to the accompanying exercise chart to begin the first strength exercise. Next, the display will turn off the exercise cycle and prepare to see the correct form for the first strength exercise. 5 Continue the cross training program. Step...
English Manual
Page 17
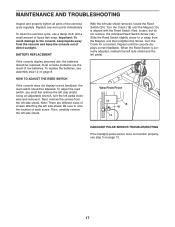
... left pedal clockwise and remove it. MAINTENANCE AND TROUBLESHOOTING Inspect and properly tighten all parts of low batteries. most console problems are different sizes of direct sunlight. Using an adjustable wrench, turn the left pedal. To adjust the reed switch, you must first remove the left side shield. Turn the Crank for a moment. BATTERY REPLACEMENT If the console display becomes dim, the batteries should be replaced; Next, loosen, but do not remove, the indicated Reed Switch Screw (49). To replace the batteries, see step...
... left pedal clockwise and remove it. MAINTENANCE AND TROUBLESHOOTING Inspect and properly tighten all parts of low batteries. most console problems are different sizes of direct sunlight. Using an adjustable wrench, turn the left pedal. To adjust the reed switch, you must first remove the left side shield. Turn the Crank for a moment. BATTERY REPLACEMENT If the console display becomes dim, the batteries should be replaced; Next, loosen, but do not remove, the indicated Reed Switch Screw (49). To replace the batteries, see step...
English Manual
Page 18
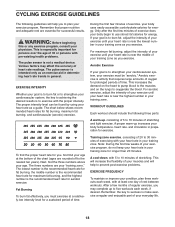
... rest between workouts. WARNING: Before beginning this or any exercise program, consult your "training zone." The chart below shows recommended heart rates for successful results. For maximum fat burning, adjust the intensity of your exercise until your heart rate is make exercise a regular and enjoyable part of your exercise must exercise at least one day of your heart rate in general. Training zone exercise, consisting of heart rate readings. The pulse sensor is...
... rest between workouts. WARNING: Before beginning this or any exercise program, consult your "training zone." The chart below shows recommended heart rates for successful results. For maximum fat burning, adjust the intensity of your exercise until your heart rate is make exercise a regular and enjoyable part of your exercise must exercise at least one day of your heart rate in general. Training zone exercise, consisting of heart rate readings. The pulse sensor is...
English Manual
Page 19
.... An alternative is important. The cross training programs will guide you will help to perform a specific number of strength exercises. When you may choose to use a cross training program, you through the full range of motion for each strength exercise, and moving only the appropriate parts of repetitions for at least one minute after each exercise that your workouts, and record key body measurements at your daily life...
.... An alternative is important. The cross training programs will guide you will help to perform a specific number of strength exercises. When you may choose to use a cross training program, you through the full range of motion for each strength exercise, and moving only the appropriate parts of repetitions for at least one minute after each exercise that your workouts, and record key body measurements at your daily life...
English Manual
Page 22
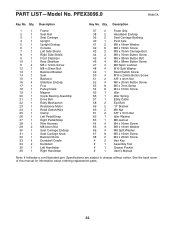
... 1 1 Frame 2 1 Seat Rail 3 1 Seat Carriage 4 1 Upright 5 1 Upright Endcap 6 1 Console 7 1 Left Side Shield 8 1 Right Side Shield 9 1 Front Stabilizer 10 1 Rear Stabilizer 11 4 M5 x 12mm Screw 12 1 M8 x 20mm Bolt 13 1 Backrest Bracket 14 1 Seat 15 1 Backrest 16 4 Stabilizer Endcap 17 1 Foot 18 1 Pulley/Crank 19 1 Magnet 20 1 Crank Bearing Assembly 21 1 Drive Belt 22 1 Eddy Mechanism 23 1 Resistance Motor 24 1 Reed Switch/Wire 25 1 Clamp 26 1 Left Pedal/Strap 27 1 Right Pedal/Strap 28 1 Wire Harness...
... 1 1 Frame 2 1 Seat Rail 3 1 Seat Carriage 4 1 Upright 5 1 Upright Endcap 6 1 Console 7 1 Left Side Shield 8 1 Right Side Shield 9 1 Front Stabilizer 10 1 Rear Stabilizer 11 4 M5 x 12mm Screw 12 1 M8 x 20mm Bolt 13 1 Backrest Bracket 14 1 Seat 15 1 Backrest 16 4 Stabilizer Endcap 17 1 Foot 18 1 Pulley/Crank 19 1 Magnet 20 1 Crank Bearing Assembly 21 1 Drive Belt 22 1 Eddy Mechanism 23 1 Resistance Motor 24 1 Reed Switch/Wire 25 1 Clamp 26 1 Left Pedal/Strap 27 1 Right Pedal/Strap 28 1 Wire Harness...
English Manual
Page 24
... (PFEX3096.0) • the NAME of the product (PROFORM GT 95X exercise cycle) • the SERIAL NUMBER of the product (see pages 22 and 23) PROFORM is limited to replacing or repairing, at ICON's option, the product through one of its scope and duration to you . ICON's obligation under normal use , costs of removal, installation or other warranty beyond that specifically set forth herein. No other consequential damages of...
... (PFEX3096.0) • the NAME of the product (PROFORM GT 95X exercise cycle) • the SERIAL NUMBER of the product (see pages 22 and 23) PROFORM is limited to replacing or repairing, at ICON's option, the product through one of its scope and duration to you . ICON's obligation under normal use , costs of removal, installation or other warranty beyond that specifically set forth herein. No other consequential damages of...

