
English Manual
Page 1
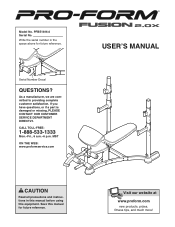
... www.proform.com new products, prizes, fitness tips, and much more! PFBE1816.0 Serial No. Serial Number Decal QUESTIONS? Write the serial number in this manual before using this manual for future reference. Save this equipment. Model No. As a manufacturer, we are committed to providing complete customer satisfaction. CALL TOLL-FREE: 1-888-533-1333 Mon.-Fri., 6 a.m.-6 p.m. If you have questions, or if a part is...
... www.proform.com new products, prizes, fitness tips, and much more! PFBE1816.0 Serial No. Serial Number Decal QUESTIONS? Write the serial number in this manual before using this manual for future reference. Save this equipment. Model No. As a manufacturer, we are committed to providing complete customer satisfaction. CALL TOLL-FREE: 1-888-533-1333 Mon.-Fri., 6 a.m.-6 p.m. If you have questions, or if a part is...
English Manual
Page 2
TABLE OF CONTENTS IMPORTANT PRECAUTIONS 3 BEFORE YOU BEGIN 4 PART IDENTIFICATION CHART 5 ASSEMBLY 6 ADJUSTMENTS 11 EXERCISE GUIDELINES 13 PART LIST 18 EXPLODED DRAWING 19 ORDERING REPLACEMENT PARTS Back Cover LIMITED WARRANTY Back Cover PROFORM is a registered trademark of ICON IP, Inc. 2
TABLE OF CONTENTS IMPORTANT PRECAUTIONS 3 BEFORE YOU BEGIN 4 PART IDENTIFICATION CHART 5 ASSEMBLY 6 ADJUSTMENTS 11 EXERCISE GUIDELINES 13 PART LIST 18 EXPLODED DRAWING 19 ORDERING REPLACEMENT PARTS Back Cover LIMITED WARRANTY Back Cover PROFORM is a registered trademark of ICON IP, Inc. 2
English Manual
Page 3
... 35 or persons with pre-existing health problems. Read all warnings on the weight bench. ICON assumes no responsibility for home use the weight bench. 9. Keep the weight bench indoors, away from the weight bench at any exercise program, consult your physician. Note: The weight bench does not include weights. 10. If a decal is missing or illegible, call the toll-free telephone number on the leg lever. Keep children under 12...
... 35 or persons with pre-existing health problems. Read all warnings on the weight bench. ICON assumes no responsibility for home use the weight bench. 9. Keep the weight bench indoors, away from the weight bench at any exercise program, consult your physician. Note: The weight bench does not include weights. 10. If a decal is missing or illegible, call the toll-free telephone number on the leg lever. Keep children under 12...
English Manual
Page 4
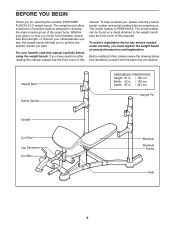
...: 87 in. / 221 cm Upright Pin Upright Curl Pad Leg Developer Curl Bar Backrest Backrest Frame Seat 4 BEFORE YOU BEGIN Thank you for any service needed under warranty, you must register the weight bench at www.proformservice.com/registration. The weight bench offers a selection of exercise stations designed to achieve the specific results you , please note the product model number and serial number before using the weight bench. Whether your goal is...
...: 87 in. / 221 cm Upright Pin Upright Curl Pad Leg Developer Curl Bar Backrest Backrest Frame Seat 4 BEFORE YOU BEGIN Thank you for any service needed under warranty, you must register the weight bench at www.proformservice.com/registration. The weight bench offers a selection of exercise stations designed to achieve the specific results you , please note the product model number and serial number before using the weight bench. Whether your goal is...
English Manual
Page 5
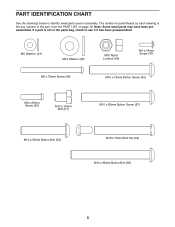
... x 70mm Bolt Set (54) M10 x 98mm Button Bolt (56) 5 Note: Some small parts may have been preassembled. If a part is the key number of the part, from the PART LIST on page 18. PART IDENTIFICATION CHART See the drawings below to identify small parts used in the parts bag, check to see if it has been preassembled. The number in parentheses by each drawing is not in assembly.
... x 70mm Bolt Set (54) M10 x 98mm Button Bolt (56) 5 Note: Some small parts may have been preassembled. If a part is the key number of the part, from the PART LIST on page 18. PART IDENTIFICATION CHART See the drawings below to identify small parts used in the parts bag, check to see if it has been preassembled. The number in parentheses by each drawing is not in assembly.
English Manual
Page 6
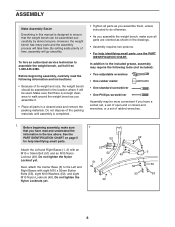
... service technician to the included grease, assembly may require the following information and instructions: • Because of its weight and size, the weight bench should be used. However, the weight bench has many parts and the assembly process will go smoothly. Do not dispose of the packing materials until assembly is completed. • Tighten all parts as you assemble them, unless instructed to do otherwise. • As you assemble the weight bench...
... service technician to the included grease, assembly may require the following information and instructions: • Because of its weight and size, the weight bench should be used. However, the weight bench has many parts and the assembly process will go smoothly. Do not dispose of the packing materials until assembly is completed. • Tighten all parts as you assemble them, unless instructed to do otherwise. • As you assemble the weight bench...

English Manual
Page 7
Attach the Seat Frame Bumper (29) to the Seat Frame (6) with four M4 x 16mm 2 Screws (47). Tighten the Nylon Locknuts (49) used in step 1 and this step for the other side of the weight bench. 52 53 49 1 56 4 52 56 28 47 7 Repeat this step. Attach the Left and Right Seat Frame Caps (42, 44) to the Seat Frame (6) with three M10 x 98mm Button Bolts (56...
Attach the Seat Frame Bumper (29) to the Seat Frame (6) with four M4 x 16mm 2 Screws (47). Tighten the Nylon Locknuts (49) used in step 1 and this step for the other side of the weight bench. 52 53 49 1 56 4 52 56 28 47 7 Repeat this step. Attach the Left and Right Seat Frame Caps (42, 44) to the Seat Frame (6) with three M10 x 98mm Button Bolts (56...

English Manual
Page 8
... holes in the Seat Frame. Attach the Backrest Frame (7) to an M10 x 85mm Button Screw (57). Tighten the Backrest Knob (38) into one of the included grease to the Seat Frame (6) with the wide end in the position shown. the Backrest Frame must pivot freely. 50 6 Grease 7 57 38 6 7 50 49 7. 5. Orient the Seat (14) with the Button Screw and an M10...
... holes in the Seat Frame. Attach the Backrest Frame (7) to an M10 x 85mm Button Screw (57). Tighten the Backrest Knob (38) into one of the included grease to the Seat Frame (6) with the wide end in the position shown. the Backrest Frame must pivot freely. 50 6 Grease 7 57 38 6 7 50 49 7. 5. Orient the Seat (14) with the Button Screw and an M10...
English Manual
Page 9
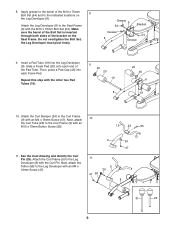
... Leg Developer (8). Then, press a Pad Cap (46) into the Leg Developer (8). Repeat this step with an M4 x 16mm Screw (47). Attach the Curl Bumper (24) to the indicated locations on the Seat Frame. the Leg Developer must pivot freely. Grease 6 54 Bracket Grease 8 54 Grease 9. See the inset drawing and identify the Curl Pin (25). Apply grease to the barrel of the M10 x 70mm 8 Bolt Set...
... Leg Developer (8). Then, press a Pad Cap (46) into the Leg Developer (8). Repeat this step with an M4 x 16mm Screw (47). Attach the Curl Bumper (24) to the indicated locations on the Seat Frame. the Leg Developer must pivot freely. Grease 6 54 Bracket Grease 8 54 Grease 9. See the inset drawing and identify the Curl Pin (25). Apply grease to the barrel of the M10 x 70mm 8 Bolt Set...

English Manual
Page 10
... next page. 10 Make sure that all parts are at the same height. 13. The use the weight bench. Attach the Curl Pad (18) to the Weight Rest with an M4 x 16mm Screw (47). Repeat this step for the other side of the remaining parts will be explained in ADJUSTMENTS, beginning on the Upright Pin to the Curl Post (10) with 13...
... next page. 10 Make sure that all parts are at the same height. 13. The use the weight bench. Attach the Curl Pad (18) to the Weight Rest with an M4 x 16mm Screw (47). Repeat this step for the other side of the remaining parts will be explained in ADJUSTMENTS, beginning on the Upright Pin to the Curl Post (10) with 13...
English Manual
Page 11
... (not shown) onto the Leg Developer and secure it will go. Replace any worn parts immediately. See the EXERCISE GUIDELINES on page 13 for each time you use solvents. Also, refer to the accompanying exercise guide to see the correct form for important information about how to adjust the weight bench. ADJUSTMENTS This section explains how to get the most benefit from your exercise program.
... (not shown) onto the Leg Developer and secure it will go. Replace any worn parts immediately. See the EXERCISE GUIDELINES on page 13 for each time you use solvents. Also, refer to the accompanying exercise guide to see the correct form for important information about how to adjust the weight bench. ADJUSTMENTS This section explains how to get the most benefit from your exercise program.

English Manual
Page 12
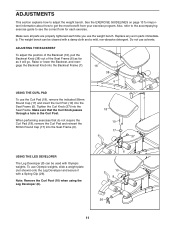
... squat exercises. REMOVING THE CURL FRAME To remove the Curl Frame (9), remove the Curl Pin (25) from the Left and Right Uprights (4, 5). Make sure that the Weight Rests are at the same height. Reengage the Upright Pins into the Weight Rests and the Left and Right Uprights. ADJUSTING THE WEIGHT RESTS AND THE SAFETY SPOTTERS To adjust the position of the Weight Rests (12), remove the Upright Pins...
... squat exercises. REMOVING THE CURL FRAME To remove the Curl Frame (9), remove the Curl Pin (25) from the Left and Right Uprights (4, 5). Make sure that the Weight Rests are at the same height. Reengage the Upright Pins into the Weight Rests and the Left and Right Uprights. ADJUSTING THE WEIGHT RESTS AND THE SAFETY SPOTTERS To adjust the position of the Weight Rests (12), remove the Upright Pins...
English Manual
Page 13
... each set. On the exercise guide accompanying this manual you perform. Exercising in any time while exercising, stop immediately and begin cooling down. The repetitions in two ways: • by changing the amount of resistance used • by pushing them close to regenerate. Exhale during the exertion stage of each workout, as well as running on a treadmill or riding on an elliptical exerciser or exercise...
... each set. On the exercise guide accompanying this manual you perform. Exercising in any time while exercising, stop immediately and begin cooling down. The repetitions in two ways: • by changing the amount of resistance used • by pushing them close to regenerate. Exhale during the exertion stage of each workout, as well as running on a treadmill or riding on an elliptical exerciser or exercise...
English Manual
Page 14
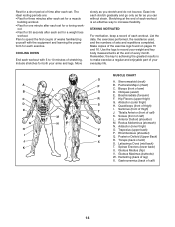
... effective way to make exercise a regular and enjoyable part of leg) X. Obliques (waist) E. Hamstring (back of your arms and legs. Include stretches for a weight loss workout. Stretching at the end of stretching. Hip Flexors (upper thigh) G. Triceps (back of each exercise. Gluteus Maximus (buttocks) W. List the date, the exercises performed, the resistance used, and the numbers of arm) D. Biceps (front of sets and repetitions completed...
... effective way to make exercise a regular and enjoyable part of leg) X. Obliques (waist) E. Hamstring (back of your arms and legs. Include stretches for a weight loss workout. Stretching at the end of stretching. Hip Flexors (upper thigh) G. Triceps (back of each exercise. Gluteus Maximus (buttocks) W. List the date, the exercises performed, the resistance used, and the numbers of arm) D. Biceps (front of sets and repetitions completed...

English Manual
Page 15
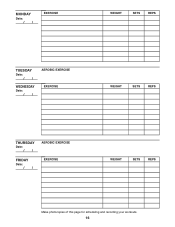
MONDAY Date: // EXERCISE WEIGHT SETS REPS TUESDAY Date: // WEDNESDAY Date: // AEROBIC EXERCISE EXERCISE WEIGHT SETS REPS THURSDAY Date: // FRIDAY Date: // AEROBIC EXERCISE EXERCISE WEIGHT SETS REPS Make photocopies of this page for scheduling and recording your workouts. 15
MONDAY Date: // EXERCISE WEIGHT SETS REPS TUESDAY Date: // WEDNESDAY Date: // AEROBIC EXERCISE EXERCISE WEIGHT SETS REPS THURSDAY Date: // FRIDAY Date: // AEROBIC EXERCISE EXERCISE WEIGHT SETS REPS Make photocopies of this page for scheduling and recording your workouts. 15
English Manual
Page 16
MONDAY Date: // EXERCISE WEIGHT SETS REPS TUESDAY Date: // WEDNESDAY Date: // AEROBIC EXERCISE EXERCISE WEIGHT SETS REPS THURSDAY Date: // FRIDAY Date: // AEROBIC EXERCISE EXERCISE WEIGHT SETS REPS Make photocopies of this page for scheduling and recording your workouts. 16
MONDAY Date: // EXERCISE WEIGHT SETS REPS TUESDAY Date: // WEDNESDAY Date: // AEROBIC EXERCISE EXERCISE WEIGHT SETS REPS THURSDAY Date: // FRIDAY Date: // AEROBIC EXERCISE EXERCISE WEIGHT SETS REPS Make photocopies of this page for scheduling and recording your workouts. 16
English Manual
Page 18
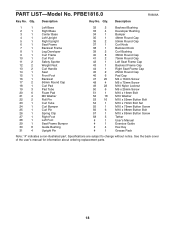
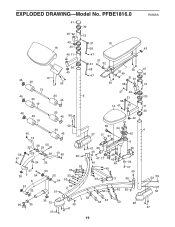
Qty. See the back cover of the user's manual for information about ordering replacement parts. 18 PFBE1816.0 R0606A Key No. Specifications are subject to change without notice. Description Key No. PART LIST-Model No. Qty. Description 1 1 Left Base 2 1 Right Base 3 1 Center Base 4 1 Left Upright 5 1 Right Upright 6 1 Seat Frame 7 1 Backrest Frame 8 1 Leg Developer 9 1 Curl Frame 10 1 Curl Post 11 2 Safety Spotter 12 2 Weight Rest 13 2 Curl Handle 14 1 Seat 15 1 Front...
Qty. See the back cover of the user's manual for information about ordering replacement parts. 18 PFBE1816.0 R0606A Key No. Specifications are subject to change without notice. Description Key No. PART LIST-Model No. Qty. Description 1 1 Left Base 2 1 Right Base 3 1 Center Base 4 1 Left Upright 5 1 Right Upright 6 1 Seat Frame 7 1 Backrest Frame 8 1 Leg Developer 9 1 Curl Frame 10 1 Curl Post 11 2 Safety Spotter 12 2 Weight Rest 13 2 Curl Handle 14 1 Seat 15 1 Front...
English Manual
Page 19
PFBE1816.0 41 30 40 12 40 18 30 31 16 58 40 11 47 46 20 30 40 10 50 19 46 20 19 20 46 57 31 32 58 47 50 7 32 49 50 31 40 58 47 40 5 31 58 14 47 40 46 20 19 45 13 20 46 56 52 20 46 22 39 23 55 58 25 47 24 47 9 36 54 8 39 13 45 56 22 52 33 53 33 53 52 54 53 33 33 2 52 51 40 47 38 44 27 17 37 42 6 47 29 49 47 17 49 21 48 49 49 49 49 34 47 49 49 3 49 52 52 56 26 35 36 15 47 1 52 53 53 53 49 28 47 19 R0606A 43 41 30 12 30 11 30 4 52 56 56 47 EXPLODED DRAWING-Model No.
PFBE1816.0 41 30 40 12 40 18 30 31 16 58 40 11 47 46 20 30 40 10 50 19 46 20 19 20 46 57 31 32 58 47 50 7 32 49 50 31 40 58 47 40 5 31 58 14 47 40 46 20 19 45 13 20 46 56 52 20 46 22 39 23 55 58 25 47 24 47 9 36 54 8 39 13 45 56 22 52 33 53 33 53 52 54 53 33 33 2 52 51 40 47 38 44 27 17 37 42 6 47 29 49 47 17 49 21 48 49 49 49 49 34 47 49 49 3 49 52 52 56 26 35 36 15 47 1 52 53 53 53 49 28 47 19 R0606A 43 41 30 12 30 11 30 4 52 56 56 47 EXPLODED DRAWING-Model No.
English Manual
Page 20
... information: • the MODEL NUMBER of the product (PFBE1816.0) • the NAME of the product (PROFORM FUSION 2.0 X weight bench) • the SERIAL NUMBER of the product (see the front cover of this manual) • the KEY NUMBER and DESCRIPTION of the part(s) (see the front cover of this warranty is limited to replacing or repairing, at ICON's option, the product through one of its scope and duration to the terms set...
... information: • the MODEL NUMBER of the product (PFBE1816.0) • the NAME of the product (PROFORM FUSION 2.0 X weight bench) • the SERIAL NUMBER of the product (see the front cover of this manual) • the KEY NUMBER and DESCRIPTION of the part(s) (see the front cover of this warranty is limited to replacing or repairing, at ICON's option, the product through one of its scope and duration to the terms set...

