
English Manual
Page 3
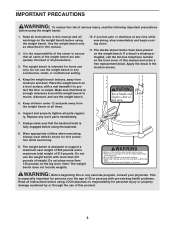
... begin cooling down. 11. ICON assumes no responsibility for persons over the age of all instructions before using . Use the weight bench only as described in the location shown. 4. If a decal is especially important for personal injury or property damage sustained by... or through the use the weight bench with pre-existing health problems. Read all precautions. 3. Keep the weight bench indoors, away from the weight bench at any exercise program, consult your physician. Make sure that there is intended for...
... begin cooling down. 11. ICON assumes no responsibility for persons over the age of all instructions before using . Use the weight bench only as described in the location shown. 4. If a decal is especially important for personal injury or property damage sustained by... or through the use the weight bench with pre-existing health problems. Read all precautions. 3. Keep the weight bench indoors, away from the weight bench at any exercise program, consult your physician. Make sure that there is intended for...
English Manual
Page 4
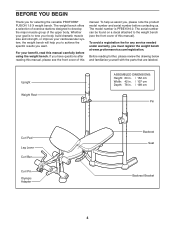
... stations designed to tone your body, build dramatic muscle size and strength, or improve your cardiovascular system, the weight bench will help us . Whether your benefit, read this manual). Before reading further, please review the drawing below and...weight bench. BEFORE YOU BEGIN Thank you for any service needed under warranty, you must register the weight bench at www.proformservice.com/registration. To help you to the weight bench (see the front cover of the upper body. To avoid a registration fee for selecting the versatile PROFORM® FUSION 1.6 X weight bench...
... stations designed to tone your body, build dramatic muscle size and strength, or improve your cardiovascular system, the weight bench will help us . Whether your benefit, read this manual). Before reading further, please review the drawing below and...weight bench. BEFORE YOU BEGIN Thank you for any service needed under warranty, you must register the weight bench at www.proformservice.com/registration. To help you to the weight bench (see the front cover of the upper body. To avoid a registration fee for selecting the versatile PROFORM® FUSION 1.6 X weight bench...
English Manual
Page 6
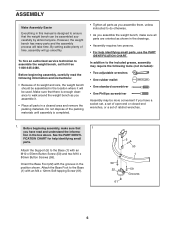
... them, unless instructed to the included grease, assembly may be used. In addition to do otherwise. • As you assemble the weight bench, make sure that the weight bench can be assembled in the location where it . • Place all parts are oriented as you have a socket set, a set... all parts in a cleared area and remove the packing materials. tion in the position shown. By setting aside plenty of its weight and size, the weight bench should be assembled successfully by almost anyone. Attach the Base Foot to the Base (1) with an M4 x 12mm Self-tapping Screw...
... them, unless instructed to the included grease, assembly may be used. In addition to do otherwise. • As you assemble the weight bench, make sure that the weight bench can be assembled in the location where it . • Place all parts are oriented as you have a socket set, a set... all parts in a cleared area and remove the packing materials. tion in the position shown. By setting aside plenty of its weight and size, the weight bench should be assembled successfully by almost anyone. Attach the Base Foot to the Base (1) with an M4 x 12mm Self-tapping Screw...
English Manual
Page 10
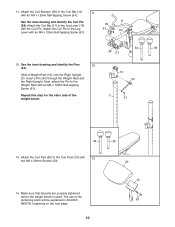
...parts will be explained in ADJUST- 53 MENTS, beginning on the next page. 10 11. The use of the weight bench. 13 34 7 61 34 13. See the inset drawing and identify the Pins 12 (34). Attach the Curl ... 39 61 10 Pin (34) Curl Pin (38) 34 38 38 61 12. Insert a Pin (34) through the Weight Rest and the Right Upright. See the inset drawing and identify the Curl Pin (38). Pin (34) Curl Pin (38... with the Curl Pin. Make sure that all parts are properly tightened before the weight bench is used. Attach the Curl Bar (11) to the Leg Lever (10) with 13 two M6 x 23mm Screws (...
...parts will be explained in ADJUST- 53 MENTS, beginning on the next page. 10 11. The use of the weight bench. 13 34 7 61 34 13. See the inset drawing and identify the Pins 12 (34). Attach the Curl ... 39 61 10 Pin (34) Curl Pin (38) 34 38 38 61 12. Insert a Pin (34) through the Weight Rest and the Right Upright. See the inset drawing and identify the Curl Pin (38). Pin (34) Curl Pin (38... with the Curl Pin. Make sure that all parts are properly tightened before the weight bench is used. Attach the Curl Bar (11) to the Leg Lever (10) with 13 two M6 x 23mm Screws (...
English Manual
Page 11
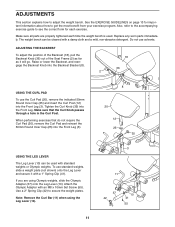
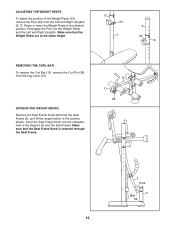
...hole in the Curl Post. Also, refer to the accompanying exercise guide to get the most benefit from your exercise program. The weight bench can be cleaned with standard weights or Olympic weights. Do not use the Curl Pad (20), remove the indicated 50mm Round Inner Cap (25) and insert the Curl Post (12... the Backrest, and reengage the Backrest Knob into the Front Leg (3). Replace any worn parts immediately. Use a 2" Spring Clip (42) to adjust the weight bench. Make sure all parts are using the Leg Lever (10). 11 8 20 12 25 35 3 11 37 42 10 41 55 If you are properly...
...hole in the Curl Post. Also, refer to the accompanying exercise guide to get the most benefit from your exercise program. The weight bench can be cleaned with standard weights or Olympic weights. Do not use the Curl Pad (20), remove the indicated 50mm Round Inner Cap (25) and insert the Curl Post (12... the Backrest, and reengage the Backrest Knob into the Front Leg (3). Replace any worn parts immediately. Use a 2" Spring Clip (42) to adjust the weight bench. Make sure all parts are using the Leg Lever (10). 11 8 20 12 25 35 3 11 37 42 10 41 55 If you are properly...
English Manual
Page 12
Raise or lower the Weight Rests to the position shown. STORING THE WEIGHT BENCH Remove the Seat Frame Knob (62) from the Leg Lever (10). Make sure that the Seat Frame Knob is inserted through the Seat Frame. 10 11 38 2 Hole 5 62 12 Make sure that the Weight Rests are at the same height... 34 7 6 34 13 REMOVING THE CURL BAR To remove the Curl Bar (11), remove the Curl Pin (38) from the Seat Frame (2), and lift the weight bench to the desired position. Reengage the Pins into the indicated hole in the Support (5) and the Seat Frame. Insert the Seat Frame Knob into the...
Raise or lower the Weight Rests to the position shown. STORING THE WEIGHT BENCH Remove the Seat Frame Knob (62) from the Leg Lever (10). Make sure that the Seat Frame Knob is inserted through the Seat Frame. 10 11 38 2 Hole 5 62 12 Make sure that the Weight Rests are at the same height... 34 7 6 34 13 REMOVING THE CURL BAR To remove the Curl Bar (11), remove the Curl Pin (38) from the Seat Frame (2), and lift the weight bench to the desired position. Reengage the Pins into the indicated hole in the Support (5) and the Seat Frame. Insert the Seat Frame Knob into the...
English Manual
Page 20
..., the above limitation may not apply to give the following information: • the MODEL NUMBER of the product (PFBE1516.0) • the NAME of the product (PROFORM FUSION 1.6 X weight bench) • the SERIAL NUMBER of the product (see the front cover of this manual) • the KEY NUMBER and DESCRIPTION of the part(s) (see the...
..., the above limitation may not apply to give the following information: • the MODEL NUMBER of the product (PFBE1516.0) • the NAME of the product (PROFORM FUSION 1.6 X weight bench) • the SERIAL NUMBER of the product (see the front cover of this manual) • the KEY NUMBER and DESCRIPTION of the part(s) (see the...


