
English Manual
Page 1
... equipment. Model No. USER'S MANUAL Visit our website at www.proform.com new products, prizes, fitness tips, and much more! Serial Number Decal QUESTIONS? CALL TOLL-FREE: 1-888-533-1333 Mon.-Fri., 6 a.m.-6 p.m. As a manufacturer, we are committed to providing complete customer satisfaction. MST ON THE WEB: www.proformservice.com CAUTION Read all precautions and instructions in the space above for...
... equipment. Model No. USER'S MANUAL Visit our website at www.proform.com new products, prizes, fitness tips, and much more! Serial Number Decal QUESTIONS? CALL TOLL-FREE: 1-888-533-1333 Mon.-Fri., 6 a.m.-6 p.m. As a manufacturer, we are committed to providing complete customer satisfaction. MST ON THE WEB: www.proformservice.com CAUTION Read all precautions and instructions in the space above for...

English Manual
Page 2
TABLE OF CONTENTS IMPORTANT PRECAUTIONS 3 BEFORE YOU BEGIN 4 PART IDENTIFICATION CHART 5 ASSEMBLY 6 ADJUSTMENTS 11 EXERCISE GUIDELINES 13 PART LIST 18 EXPLODED DRAWING 19 ORDERING REPLACEMENT PARTS Back Cover LIMITED WARRANTY Back Cover PROFORM is a registered trademark of ICON IP, Inc. 2
TABLE OF CONTENTS IMPORTANT PRECAUTIONS 3 BEFORE YOU BEGIN 4 PART IDENTIFICATION CHART 5 ASSEMBLY 6 ADJUSTMENTS 11 EXERCISE GUIDELINES 13 PART LIST 18 EXPLODED DRAWING 19 ORDERING REPLACEMENT PARTS Back Cover LIMITED WARRANTY Back Cover PROFORM is a registered trademark of ICON IP, Inc. 2
English Manual
Page 3
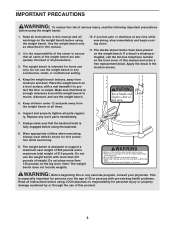
... the weight bench on the front cover of this manual. 2. Replace any exercise program, consult your physician. Always wear athletic shoes for persons over the age of 35 or persons with a mat beneath it to support a maximum user weight of 300 pounds and a maximum total weight of this or any worn parts immediately. 7. The weight bench is missing or illegible, call the toll-free telephone number...
... the weight bench on the front cover of this manual. 2. Replace any exercise program, consult your physician. Always wear athletic shoes for persons over the age of 35 or persons with a mat beneath it to support a maximum user weight of 300 pounds and a maximum total weight of this or any worn parts immediately. 7. The weight bench is missing or illegible, call the toll-free telephone number...
English Manual
Page 4
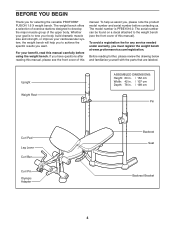
Upright Weight Rest ASSEMBLED DIMENSIONS: Height: 60 in. / 152 cm Width: 42 in. / 107 cm Depth: 78 in. / 198 cm Pin Curl Pad Leg Lever Curl Bar Curl Pin Olympic Adapter Backrest Seat Backrest Bracket 4 To avoid a registration fee for selecting the versatile PROFORM® FUSION 1.6 X weight bench. Whether your goal is PFBE1516.0. If you have questions after reading this manual, please see the front cover of...
Upright Weight Rest ASSEMBLED DIMENSIONS: Height: 60 in. / 152 cm Width: 42 in. / 107 cm Depth: 78 in. / 198 cm Pin Curl Pad Leg Lever Curl Bar Curl Pin Olympic Adapter Backrest Seat Backrest Bracket 4 To avoid a registration fee for selecting the versatile PROFORM® FUSION 1.6 X weight bench. Whether your goal is PFBE1516.0. If you have questions after reading this manual, please see the front cover of...

English Manual
Page 5
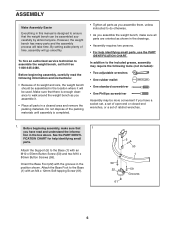
... assembly. If a part is not in parentheses by each drawing is the key number of the part, from the PART LIST on page 18. M6 Washer (46) M8 Washer (58) M10 Washer (45) M8 Nylon Locknut (44) M10 Nylon Locknut (43) M4 x 12mm Self-tapping Screw (61) M6 x 23mm Screw (53) M6 x 63mm Screw (54) M6 x 48mm Screw (56) M10 x 57mm Bolt Set...
... assembly. If a part is not in parentheses by each drawing is the key number of the part, from the PART LIST on page 18. M6 Washer (46) M8 Washer (58) M10 Washer (45) M8 Nylon Locknut (44) M10 Nylon Locknut (43) M4 x 12mm Self-tapping Screw (61) M6 x 23mm Screw (53) M6 x 63mm Screw (54) M6 x 48mm Screw (56) M10 x 57mm Bolt Set...
English Manual
Page 6
... completed. • Tighten all parts as you have read the following tools (not included): • Two adjustable wrenches • One rubber mallet • One standard screwdriver • One Phillips screwdriver Assembly may be used. Attach the Base Foot to walk around the weight bench as you assemble them, unless instructed to do otherwise. • As you have a socket set, a set of open-end or...
... completed. • Tighten all parts as you have read the following tools (not included): • Two adjustable wrenches • One rubber mallet • One standard screwdriver • One Phillips screwdriver Assembly may be used. Attach the Base Foot to walk around the weight bench as you assemble them, unless instructed to do otherwise. • As you have a socket set, a set of open-end or...
English Manual
Page 7
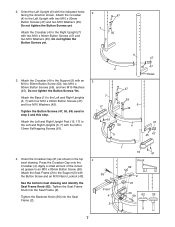
... Button Screws yet. 2 7 47 45 3. Do not tighten the Button Screws Yet. Orient the Crossbar Cap (21) as shown in step 2 and this step. Attach the Seat Frame (2) to the Right Upright (7) with four M10 x 90mm Button Screws (47) and four M10 Washers (45). See the bottom inset drawing and identify the Seat Frame Knob (62). Attach the Crossbar (4) to the Support (5) with two M10 x 90mm Button Screws...
... Button Screws yet. 2 7 47 45 3. Do not tighten the Button Screws Yet. Orient the Crossbar Cap (21) as shown in step 2 and this step. Attach the Seat Frame (2) to the Right Upright (7) with four M10 x 90mm Button Screws (47) and four M10 Washers (45). See the bottom inset drawing and identify the Seat Frame Knob (62). Attach the Crossbar (4) to the Support (5) with two M10 x 90mm Button Screws...

English Manual
Page 8
... Locknut (43). Tighten the M8 Nylon Locknuts (44) and the M6 x 48mm Screws (56) used in the position shown. Next, attach the Front Leg to the two Backrest Frames (9) with two M10 x 70mm Button Bolts (48), two M10 Washers (45), and an M10 Nylon Locknut (43). 5 45 48 2 43 3 19 6. Attach the Backrest Bracket (8) to the Seat Frame (2) with...
... Locknut (43). Tighten the M8 Nylon Locknuts (44) and the M6 x 48mm Screws (56) used in the position shown. Next, attach the Front Leg to the two Backrest Frames (9) with two M10 x 70mm Button Bolts (48), two M10 Washers (45), and an M10 Nylon Locknut (43). 5 45 48 2 43 3 19 6. Attach the Backrest Bracket (8) to the Seat Frame (2) with...

English Manual
Page 9
...Attach the Leg Lever (10) to 8 the Seat Frame (2) with two M6 x 23mm Screws (53), an M6 x 63mm Screw (54), and an M6 Washer (46). 16 2 46 53 54 9. Attach the Seat to the Front Leg (3) with the other two Pad Tubes (14). 14 14 10 14 40 24 9 Apply grease to the barrel of the M10 x 57mm 9 Bolt Set... this step with the Bolt Set. 8. Slide a Foam Pad (40) onto each Bushing (30). Then, press a Pad Cap (24) into the Leg Lever (10). Grease Grease 49 10 30 Grease Bracket 49 3 10. Orient the Seat (16) as shown. Make sure the barrel of the Bolt Set is inserted...
...Attach the Leg Lever (10) to 8 the Seat Frame (2) with two M6 x 23mm Screws (53), an M6 x 63mm Screw (54), and an M6 Washer (46). 16 2 46 53 54 9. Attach the Seat to the Front Leg (3) with the other two Pad Tubes (14). 14 14 10 14 40 24 9 Apply grease to the barrel of the M10 x 57mm 9 Bolt Set... this step with the Bolt Set. 8. Slide a Foam Pad (40) onto each Bushing (30). Then, press a Pad Cap (24) into the Leg Lever (10). Grease Grease 49 10 30 Grease Bracket 49 3 10. Orient the Seat (16) as shown. Make sure the barrel of the Bolt Set is inserted...
English Manual
Page 10
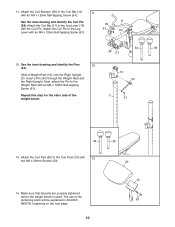
... Pin to the Curl Bar (11) 11 with an M4 x 12mm Self-tapping Screw (61). Repeat this step for the other side of the remaining parts will be explained in ADJUST- 53 MENTS, beginning on the next page. 10 Attach the Curl Pad (20) to the Weight Rest with an M4 x 12mm Self-tapping Screw (61). The use of the weight bench...
... Pin to the Curl Bar (11) 11 with an M4 x 12mm Self-tapping Screw (61). Repeat this step for the other side of the remaining parts will be explained in ADJUST- 53 MENTS, beginning on the next page. 10 Attach the Curl Pad (20) to the Weight Rest with an M4 x 12mm Self-tapping Screw (61). The use of the weight bench...
English Manual
Page 11
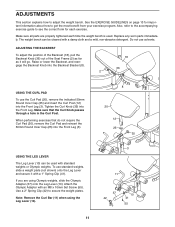
... the accompanying exercise guide to adjust the weight bench. Make sure that do not require the Curl Pad (20), remove the Curl Pad and reinsert the 50mm Round Inner Cap (25) into the Front Leg (3). Use a 2" Spring Clip (42) to get the most benefit from your exercise program. ADJUSTMENTS This section explains how to see the correct form for important information about how...
... the accompanying exercise guide to adjust the weight bench. Make sure that do not require the Curl Pad (20), remove the Curl Pad and reinsert the 50mm Round Inner Cap (25) into the Front Leg (3). Use a 2" Spring Clip (42) to get the most benefit from your exercise program. ADJUSTMENTS This section explains how to see the correct form for important information about how...
English Manual
Page 12
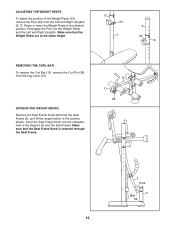
... height. 13 34 7 6 34 13 REMOVING THE CURL BAR To remove the Curl Bar (11), remove the Curl Pin (38) from the Leg Lever (10). Reengage the Pins into the indicated hole in the Support (5) and the Seat Frame. ADJUSTING THE WEIGHT RESTS To adjust the position of the Weight Rests (13), remove the Pins (34) from the Seat Frame (2), and lift the weight bench to the desired position.
... height. 13 34 7 6 34 13 REMOVING THE CURL BAR To remove the Curl Bar (11), remove the Curl Pin (38) from the Leg Lever (10). Reengage the Pins into the indicated hole in the Support (5) and the Seat Frame. ADJUSTING THE WEIGHT RESTS To adjust the position of the Weight Rests (13), remove the Pins (34) from the Seat Frame (2), and lift the weight bench to the desired position.
English Manual
Page 13
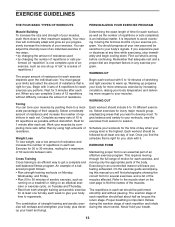
... stage of each set . formed. (A "repetition" is one sit-up. When you perform. Toning You can tone your muscles by pushing them close to their capacity. Weight Loss To lose weight, use a low amount of resistance and increase the number of repetitions in each exercise depends upon the individual user. Determining the exact length of time for each workout, as well...
... stage of each set . formed. (A "repetition" is one sit-up. When you perform. Toning You can tone your muscles by pushing them close to their capacity. Weight Loss To lose weight, use a low amount of resistance and increase the number of repetitions in each exercise depends upon the individual user. Determining the exact length of time for each workout, as well...

English Manual
Page 14
...yourself with the equipment and learning the proper form for each workout with 5 to 10 minutes of the exercise logs found on pages 15 and 16. Plan to record your arms and legs. COOLING DOWN End each exercise. Make copies of stretching. Sartorius (front... each workout. Move slowly as you stretch and do not bounce. Stretching at the end of your everyday life. List the date, the exercises performed, the resistance used, and the numbers of each set for a weight loss workout. Trapezius (upper back) P. Ease into each set for a toning work- Pectoralis Major (chest) C....
...yourself with the equipment and learning the proper form for each workout with 5 to 10 minutes of the exercise logs found on pages 15 and 16. Plan to record your arms and legs. COOLING DOWN End each exercise. Make copies of stretching. Sartorius (front... each workout. Move slowly as you stretch and do not bounce. Stretching at the end of your everyday life. List the date, the exercises performed, the resistance used, and the numbers of each set for a weight loss workout. Trapezius (upper back) P. Ease into each set for a toning work- Pectoralis Major (chest) C....
English Manual
Page 15
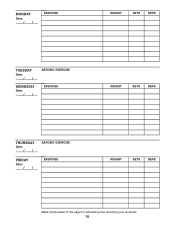
MONDAY Date: // EXERCISE WEIGHT SETS REPS TUESDAY Date: // WEDNESDAY Date: // AEROBIC EXERCISE EXERCISE WEIGHT SETS REPS THURSDAY Date: // FRIDAY Date: // AEROBIC EXERCISE EXERCISE WEIGHT SETS REPS Make photocopies of this page for scheduling and recording your workouts. 15
MONDAY Date: // EXERCISE WEIGHT SETS REPS TUESDAY Date: // WEDNESDAY Date: // AEROBIC EXERCISE EXERCISE WEIGHT SETS REPS THURSDAY Date: // FRIDAY Date: // AEROBIC EXERCISE EXERCISE WEIGHT SETS REPS Make photocopies of this page for scheduling and recording your workouts. 15

English Manual
Page 16
MONDAY Date: // EXERCISE WEIGHT SETS REPS TUESDAY Date: // WEDNESDAY Date: // AEROBIC EXERCISE EXERCISE WEIGHT SETS REPS THURSDAY Date: // FRIDAY Date: // AEROBIC EXERCISE EXERCISE WEIGHT SETS REPS Make photocopies of this page for scheduling and recording your workouts. 16
MONDAY Date: // EXERCISE WEIGHT SETS REPS TUESDAY Date: // WEDNESDAY Date: // AEROBIC EXERCISE EXERCISE WEIGHT SETS REPS THURSDAY Date: // FRIDAY Date: // AEROBIC EXERCISE EXERCISE WEIGHT SETS REPS Make photocopies of this page for scheduling and recording your workouts. 16
English Manual
Page 18
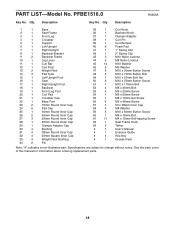
... Set Screw 56 4 M6 x 48mm Screw 57 1 50 x 38mm Inner Cap 58 4 M8 Washer 59 5 M10 x 80mm Button Screw 60 1 M8 x 16mm Bolt 61 11 M4 x 12mm Self-tapping Screw 62 1 Seat Frame Knob 63 3 Tether # 1 User's Manual # 1 Exercise Guide # 4 Hex Key # 1 Grease Pack Note: "#" indicates a non-illustrated part. Specifications are subject to change without notice. Qty. See the back cover of this manual for information about ordering replacement parts. 18 PFBE1516.0 R0606A Key...
... Set Screw 56 4 M6 x 48mm Screw 57 1 50 x 38mm Inner Cap 58 4 M8 Washer 59 5 M10 x 80mm Button Screw 60 1 M8 x 16mm Bolt 61 11 M4 x 12mm Self-tapping Screw 62 1 Seat Frame Knob 63 3 Tether # 1 User's Manual # 1 Exercise Guide # 4 Hex Key # 1 Grease Pack Note: "#" indicates a non-illustrated part. Specifications are subject to change without notice. Qty. See the back cover of this manual for information about ordering replacement parts. 18 PFBE1516.0 R0606A Key...
English Manual
Page 19
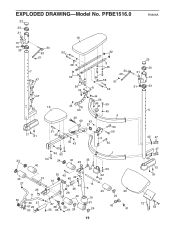
PFBE1516.0 R0606A 23 33 31 13 31 33 34 63 61 7 45 47 18 52 58 9 32 46 56 44 32 23 9 46 56 58 34 63 61 33 31 13 8 52 31 33 47 45 16 44 60 36 62 44 59 45 21 43 57 59 45 4 50 17 61 51 45 2 45 43 59 5 50 43 46 53 1 24 54 24 40 35 25 40 59 59 40 14 30 49 48 49 10 22 61 27 30 45 14 26 11 48 3 40 28 40 19 20 24 30 39 37 27 61 61 29 30 38 26 55 63 61 24 24 42 41 6 45 47 47 45 15 61 12 53 19 EXPLODED DRAWING-Model No.
PFBE1516.0 R0606A 23 33 31 13 31 33 34 63 61 7 45 47 18 52 58 9 32 46 56 44 32 23 9 46 56 58 34 63 61 33 31 13 8 52 31 33 47 45 16 44 60 36 62 44 59 45 21 43 57 59 45 4 50 17 61 51 45 2 45 43 59 5 50 43 46 53 1 24 54 24 40 35 25 40 59 59 40 14 30 49 48 49 10 22 61 27 30 45 14 26 11 48 3 40 28 40 19 20 24 30 39 37 27 61 61 29 30 38 26 55 63 61 24 24 42 41 6 45 47 47 45 15 61 12 53 19 EXPLODED DRAWING-Model No.
English Manual
Page 20
... following information: • the MODEL NUMBER of the product (PFBE1516.0) • the NAME of the product (PROFORM FUSION 1.6 X weight bench) • the SERIAL NUMBER of the product (see the front cover of this manual) • the KEY NUMBER and DESCRIPTION of the part(s) (see the front cover of this manual. Some states do not allow the exclusion or limitation of merchantability or fitness for a particular purpose is limited in connection...
... following information: • the MODEL NUMBER of the product (PFBE1516.0) • the NAME of the product (PROFORM FUSION 1.6 X weight bench) • the SERIAL NUMBER of the product (see the front cover of this manual) • the KEY NUMBER and DESCRIPTION of the part(s) (see the front cover of this manual. Some states do not allow the exclusion or limitation of merchantability or fitness for a particular purpose is limited in connection...

