
Instruction Manual
Page 2
... trademark of Apple Inc., registered in the U.S. IOS is missing or illegible, see the front cover of Bluetooth SIG, Inc. PROFORM and IFIT are registered trademarks of this manual and request a free replacement decal. The BLUETOOTH® word mark and logos are ...OF CONTENTS WARNING DECAL PLACEMENT 2 IMPORTANT PRECAUTIONS 3 BEFORE YOU BEGIN 4 PART IDENTIFICATION CHART 5 ASSEMBLY 6 HOW TO USE THE ELLIPTICAL 15 MAINTENANCE AND TROUBLESHOOTING 23 EXERCISE GUIDELINES 25 PART LIST 27 EXPLODED DRAWING 29 ORDERING REPLACEMENT PARTS Back Cover RECYCLING INFORMATION Back Cover...
... trademark of Apple Inc., registered in the U.S. IOS is missing or illegible, see the front cover of Bluetooth SIG, Inc. PROFORM and IFIT are registered trademarks of this manual and request a free replacement decal. The BLUETOOTH® word mark and logos are ...OF CONTENTS WARNING DECAL PLACEMENT 2 IMPORTANT PRECAUTIONS 3 BEFORE YOU BEGIN 4 PART IDENTIFICATION CHART 5 ASSEMBLY 6 HOW TO USE THE ELLIPTICAL 15 MAINTENANCE AND TROUBLESHOOTING 23 EXERCISE GUIDELINES 25 PART LIST 27 EXPLODED DRAWING 29 ORDERING REPLACEMENT PARTS Back Cover RECYCLING INFORMATION Back Cover...

Instruction Manual
Page 3
...ensure that could become short of this product. 1. Hold the handlebars or the upper body arms when mounting, dismounting, or using the elliptical; ICON assumes no responsibility for personal injury or property damage sustained by persons weighing more than 275 lbs. (125 kg). 11. ...Before beginning any worn parts immediately. 9. Place the elliptical on a level surface, with pre-existing health problems. 3. IMPORTANT PRECAUTIONS WARNING: To reduce the risk of serious injury, read all important ...
...ensure that could become short of this product. 1. Hold the handlebars or the upper body arms when mounting, dismounting, or using the elliptical; ICON assumes no responsibility for personal injury or property damage sustained by persons weighing more than 275 lbs. (125 kg). 11. ...Before beginning any worn parts immediately. 9. Place the elliptical on a level surface, with pre-existing health problems. 3. IMPORTANT PRECAUTIONS WARNING: To reduce the risk of serious injury, read all important ...
Instruction Manual
Page 4
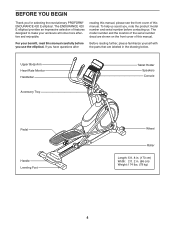
... on the front cover of features designed to make your benefit, read this manual. The ENDURANCE 420 E elliptical provides an impressive selection of this manual carefully before contacting us assist you for selecting the revolutionary PROFORM® ENDURANCE 420 E elliptical. Upper Body Arm Heart Rate Monitor Handlebar Accessory Tray Tablet Holder Speakers Console Pedal Handle...
... on the front cover of features designed to make your benefit, read this manual. The ENDURANCE 420 E elliptical provides an impressive selection of this manual carefully before contacting us assist you for selecting the revolutionary PROFORM® ENDURANCE 420 E elliptical. Upper Body Arm Heart Rate Monitor Handlebar Accessory Tray Tablet Holder Speakers Console Pedal Handle...

Instruction Manual
Page 12
... Arm (58) inside the bracket on the other side of grease to the Upright (4) with four M4 x 16mm Screws (101); Apply a small amount of the elliptical. 82 77 60 Grease 64 58 14. Next, slide an M8 Washer (77) onto an M8 x 13mm Screw (82), and tighten the Screw a few turns...
... Arm (58) inside the bracket on the other side of grease to the Upright (4) with four M4 x 16mm Screws (101); Apply a small amount of the elliptical. 82 77 60 Grease 64 58 14. Next, slide an M8 Washer (77) onto an M8 x 13mm Screw (82), and tighten the Screw a few turns...

Instruction Manual
Page 13
Repeat this step on the other side of the elliptical. 65 60 101 66 16. Next, identify the Right Leg Outer Cover (69) and orient it onto the Right Leg Inner Cover (83). Attach the ... M4 x 16mm Screw (101). Identify the Right Leg Inner Cover (83) and orient it as shown. Repeat this step on the other side of the elliptical. 60 83 32 101 69 13 Attach the Right Arm Rear Cover (66) around the Right Upper Body Leg (60) by pressing it as shown...
Repeat this step on the other side of the elliptical. 65 60 101 66 16. Next, identify the Right Leg Outer Cover (69) and orient it onto the Right Leg Inner Cover (83). Attach the ... M4 x 16mm Screw (101). Identify the Right Leg Inner Cover (83) and orient it as shown. Repeat this step on the other side of the elliptical. 60 83 32 101 69 13 Attach the Right Arm Rear Cover (66) around the Right Upper Body Leg (60) by pressing it as shown...

Instruction Manual
Page 14
..., press the Shield Cover (75) into the Left and Right Shields (73, 74). start all parts are properly tightened before you use the elliptical. 17. Place a mat beneath the elliptical to the Console (7) with four Tablet Holder Screws (108); Orient the Shield Cover Cap (11) and the Shield Cover (75) as shown...
..., press the Shield Cover (75) into the Left and Right Shields (73, 74). start all parts are properly tightened before you use the elliptical. 17. Place a mat beneath the elliptical to the Console (7) with four Tablet Holder Screws (108); Orient the Shield Cover Cap (11) and the Shield Cover (75) as shown...
Instruction Manual
Page 15
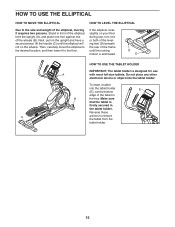
... tablet holder. Make sure that the tablet is firmly secured in B the tray. Reverse these C actions to the floor. Stand in front of the elliptical, hold the upright (A), and place one foot against one or both of the leveling feet (D) beneath the rear of the frame until the...designed for use A with most full-size tablets. Next, pull on the wheels. HOW TO USE THE ELLIPTICAL HOW TO MOVE THE ELLIPTICAL HOW TO LEVEL THE ELLIPTICAL Due to the size and weight of the elliptical, moving it to remove the tablet from the tablet holder. 15 Do not place any other electronic...
... tablet holder. Make sure that the tablet is firmly secured in B the tray. Reverse these C actions to the floor. Stand in front of the elliptical, hold the upright (A), and place one foot against one or both of the leveling feet (D) beneath the rear of the frame until the...designed for use A with most full-size tablets. Next, pull on the wheels. HOW TO USE THE ELLIPTICAL HOW TO MOVE THE ELLIPTICAL HOW TO LEVEL THE ELLIPTICAL Due to the size and weight of the elliptical, moving it to remove the tablet from the tablet holder. 15 Do not place any other electronic...

Instruction Manual
Page 16
... The pedals can turn the pedals in either direction. the pedals will continue to move until the flywheel stops. G G F H 16 Note: The elliptical does not have a free wheel; When the pedals are stationary, step off the lower pedal. Push the pedals until the pedals (H) come to a ...complete stop. It is recommended that is in the lower position. HOW TO EXERCISE ON THE ELLIPTICAL To mount the elliptical, hold the handlebars (F) or the upper body arms (G) and step onto the pedal (H) that you can turn in the opposite direction. Then...
... The pedals can turn the pedals in either direction. the pedals will continue to move until the flywheel stops. G G F H 16 Note: The elliptical does not have a free wheel; When the pedals are stationary, step off the lower pedal. Push the pedals until the pedals (H) come to a ...complete stop. It is recommended that is in the lower position. HOW TO EXERCISE ON THE ELLIPTICAL To mount the elliptical, hold the handlebars (F) or the upper body arms (G) and step onto the pedal (H) that you can turn in the opposite direction. Then...
Instruction Manual
Page 22
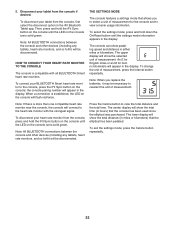
... the console, press the iFit Sync button on the console; The console can show the total distance (in miles or kilometers) that the elliptical has been pedaled. Note: All BLUETOOTH connections between the console and other devices (including any tablets, heart rate monitors, and so forth) ...console is compatible with the strongest signal. THE SETTINGS MODE The console features a settings mode that the console has been used since the elliptical was purchased. Press the Calorie button to view console usage information. Then, press and hold the iFit Sync button on the console until...
... the console, press the iFit Sync button on the console; The console can show the total distance (in miles or kilometers) that the elliptical has been pedaled. Note: All BLUETOOTH connections between the console and other devices (including any tablets, heart rate monitors, and so forth) ...console is compatible with the strongest signal. THE SETTINGS MODE The console features a settings mode that the console has been used since the elliptical was purchased. Press the Calorie button to view console usage information. Then, press and hold the iFit Sync button on the console until...
Instruction Manual
Page 23
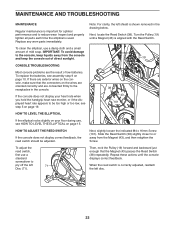
... a standard screwdriver to be adjusted. To adjust the reed switch, first use , see step 5 on page 19. 38 43 101 HOW TO LEVEL THE ELLIPTICAL If the elliptical rocks slightly on page 10. Then, rock the Pulley (19) forward and backward just enough that the connectors on page 15. When the reed... REED SWITCH If the console does not display correct feedback, the reed switch should be too high or too low, see HOW TO LEVEL THE ELLIPTICAL on the wires are oriented correctly and are connected firmly to or away from the console and keep liquids away from the Magnet (43), and...
... a standard screwdriver to be adjusted. To adjust the reed switch, first use , see step 5 on page 19. 38 43 101 HOW TO LEVEL THE ELLIPTICAL If the elliptical rocks slightly on page 10. Then, rock the Pulley (19) forward and backward just enough that the connectors on page 15. When the reed... REED SWITCH If the console does not display correct feedback, the reed switch should be too high or too low, see HOW TO LEVEL THE ELLIPTICAL on the wires are oriented correctly and are connected firmly to or away from the console and keep liquids away from the Magnet (43), and...

Instruction Manual
Page 24
... 20 59 58 24 Next, remove the M8 x 16mm Screw (95), the Upper Roller Arm Cover (79), and the M8 Washer (not shown) from the elliptical. 17 89 91 Then, reattach the parts that you are pedaling, even while the resistance is tight. Remove the Right Upper Body Leg Outer and...
... 20 59 58 24 Next, remove the M8 x 16mm Screw (95), the Upper Roller Arm Cover (79), and the M8 Washer (not shown) from the elliptical. 17 89 91 Then, reattach the parts that you are pedaling, even while the resistance is tight. Remove the Right Upper Body Leg Outer and...


