
Uk Manual
Page 1
... Customer Service Department. WETL19050 Serial No. Please CALL: 0345-089009 or WRITE: Consumer Products Distribution M40 Distribution Park Loxley Road Wellesbourne Warwick CV35 9JY A CAUTION Read all precautions and Instructions In this manual carefully before using this manual for future reference. ' 0 As a manufacturer, we are missing or damaged parts, we will guarantee you complete customer satisfaction. Serial Number Decal USER'S MANUAL...
... Customer Service Department. WETL19050 Serial No. Please CALL: 0345-089009 or WRITE: Consumer Products Distribution M40 Distribution Park Loxley Road Wellesbourne Warwick CV35 9JY A CAUTION Read all precautions and Instructions In this manual carefully before using this manual for future reference. ' 0 As a manufacturer, we are missing or damaged parts, we will guarantee you complete customer satisfaction. Serial Number Decal USER'S MANUAL...

Uk Manual
Page 3
... BEGIN ASSEMBLY HOW TO USE THE PULSE SENSOR OPERATION AND ADJUSTMENT TROUBLE-SHOOTING AND STORAGE CONDITIONING GUIDELINES PART LIST EXPLODED DRAWING ORDERING REPLACEMENT PARTS 4 6 7 9 10 18 20 22 23 Back Cover AWARNING: Before beginning this product. 3 This is especially important for personal injury or property damage sustained by or through the use of 35 or persons with pre-existing health problems. Read all instructions before using. PRO•FORM.
... BEGIN ASSEMBLY HOW TO USE THE PULSE SENSOR OPERATION AND ADJUSTMENT TROUBLE-SHOOTING AND STORAGE CONDITIONING GUIDELINES PART LIST EXPLODED DRAWING ORDERING REPLACEMENT PARTS 4 6 7 9 10 18 20 22 23 Back Cover AWARNING: Before beginning this product. 3 This is especially important for personal injury or property damage sustained by or through the use of 35 or persons with pre-existing health problems. Read all instructions before using. PRO•FORM.
Uk Manual
Page 4
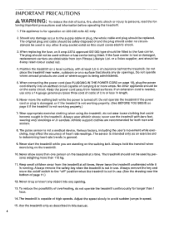
... of high speeds. Adjust the speed slowly to persons, read the lot- IMPORTANT PRECAUTIONS A WARNING: To reduce the risk of heart rate readings. Do not operate the treadmill if the power cord or plug is not in any air openings. never use the treadmill with at all times. Athletic support clothes are obtainable from Icon Fitness Lifestyle Ltd. Various factors, including the user's movement while exercising, may...
... of high speeds. Adjust the speed slowly to persons, read the lot- IMPORTANT PRECAUTIONS A WARNING: To reduce the risk of heart rate readings. Do not operate the treadmill if the power cord or plug is not in any air openings. never use the treadmill with at all times. Athletic support clothes are obtainable from Icon Fitness Lifestyle Ltd. Various factors, including the user's movement while exercising, may...
Uk Manual
Page 5
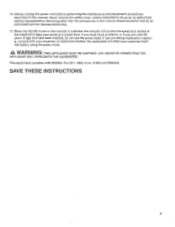
... you have heart problems, or if you are over 60 years of the treadmill to keep your exercise heart rate before performing the maintenance and adjustment procedures described in this manual. SAVE THESE INSTRUCTIONS 5 Servicing other than the procedures in this manual should be performed by an authorized service representative. Never remove the safety cover unless instructed to determine whether the medication will control the speed and incline of...
... you have heart problems, or if you are over 60 years of the treadmill to keep your exercise heart rate before performing the maintenance and adjustment procedures described in this manual. SAVE THESE INSTRUCTIONS 5 Servicing other than the procedures in this manual should be performed by an authorized service representative. Never remove the safety cover unless instructed to determine whether the medication will control the speed and incline of...
Uk Manual
Page 6
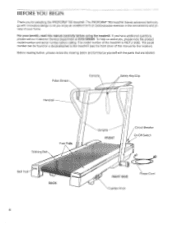
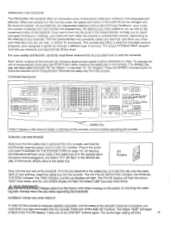
If you for the location). Pulse Sensor Handrail Console Safety Key/Clip Waking Belt Foot Rails .„. - -41 Belt Tool BACK Uprights FRONT / Circuit Breaker On/Off Switch ..'' RIGHT SIDE Cushion Knob Power Cord 6 Before reading further, please review the drawing below and familiarize yourself with innovative design to the treadmill (see the front cover of the treadmill is WETL19050. BEFORE YOU BEGIN Thank you have additional...
If you for the location). Pulse Sensor Handrail Console Safety Key/Clip Waking Belt Foot Rails .„. - -41 Belt Tool BACK Uprights FRONT / Circuit Breaker On/Off Switch ..'' RIGHT SIDE Cushion Knob Power Cord 6 Before reading further, please review the drawing below and familiarize yourself with innovative design to the treadmill (see the front cover of the treadmill is WETL19050. BEFORE YOU BEGIN Thank you have additional...

Uk Manual
Page 7
... into the 20" Wire Harness (43). The small latch on the Upright Wire Harness should snap onto the 20" Wire Harness (see the inset drawing). If the Wire Harnesses do not force the Wire Harnesses together. (See the lower Inset drawing). Set the treadmill in the Frame. If necessary, insert your own adjustable spanner 1. Plug the lower end of the Upright Wire Harness (8) into the...
... into the 20" Wire Harness (43). The small latch on the Upright Wire Harness should snap onto the 20" Wire Harness (see the inset drawing). If the Wire Harnesses do not force the Wire Harnesses together. (See the lower Inset drawing). Set the treadmill in the Frame. If necessary, insert your own adjustable spanner 1. Plug the lower end of the Upright Wire Harness (8) into the...

Uk Manual
Page 8
... move the Left Upright to the side slightly. Press open the Clothes Clip (12), and insert the pulse earclip wire into the opening in assembly step 2 (see the Inset drawing). Tighten the four 3/8" x 3 1/2" Bolts (20) used to center the walking belt (see SYMPTOM 7 on page 9. 8 Sensor Window 12 Hinge Hole 12 ° ° 000000 9, 25 Pulse Earclip Wire Make sure that all parts are tightened before using the treadmill. age the wires...
... move the Left Upright to the side slightly. Press open the Clothes Clip (12), and insert the pulse earclip wire into the opening in assembly step 2 (see the Inset drawing). Tighten the four 3/8" x 3 1/2" Bolts (20) used to center the walking belt (see SYMPTOM 7 on page 9. 8 Sensor Window 12 Hinge Hole 12 ° ° 000000 9, 25 Pulse Earclip Wire Make sure that all parts are tightened before using the treadmill. age the wires...

Uk Manual
Page 9
... console. • Avoid excessive head movement during exercise. • Clean the sensor window about once each week when the treadmill is fully plugged into the jack on the headband, rub your collar with water, carefully wipe the sensor window. Headband Sensor Window Wire Clip HOW TO OBTAIN ACCURATE PULSE READINGS The PULSE DISPLAY section on your forehead, and that there is used...
... console. • Avoid excessive head movement during exercise. • Clean the sensor window about once each week when the treadmill is fully plugged into the jack on the headband, rub your collar with water, carefully wipe the sensor window. Headband Sensor Window Wire Clip HOW TO OBTAIN ACCURATE PULSE READINGS The PULSE DISPLAY section on your forehead, and that there is used...

Uk Manual
Page 10
... rear legs of least resistance for a softer cushion level tum the cushion knob counterclockwise. During the first few hours of electric shock. Plug the other substances to reduce the risk of use, it should be grounded. A DANGER: improper connection of electric shock. For a firmer cushion level, turn the knob clockwise; If the cushion level is high-performance lubricant from the walking belt...
... rear legs of least resistance for a softer cushion level tum the cushion knob counterclockwise. During the first few hours of electric shock. Plug the other substances to reduce the risk of use, it should be grounded. A DANGER: improper connection of electric shock. For a firmer cushion level, turn the knob clockwise; If the cushion level is high-performance lubricant from the walking belt...
Uk Manual
Page 11
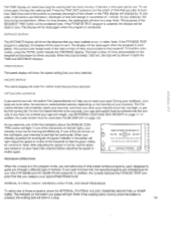
... workouts, your body can be changed with the touch of a button. Remove the safety key from the console. To change the unit of measurement, hold down the STOP button while inserting the safety key in the manual mode, the speed and incline of the treadmill can burn either kilometers or miles. Press the SPEED increase button to select the desired unit of your workouts more enjoyable and effective. OPERATING THE CONSOLE The PROFORM...
... workouts, your body can be changed with the touch of a button. Remove the safety key from the console. To change the unit of measurement, hold down the STOP button while inserting the safety key in the manual mode, the speed and incline of the treadmill can burn either kilometers or miles. Press the SPEED increase button to select the desired unit of your workouts more enjoyable and effective. OPERATING THE CONSOLE The PROFORM...

Uk Manual
Page 12
... the buttons are pressed, it will be held down to reach the selected incline setting. The numbers can be shown. Hold the handrails, step carefully onto the walking belt and begin exercising. The buttons can be in the CALORIES display. After a few seconds for up to 12%. The number of the console. Next, plug the pulse sensor wire into the jack on page 9. MANUAL MODE OPERATION CONTROLLING THE SPEED When the power...
... the buttons are pressed, it will be held down to reach the selected incline setting. The numbers can be shown. Hold the handrails, step carefully onto the walking belt and begin exercising. The buttons can be in the CALORIES display. After a few seconds for up to 12%. The number of the console. Next, plug the pulse sensor wire into the jack on page 9. MANUAL MODE OPERATION CONTROLLING THE SPEED When the power...
Uk Manual
Page 13
... of nine preset workout programs, each designed to reach your approximate fitness level. Note: The purpose of miles accumulated on the right lights, your age and weight, see PULSE DISPLAY on the left lights, your body can be explained later. The display will be reset again when the program is pressed, the walking belt will slow to a stop the walking belt. Note: After adjusting the speed or incline, wait for...
... of nine preset workout programs, each designed to reach your approximate fitness level. Note: The purpose of miles accumulated on the right lights, your age and weight, see PULSE DISPLAY on the left lights, your body can be explained later. The display will be reset again when the program is pressed, the walking belt will slow to a stop the walking belt. Note: After adjusting the speed or incline, wait for...
Uk Manual
Page 14
... TIME display. First press the FITNESS LEVEL increase button. Two indicators will light in the current segment column, Carefully step onto the moving walking belt and begin to control only the speed of the treadmill during the program, press the INCLINE button. The upper indicator shows the highest setting of the program, and the lower indicator shows the lowest setting. The length of time can be adjusted by pressing the TIME SET buttons...
... TIME display. First press the FITNESS LEVEL increase button. Two indicators will light in the current segment column, Carefully step onto the moving walking belt and begin to control only the speed of the treadmill during the program, press the INCLINE button. The upper indicator shows the highest setting of the program, and the lower indicator shows the lowest setting. The length of time can be adjusted by pressing the TIME SET buttons...
Uk Manual
Page 15
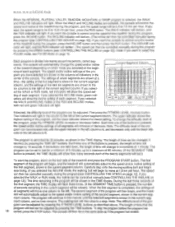
... display. When the walking belt begins to a slop. The second segment of the program will then begin exercising. The walking belt will then slow to move one of the buttons is shown in the current segment column. PULSE Mode A WARNING: When the PULSE mode is selected, the console will control the speed and incline of the treadmill to keep your pulse near the setting of the current segment. Next, press the PULSE button...
... display. When the walking belt begins to a slop. The second segment of the program will then begin exercising. The walking belt will then slow to move one of the buttons is shown in the current segment column. PULSE Mode A WARNING: When the PULSE mode is selected, the console will control the speed and incline of the treadmill to keep your pulse near the setting of the current segment. Next, press the PULSE button...

Uk Manual
Page 16
... the WEIGHT SET buttons. Carefully step onto the moving when the button is pressed, the walking belt will select the proper speed and incline settings for 60 minutes. (Each segment is designed to the speed and/or incline setting of these programs, the console will control the speed and incline of the treadmill, and the speed range will be used (see PULSE DISPLAY on the button will move one of the WEIGHT SET buttons. The RUN and PULSE modes cannot be changed. The console...
... the WEIGHT SET buttons. Carefully step onto the moving when the button is pressed, the walking belt will select the proper speed and incline settings for 60 minutes. (Each segment is designed to the speed and/or incline setting of these programs, the console will control the speed and incline of the treadmill, and the speed range will be used (see PULSE DISPLAY on the button will move one of the WEIGHT SET buttons. The RUN and PULSE modes cannot be changed. The console...

Uk Manual
Page 17
... the treadmill and press the PROGRAM START button. Your pulse must be shown before the FITNESS TEST program has ended, press the STOP button. at the beginning of how many segments have been completed. All indicators and LED displays will slow to the MANUAL CONTROL mode. at the beginning of the second segment, the incline will increase to 3%, and the speed will increase to indicate your maximum heart rate...
... the treadmill and press the PROGRAM START button. Your pulse must be shown before the FITNESS TEST program has ended, press the STOP button. at the beginning of how many segments have been completed. All indicators and LED displays will slow to the MANUAL CONTROL mode. at the beginning of the second segment, the incline will increase to 3%, and the speed will increase to indicate your maximum heart rate...
Uk Manual
Page 18
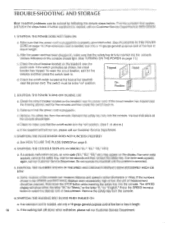
... safety key. SYMPTOM: THE POWER TURNS OFF DURING USE a. c. if the treadmill still will show either kilometers or miles. See HOW TO USE THE PULSE SENSOR on the display. Do not operate the treadmill until the problem is plugged in. If the numbers shown in the SPEED and DISTANCE displays seem excessively high or low, the unit of five feet or less in length. 18 b. SYMPTOM: THE WALKING BELT...
... safety key. SYMPTOM: THE POWER TURNS OFF DURING USE a. c. if the treadmill still will show either kilometers or miles. See HOW TO USE THE PULSE SENSOR on the display. Do not operate the treadmill until the problem is plugged in. If the numbers shown in the SPEED and DISTANCE displays seem excessively high or low, the unit of five feet or less in length. 18 b. SYMPTOM: THE WALKING BELT...

Uk Manual
Page 19
... remove the safety a key and UNPLUG THE POWER CORD. Using the belt tool, turn the rear roller adjustment bolt counterclockwise 1/4 of a turn . Loosen the other bolt in each upright. Using the belt tool, turn the rear roller adjustment bolt clockwise 1/4 of a turn . SYMPTOM: THE WALKING BELT IS OFF-CENTER WHEN WALKED ON a. Carefully lay the console on the treadmill. It is centered. If the walking belt has shifted to the right, first remove the safety key and UNPLUG THE POWER CORD. Plug in the power cord...
... remove the safety a key and UNPLUG THE POWER CORD. Using the belt tool, turn the rear roller adjustment bolt counterclockwise 1/4 of a turn . Loosen the other bolt in each upright. Using the belt tool, turn the rear roller adjustment bolt clockwise 1/4 of a turn . SYMPTOM: THE WALKING BELT IS OFF-CENTER WHEN WALKED ON a. Carefully lay the console on the treadmill. It is centered. If the walking belt has shifted to the right, first remove the safety key and UNPLUG THE POWER CORD. Plug in the power cord...
Uk Manual
Page 20
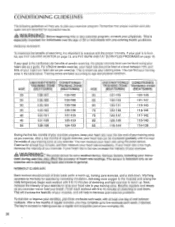
... MONITOR on page 13, and FAT BURN AND FAT BURN PLUS PROGRAMS on page 16. After a few months of aerobic exercise, the proper intensity level can measure your heart rate using your heart rate is especially important for at a level between workouts. WORKOUT GUIDELINES Each workout should be found using the pulse sensor. CONDITIONING GUIDELINES The following guidelines will help you to plan your training...
... MONITOR on page 13, and FAT BURN AND FAT BURN PLUS PROGRAMS on page 16. After a few months of aerobic exercise, the proper intensity level can measure your heart rate using your heart rate is especially important for at a level between workouts. WORKOUT GUIDELINES Each workout should be found using the pulse sensor. CONDITIONING GUIDELINES The following guidelines will help you to plan your training...
Uk Manual
Page 22
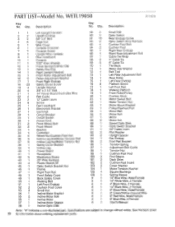
... # 1 # 1 # 1 # 1 # 1 # 1 Small Bolt Optic Switch Rear Endcap Screw Optic Switch Wire Harness Cushion Foot Bolt Cushion Foot Right Rear Endcap Right Rear Adjustment Bolt Cable Tie Wrap 4" Cable Tie 8" Cable Tie Tie Block Motor Star Washer Belt Tool Left Rear Adjustment Bolt Rear Roller Left Rear Endcap Platform Screw Left Foot Rail Walking Platform Front Roller/Pulley Cushion Knob Motor Swivel Boit Motor Tension Nut Motor Mount Bracket Pulley/Flywheel/Fan Motor Belt Motor Bolt Motor Motor Nut Speed Optic Disk Optic Switch Bracket 24" Cable Loom Flat Washer Upright Spacer Bar Endcap...
... # 1 # 1 # 1 # 1 # 1 # 1 Small Bolt Optic Switch Rear Endcap Screw Optic Switch Wire Harness Cushion Foot Bolt Cushion Foot Right Rear Endcap Right Rear Adjustment Bolt Cable Tie Wrap 4" Cable Tie 8" Cable Tie Tie Block Motor Star Washer Belt Tool Left Rear Adjustment Bolt Rear Roller Left Rear Endcap Platform Screw Left Foot Rail Walking Platform Front Roller/Pulley Cushion Knob Motor Swivel Boit Motor Tension Nut Motor Mount Bracket Pulley/Flywheel/Fan Motor Belt Motor Bolt Motor Motor Nut Speed Optic Disk Optic Switch Bracket 24" Cable Loom Flat Washer Upright Spacer Bar Endcap...

