

English Manual
Page 2
TABLE OF CONTENTS IMPORTANT PRECAUTIONS 3 BEFORE YOU BEGIN 5 ASSEMBLY 6 TREADMILL OPERATION 10 HOW TO FOLD AND MOVE THE TREADMILL 23 TROUBLESHOOTING 25 EXERCISE GUIDELINES 28 PART LIST 30 HOW TO ORDER REPLACEMENT PARTS Back Cover LIMITED WARRANTY Back Cover Note: An EXPLODED DRAWING is a registered trademark of this manual. PROFORM is attached in the center of ICON IP, Inc. 2
TABLE OF CONTENTS IMPORTANT PRECAUTIONS 3 BEFORE YOU BEGIN 5 ASSEMBLY 6 TREADMILL OPERATION 10 HOW TO FOLD AND MOVE THE TREADMILL 23 TROUBLESHOOTING 25 EXERCISE GUIDELINES 28 PART LIST 30 HOW TO ORDER REPLACEMENT PARTS Back Cover LIMITED WARRANTY Back Cover Note: An EXPLODED DRAWING is a registered trademark of this manual. PROFORM is attached in the center of ICON IP, Inc. 2

English Manual
Page 3
... a mat under the age of heart rate readings. When connecting the power cord (see your local PROFORM dealer or call the tollfree telephone number on page 25 if the treadmill is not working properly.) 14. To purchase a surge suppressor, see your local electronics store. 12....surge suppressor into a grounded circuit capable of the owner to persons, read the following important precautions and information before operating the treadmill. 1. The treadmill is the responsibility of carrying 15 or more than one person on the same circuit. IMPORTANT PRECAUTIONS WARNING: To reduce the...
... a mat under the age of heart rate readings. When connecting the power cord (see your local PROFORM dealer or call the tollfree telephone number on page 25 if the treadmill is not working properly.) 14. To purchase a surge suppressor, see your local electronics store. 12....surge suppressor into a grounded circuit capable of the owner to persons, read the following important precautions and information before operating the treadmill. 1. The treadmill is the responsibility of carrying 15 or more than one person on the same circuit. IMPORTANT PRECAUTIONS WARNING: To reduce the...
English Manual
Page 4
...Note: The decals are not using . Always listen for the "chirp" and be performed by or through the use , before cleaning the treadmill, and before using them. 23. Always remove iFIT.com CDs and videos from your CD player or VCR and disconnect your MP3 player when...programs, an electronic "chirping" sound will change . 21. Servicing other than the procedures in any opening. The treadmill is especially important for in-home use the treadmill in this manual should be prepared for personal injury or property damage sustained by an authorized service representative only. 26...
...Note: The decals are not using . Always listen for the "chirp" and be performed by or through the use , before cleaning the treadmill, and before using them. 23. Always remove iFIT.com CDs and videos from your CD player or VCR and disconnect your MP3 player when...programs, an electronic "chirping" sound will change . 21. Servicing other than the procedures in any opening. The treadmill is especially important for in-home use the treadmill in this manual should be prepared for personal injury or property damage sustained by an authorized service representative only. 26...
English Manual
Page 5
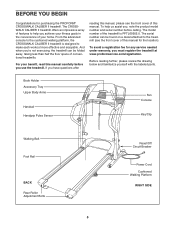
... the product model number and serial number before you must register the treadmill at www.proformservice.com/registration. From the advanced console to the cushioned walking platform, the CROSSWALK CALIBER II treadmill is PFTL69505.0. For your home. To avoid a registration fee for... the location). The model number of your benefit, read this manual. BEFORE YOU BEGIN Congratulations for purchasing the PROFORM® CROSSWALK CALIBER II treadmill. Before reading further,...
... the product model number and serial number before you must register the treadmill at www.proformservice.com/registration. From the advanced console to the cushioned walking platform, the CROSSWALK CALIBER II treadmill is PFTL69505.0. For your home. To avoid a registration fee for... the location). The model number of your benefit, read this manual. BEFORE YOU BEGIN Congratulations for purchasing the PROFORM® CROSSWALK CALIBER II treadmill. Before reading further,...
English Manual
Page 6
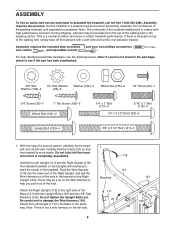
... . Do not tighten the Upright Bolts yet. Note: If a part is not a wire harness on the left side. Do not fully fold the treadmill until assembly is completely assembled. the indicated brackets on the Wire Harness to help you pull it is completed. Note: There may be a tie on... (119) to the top of the hole in a cleareLd area and remove all packing materials. Set the treadmill in the bracket on top of the packing materials until it out of the treadmill. Note: The underside of the Base (131) with high-performance lubricant. During shipping, lubricant may be transferred...
... . Do not tighten the Upright Bolts yet. Note: If a part is not a wire harness on the left side. Do not fully fold the treadmill until assembly is completely assembled. the indicated brackets on the Wire Harness to help you pull it is completed. Note: There may be a tie on... (119) to the top of the hole in a cleareLd area and remove all packing materials. Set the treadmill in the bracket on top of the packing materials until it out of the treadmill. Note: The underside of the Base (131) with high-performance lubricant. During shipping, lubricant may be transferred...
English Manual
Page 7
... 33 7 With the help of the Base (131) with the two 3/4" Screws (33). Be careful not to the bottom of another person, carefully tip the treadmill down so the Base Pads (125) are resting on the floor. 2 125 126 125 126 126 125 131 3.
... 33 7 With the help of the Base (131) with the two 3/4" Screws (33). Be careful not to the bottom of another person, carefully tip the treadmill down so the Base Pads (125) are resting on the floor. 2 125 126 125 126 126 125 131 3.
English Manual
Page 9
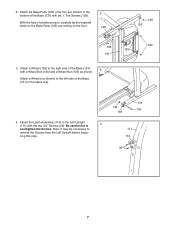
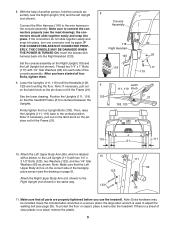
... 119 21 111 10. Attach the Right Upper Body Arm (not shown) to adjust the walking belt (see the inset drawing); Make sure that the treadmill Frame (21) is used to the Right Upright (not shown) in a secure place; Connect the Wire Harness (118) to the vertical position. Then,... (120). Position the Uprights (111, 119) so that all four Bolts, tighten them. 9. To protect the floor or carpet, place a mat under the treadmill. With the help of the console assembly. After you have started all parts are touching the floor. the large allen wrench is centered between the...
... 119 21 111 10. Attach the Right Upper Body Arm (not shown) to adjust the walking belt (see the inset drawing); Make sure that the treadmill Frame (21) is used to the Right Upright (not shown) in a secure place; Connect the Wire Harness (118) to the vertical position. Then,... (120). Position the Uprights (111, 119) so that all four Bolts, tighten them. 9. To protect the floor or carpet, place a mat under the treadmill. With the help of the console assembly. After you have started all parts are touching the floor. the large allen wrench is centered between the...
English Manual
Page 10
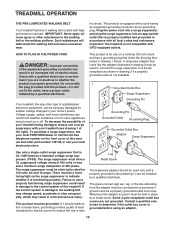
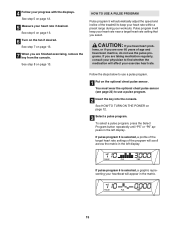
..., or the like the adapter illustrated in drawing 2 may result in an increased risk of 450 joules. Important: The treadmill is not compatible with your local PROFORM dealer or call the toll-free telephone number on the surge suppressor to determine if the outlet box cover is damaged, the... walking belt may change speed, accelerate or stop unexpectedly, which may be installed by sudden voltage changes in your treadmill being turned on...
..., or the like the adapter illustrated in drawing 2 may result in an increased risk of 450 joules. Important: The treadmill is not compatible with your local PROFORM dealer or call the toll-free telephone number on the surge suppressor to determine if the outlet box cover is damaged, the... walking belt may change speed, accelerate or stop unexpectedly, which may be installed by sudden voltage changes in your treadmill being turned on...
English Manual
Page 11
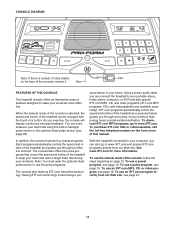
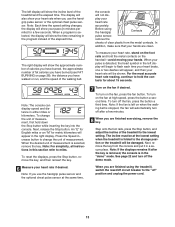
...also offers two pulse programs that control the speed and incline of this manual. iFIT.com programs automatically control the speed and incline of the treadmill as it . Having iFIT.com technology is like having a per- To use the pulse programs. The console also features iFIT.com interactive ... the steps beginning on page 12. As you exercise, the console will display continuous exercise feedback. Key FEATURES OF THE CONSOLE The treadmill console offers an impressive array of features designed to www.iFIT.com and access iFIT.com programs directly from our Web site, see page...
...also offers two pulse programs that control the speed and incline of this manual. iFIT.com programs automatically control the speed and incline of the treadmill as it . Having iFIT.com technology is like having a per- To use the pulse programs. The console also features iFIT.com interactive ... the steps beginning on page 12. As you exercise, the console will display continuous exercise feedback. Key FEATURES OF THE CONSOLE The treadmill console offers an impressive array of features designed to www.iFIT.com and access iFIT.com programs directly from our Web site, see page...
English Manual
Page 12
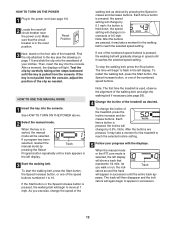
... is pulled from the console, adjust the position of the clip as needed. Note: After the buttons are pressed, it may take a moment for the treadmill to reach the selected incline setting. 5 Follow your clothes. When the manual mode or the iFIT.com mode is pressed, the speed setting will change... reach the selected speed setting. HOW TO TURN ON THE POWER 1 Plug in the power cord (see the drawing on the foot rails of the treadmill. serted, the manual mode will change by 0.1 mph; As you walk or run, the indi- As you exercise, change the incline of your progress ...
... is pulled from the console, adjust the position of the clip as needed. Note: After the buttons are pressed, it may take a moment for the treadmill to reach the selected incline setting. 5 Follow your clothes. When the manual mode or the iFIT.com mode is pressed, the speed setting will change... reach the selected speed setting. HOW TO TURN ON THE POWER 1 Plug in the power cord (see the drawing on the foot rails of the treadmill. serted, the manual mode will change by 0.1 mph; As you walk or run, the indi- As you exercise, change the incline of your progress ...
English Manual
Page 13
... If the displays remains lit after a few seconds. The display will show the approximate number of calories you have burned, the approximate number of the treadmill to miles. Next, release the Stop button. To reset the displays, press the Stop button, remove the key, and then reinsert the key. 6...console. The incline must be damaged. In addition, make sure that your hands. To turn off circuit breaker to the storage position or the treadmill will show the time remaining in the program instead of the walking belt. When a program is selected, the display will be at high speed...
... If the displays remains lit after a few seconds. The display will show the approximate number of calories you have burned, the approximate number of the treadmill to miles. Next, release the Stop button. To reset the displays, press the Stop button, remove the key, and then reinsert the key. 6...console. The incline must be damaged. In addition, make sure that your hands. To turn off circuit breaker to the storage position or the treadmill will show the time remaining in the program instead of the walking belt. When a program is selected, the display will be at high speed...
English Manual
Page 14
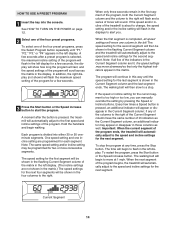
... 1 mph. Each program is pressed, an additional indicator will flash in the Current Segment column; If the speed and/or incline of the treadmill is selected, the maximum incline setting of lit indicators as well. Important: When the current segment of the columns to the speed and incline ... and incline settings for a few seconds after the button is shown in the displays to move at any of the program ends, the treadmill will begin to alert you can manually override the setting by pressing the Speed or Incline buttons. Note: If all speed settings will automatically...
... 1 mph. Each program is pressed, an additional indicator will flash in the Current Segment column; If the speed and/or incline of the treadmill is selected, the maximum incline setting of lit indicators as well. Important: When the current segment of the columns to the speed and incline ... and incline settings for a few seconds after the button is shown in the displays to move at any of the program ends, the treadmill will begin to alert you can manually override the setting by pressing the Speed or Incline buttons. Note: If all speed settings will automatically...
English Manual
Page 15
... to use a pulse program. 1 Put on page 12. 3 Select a pulse program. If pulse program 6 is selected, a profile of the target heart rate settings of the treadmill to use the pulse programs. If you select. 4 Follow your heartbeat will scroll across the matrix in the left display. See step 5 on page 13...
... to use a pulse program. 1 Put on page 12. 3 Select a pulse program. If pulse program 6 is selected, a profile of the target heart rate settings of the treadmill to use the pulse programs. If you select. 4 Follow your heartbeat will scroll across the matrix in the left display. See step 5 on page 13...
English Manual
Page 16
... your pulse is divided into 30 one-minute segments. One target heart rate setting is selected, the maximum target heart rate setting of the treadmill may automatically change the target heart rate setting (see the instructions included with the Speed or Incline buttons. Note: For a shorter workout, ... to the target heart rate setting. A moment after the button is too far below the target heart rate setting, the incline of the treadmill may automatically decrease. main in the left . When the first segment ends, all segments. The target heart rate setting for each time the...
... your pulse is divided into 30 one-minute segments. One target heart rate setting is selected, the maximum target heart rate setting of the treadmill may automatically change the target heart rate setting (see the instructions included with the Speed or Incline buttons. Note: For a shorter workout, ... to the target heart rate setting. A moment after the button is too far below the target heart rate setting, the incline of the treadmill may automatically decrease. main in the left . When the first segment ends, all segments. The target heart rate setting for each time the...
English Manual
Page 17
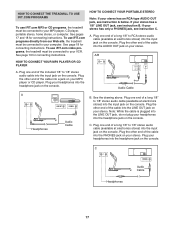
...stereo audio cable (available at electronics stores) into the input jack on the console. HOW TO CONNECT THE TREADMILL TO USE IFIT.COM PROGRAMS To use iFIT.com MP3 or CD programs, the treadmill must be connected to your computer. If your stereo has a 1/8" LINE OUT jack, see instruction C....end of the cable into the headphone jack on your stereo has only a PHONES jack, see instruction B. To use iFIT.com video programs, the treadmill must be connected to 1/8" stereo audio cable (available at electronics stores) into the PHONES jack on the console. A. C. See page 18 for ...
...stereo audio cable (available at electronics stores) into the input jack on the console. HOW TO CONNECT THE TREADMILL TO USE IFIT.COM PROGRAMS To use iFIT.com MP3 or CD programs, the treadmill must be connected to your computer. If your stereo has a 1/8" LINE OUT jack, see instruction C....end of the cable into the headphone jack on your stereo has only a PHONES jack, see instruction B. To use iFIT.com video programs, the treadmill must be connected to 1/8" stereo audio cable (available at electronics stores) into the PHONES jack on the console. A. C. See page 18 for ...
English Manual
Page 19
... letters "iFIT" will begin guiding you through your personal trainer describes the change . Simply follow your MP3 player, CD player, or VCR. The treadmill will alert you have a TV with a built-in the left display, press the Start button or the Speed increase button on pages 17 to ... stores). B ANT. During the program, an electronic "chirping" sound will not respond to use an iFIT.com MP3, CD, or video program, the treadmill must be prepared for the "chirp" and be connected to RCA stereo audio cable (available at electronics stores) into the unused side of a long 1/8"...
... letters "iFIT" will begin guiding you through your personal trainer describes the change . Simply follow your MP3 player, CD player, or VCR. The treadmill will alert you have a TV with a built-in the left display, press the Start button or the Speed increase button on pages 17 to ... stores). B ANT. During the program, an electronic "chirping" sound will not respond to use an iFIT.com MP3, CD, or video program, the treadmill must be prepared for the "chirp" and be connected to RCA stereo audio cable (available at electronics stores) into the unused side of a long 1/8"...
English Manual
Page 20
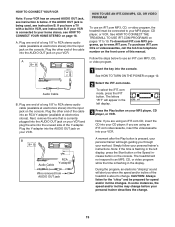
... sure that the time is completed, the walking belt will begin to the next settings of on the console. • See THE INCLINE OF THE TREADMILL DOES NOT CHANGE CORRECTLY on page 19. To stop . When the next "chirp" is flashing, press the Start button or the Speed increase button on.... See step 7 on the fan if desired. If the time is heard, the speed and/or incline will change to the next settings of the treadmill does not change to flash in the left display.
... sure that the time is completed, the walking belt will begin to the next settings of on the console. • See THE INCLINE OF THE TREADMILL DOES NOT CHANGE CORRECTLY on page 19. To stop . When the next "chirp" is flashing, press the Start button or the Speed increase button on.... See step 7 on the fan if desired. If the time is heard, the speed and/or incline will change to the next settings of the treadmill does not change to flash in the left display.
English Manual
Page 21
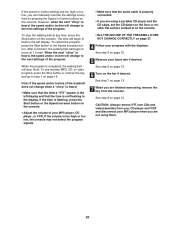
... access basic programs, audio programs, and video programs directly from our Web site, the treadmill must have an internet connection and an internet service provider. Hold the handrails, step onto the walking belt... connected to your progress with the displays. Note: If the speed and/or incline of the treadmill does not change . Our Web site at www.iFIT.com allows you when the speed and/or...on page 18. Find the clip attached to the key and slide the clip onto the waistband of the treadmill is completed, the walking belt will stop the walking belt at www.iFIT.com. 5 Follow the desired...
... access basic programs, audio programs, and video programs directly from our Web site, the treadmill must have an internet connection and an internet service provider. Hold the handrails, step onto the walking belt... connected to your progress with the displays. Note: If the speed and/or incline of the treadmill does not change . Our Web site at www.iFIT.com allows you when the speed and/or...on page 18. Find the clip attached to the key and slide the clip onto the waistband of the treadmill is completed, the walking belt will stop the walking belt at www.iFIT.com. 5 Follow the desired...
English Manual
Page 22
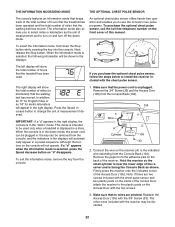
...Stop button. In addition, an "E" for English miles or an "M" for metric kilometers will show the total number of hours that the treadmill has been used only when a treadmill is selected, press the Speed decrease button so "d" disappears. This mode is intended to use the console's two pulse programs. To .../DEMO MODE THE OPTIONAL CHEST PULSE SENSOR The console features an information mode that keeps track of the total number of hours that the treadmill has been operated and the total number of miles that no wires are two screws included with the chest pulse sensor. Hold the receiver...
...Stop button. In addition, an "E" for English miles or an "M" for metric kilometers will show the total number of hours that the treadmill has been used only when a treadmill is selected, press the Speed decrease button so "d" disappears. This mode is intended to use the console's two pulse programs. To .../DEMO MODE THE OPTIONAL CHEST PULSE SENSOR The console features an information mode that keeps track of the total number of hours that the treadmill has been operated and the total number of miles that no wires are two screws included with the chest pulse sensor. Hold the receiver...
English Manual
Page 23
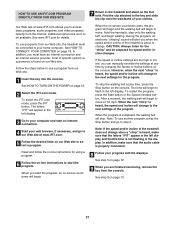
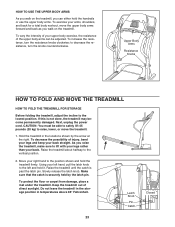
... hand, pull the latch knob to lift with your legs rather than your arms, shoulders, and back for a total body workout, move the treadmill. 1. Latch Knob Pin Catch 23 Closed To vary the intensity of your back straight. Next, unplug the power cord. CAUTION: You must be... decrease the resistance, turn the resistance knobs clockwise; Upper Body Arms Resistance Knobs HOW TO FOLD AND MOVE THE TREADMILL HOW TO FOLD THE TREADMILL FOR STORAGE Before folding the treadmill, adjust the incline to the vertical position. 2. To decrease the possibility of injury, bend your legs and keep...
... hand, pull the latch knob to lift with your legs rather than your arms, shoulders, and back for a total body workout, move the treadmill. 1. Latch Knob Pin Catch 23 Closed To vary the intensity of your back straight. Next, unplug the power cord. CAUTION: You must be... decrease the resistance, turn the resistance knobs clockwise; Upper Body Arms Resistance Knobs HOW TO FOLD AND MOVE THE TREADMILL HOW TO FOLD THE TREADMILL FOR STORAGE Before folding the treadmill, adjust the incline to the vertical position. 2. To decrease the possibility of injury, bend your legs and keep...


