
English Manual
Page 2
...could become caught in this manual. 4. If the seat pin is the responsibility of the owner to ensure that all users of the exercise bike are not on a level surface. 6. If the link arms are adequately informed of all instructions before using this product. ICON assumes... injury or property 2 damage sustained by or through the use . Keep small children and pets away from the front, as described in the exercise bike. TABLE OF CONTENTS IMPORTANT SAFETY PRECAUTIONS 2 BEFORE YOU BEGIN 3 PART CHART 4 ASSEMBLY 5 ADJUSTMENT AND OPERATION 8 TROUBLE-SHOOTING AND MAINTENANCE 11 ...
...could become caught in this manual. 4. If the seat pin is the responsibility of the owner to ensure that all users of the exercise bike are not on a level surface. 6. If the link arms are adequately informed of all instructions before using this product. ICON assumes... injury or property 2 damage sustained by or through the use . Keep small children and pets away from the front, as described in the exercise bike. TABLE OF CONTENTS IMPORTANT SAFETY PRECAUTIONS 2 BEFORE YOU BEGIN 3 PART CHART 4 ASSEMBLY 5 ADJUSTMENT AND OPERATION 8 TROUBLE-SHOOTING AND MAINTENANCE 11 ...
English Manual
Page 3
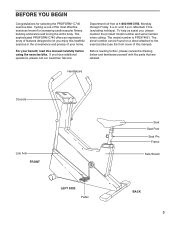
... exercises known for selecting the PROFORM® C740 exercise bike. The serial number can be found on a decal attached to let you enjoy this healthful exercise in the convenience and privacy of this manual carefully before using the exercise bike. For your home. The sophisticated PROFORM C740 ...offers an impressive array of features designed to the exercise bike (see the front cover of your benefit...
... exercises known for selecting the PROFORM® C740 exercise bike. The serial number can be found on a decal attached to let you enjoy this healthful exercise in the convenience and privacy of this manual carefully before using the exercise bike. For your home. The sophisticated PROFORM C740 ...offers an impressive array of features designed to the exercise bike (see the front cover of your benefit...
English Manual
Page 5
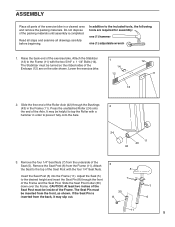
Read all steps and examine all parts of the exercise bike in a cleared area and remove the packing materials. It may slip out. 8 6 11 5 Remove the four 1/4" Seat Nuts (7) from the front, as shown. The Seat ... ribbed sides of the Frame and the Seat Post. Press the unattached Roller (24) onto the end of the exercise bike. Slide the Seat Post Collar (30) down over the Frame. Lower the exercise bike. 1 14 12 12 11 13 2. Slide the free end of the Roller Axle (42) through the front 7 of the...
Read all steps and examine all parts of the exercise bike in a cleared area and remove the packing materials. It may slip out. 8 6 11 5 Remove the four 1/4" Seat Nuts (7) from the front, as shown. The Seat ... ribbed sides of the Frame and the Seat Post. Press the unattached Roller (24) onto the end of the exercise bike. Slide the Seat Post Collar (30) down over the Frame. Lower the exercise bike. 1 14 12 12 11 13 2. Slide the free end of the Roller Axle (42) through the front 7 of the...

English Manual
Page 8
As you pedal, there should be adjusted to the proper height. Dismount the exercise bike. The Seat Pin must be inside of the Frame. Lift each Link ... the Seat Pin through the Frame (11) and the Seat Post (6). ADJUSTMENT AND OPERATION SEAT ADJUSTMENT 5 For effective exercise, the Seat (5) should be a slight bend in the stationary mode, the link arms must be disconnected from the ... modes: the dual-action mode, for lower- See drawing 2 above . or the rowing mode, for lower-body exercise; See DUAL-ACTION 8 MODE above. If the Seat Pin is inserted 11 from the front, as shown. It ...
As you pedal, there should be adjusted to the proper height. Dismount the exercise bike. The Seat Pin must be inside of the Frame. Lift each Link ... the Seat Pin through the Frame (11) and the Seat Post (6). ADJUSTMENT AND OPERATION SEAT ADJUSTMENT 5 For effective exercise, the Seat (5) should be a slight bend in the stationary mode, the link arms must be disconnected from the ... modes: the dual-action mode, for lower- See drawing 2 above . or the rowing mode, for lower-body exercise; See DUAL-ACTION 8 MODE above. If the Seat Pin is inserted 11 from the front, as shown. It ...
English Manual
Page 9
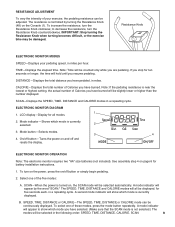
... order: SPEED, TIME, DISTANCE, CALORIE, SCAN. 9 IMPORTANT: Stop turning the Resistance Knob when turning becomes difficult, or the exercise bike may be continuously displayed. DISTANCE-Displays the total distance you have burned will be slightly lower or higher than the number displayed. SCAN... The modes will be selected in miles. A mode indicator will be adjusted. Resistance Knob ELECTRONIC MONITOR MODES SPEED-Displays your exercise, the pedaling resistance can be damaged. CALORIE-Displays the total number of Calories you have selected. (Make sure that the SCAN...
... order: SPEED, TIME, DISTANCE, CALORIE, SCAN. 9 IMPORTANT: Stop turning the Resistance Knob when turning becomes difficult, or the exercise bike may be continuously displayed. DISTANCE-Displays the total distance you have burned will be slightly lower or higher than the number displayed. SCAN... The modes will be selected in miles. A mode indicator will be adjusted. Resistance Knob ELECTRONIC MONITOR MODES SPEED-Displays your exercise, the pedaling resistance can be damaged. CALORIE-Displays the total number of Calories you have selected. (Make sure that the SCAN...
English Manual
Page 11
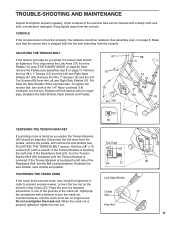
... x 16 Locknut (31) with a hammer to prevent excessive wear. Reattach the side shields, neck shields and pedals. Slide the Side Shields off the exercise bike. If the Tension Bracket is centered. Place the end of the Crank (27). Keep liquids away from the Left and Right Neck Shields (67, 68...) (see assembly step 8 on the left side of the Resistance Disk, turn both of the 1/4" Nylon Locknuts (18) clockwise one of the exercise bike can be adjusted. When the crank nut is touching the left arm of a standard screwdriver in one full turn the Tension Bracket Bolt (60) clockwise...
... x 16 Locknut (31) with a hammer to prevent excessive wear. Reattach the side shields, neck shields and pedals. Slide the Side Shields off the exercise bike. If the Tension Bracket is centered. Place the end of the Crank (27). Keep liquids away from the Left and Right Neck Shields (67, 68...) (see assembly step 8 on the left side of the Resistance Disk, turn both of the 1/4" Nylon Locknuts (18) clockwise one of the exercise bike can be adjusted. When the crank nut is touching the left arm of a standard screwdriver in one full turn the Tension Bracket Bolt (60) clockwise...
English Manual
Page 16
... repairs not provided by sufficient proof of purchase. ACCORDINGLY, THE ABOVE LIMITATION MAY NOT APPLY TO YOU. until 6 p.m. The MODEL NUMBER of the product (PROFORM® C740 exercise bike). 3. ICON IS NOT RESPONSIBLE OR LIABLE FOR INDIRECT, SPECIAL OR CONSEQUENTIAL DAMAGES ARISING OUT OF OR IN CONNECTION WITH THE USE OR PERFORMANCE OF THE...
... repairs not provided by sufficient proof of purchase. ACCORDINGLY, THE ABOVE LIMITATION MAY NOT APPLY TO YOU. until 6 p.m. The MODEL NUMBER of the product (PROFORM® C740 exercise bike). 3. ICON IS NOT RESPONSIBLE OR LIABLE FOR INDIRECT, SPECIAL OR CONSEQUENTIAL DAMAGES ARISING OUT OF OR IN CONNECTION WITH THE USE OR PERFORMANCE OF THE...


