
English Manual
Page 3
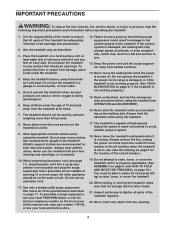
... be on page 11. Always hold the handrails while using the treadmill. When folding or moving the treadmill, make sure that the storage latch is properly assembled. (See ASSEMBLY on page 6, and HOW TO FOLD AND MOVE THE TREADMILL on page 19.) You must be able to safely lift 45 pounds... Never insert any object into a grounded circuit capable of this treadmill are used by persons weighing more than one person on each side. Use the treadmill only as described. 3. When connecting the power cord (see your local PROFORM dealer or call the toll-free telephone number on a level ...
... be on page 11. Always hold the handrails while using the treadmill. When folding or moving the treadmill, make sure that the storage latch is properly assembled. (See ASSEMBLY on page 6, and HOW TO FOLD AND MOVE THE TREADMILL on page 19.) You must be able to safely lift 45 pounds... Never insert any object into a grounded circuit capable of this treadmill are used by persons weighing more than one person on each side. Use the treadmill only as described. 3. When connecting the power cord (see your local PROFORM dealer or call the toll-free telephone number on a level ...
English Manual
Page 6
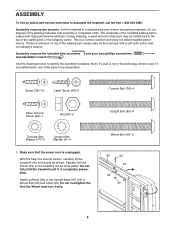
...)-10 Latch Screw (46)-2 Console Bolt (76)-4 Silver Ground Screw (23)-1 Nut (20)-2 Upright Bolt (80)-4 Console Star Washer (77)-4 Upright Star Washer (4)-4 Wheel Bolt (90)-2 1. With the help of lubricant may be more stable. ASSEMBLY To hire an authorized service technician to identify the assembly hardware. Use the drawings below to assemble the treadmill...
...)-10 Latch Screw (46)-2 Console Bolt (76)-4 Silver Ground Screw (23)-1 Nut (20)-2 Upright Bolt (80)-4 Console Star Washer (77)-4 Upright Star Washer (4)-4 Wheel Bolt (90)-2 1. With the help of lubricant may be more stable. ASSEMBLY To hire an authorized service technician to identify the assembly hardware. Use the drawings below to assemble the treadmill...

English Manual
Page 9
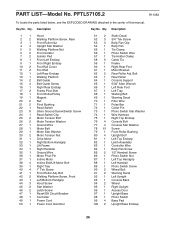
...Uprights back to the Left Upright (92) 9 with the two Latch Screws (46); Attach the Latch Assembly (82) to the vertical position. 80 Handrail 92, 95 Top View 95 92 59 9. Make sure that the treadmill Frame (59) is used to remove the Latch Screws from the Left Upright before you use the... treadmill. Lower the Uprights (92, 95) until the handrails are ...
...Uprights back to the Left Upright (92) 9 with the two Latch Screws (46); Attach the Latch Assembly (82) to the vertical position. 80 Handrail 92, 95 Top View 95 92 59 9. Make sure that the treadmill Frame (59) is used to remove the Latch Screws from the Left Upright before you use the... treadmill. Lower the Uprights (92, 95) until the handrails are ...
English Manual
Page 26
... Right Top Endcap 76 4 Console Bolt 77 4 Console Star Washer 78 61 Screw 79 1 Front Roller Bushing 80 4 Upright Bolt 81 1 Left Top Endcap 82 1 Latch Assembly 83 1 Controller Wire 84 1 Belly Pan Screw 85 2 1/2" Handrail Screw 86 1 Photo Switch Nut 87 1 Left Top Handgrip 88 1 Left Handrail 89 1 Photo ... 4 1" Tek Screw 41 1 Front Roller Adj. Bolt 42 2 Walking Platform Screw, Front 43 1 Left Bottom Handgrip 44 3 Hood Screw 45 2 Star Washer 46 2 Latch Screw 47 1 Reset/Off Circuit Breaker 48 1 Controller 49 1 Power Cord 50 1 Power Cord Grommet 51 2 Static Decal 52 3 3/4" Tek Screw 53 3 Belly Pan ...
... Right Top Endcap 76 4 Console Bolt 77 4 Console Star Washer 78 61 Screw 79 1 Front Roller Bushing 80 4 Upright Bolt 81 1 Left Top Endcap 82 1 Latch Assembly 83 1 Controller Wire 84 1 Belly Pan Screw 85 2 1/2" Handrail Screw 86 1 Photo Switch Nut 87 1 Left Top Handgrip 88 1 Left Handrail 89 1 Photo ... 4 1" Tek Screw 41 1 Front Roller Adj. Bolt 42 2 Walking Platform Screw, Front 43 1 Left Bottom Handgrip 44 3 Hood Screw 45 2 Star Washer 46 2 Latch Screw 47 1 Reset/Off Circuit Breaker 48 1 Controller 49 1 Power Cord 50 1 Power Cord Grommet 51 2 Static Decal 52 3 3/4" Tek Screw 53 3 Belly Pan ...


