
English Manual
Page 3
.... When connecting the power cord (see page 11), plug the power cord into a surge suppressor (not included) and plug the surge suppressor into any surface that all times. 7. If the control system is the responsibility of the owner to ensure that blocks air openings. Do not attempt to raise, lower, or move the treadmill. 20. It is damaged, the walking belt may change speed, accelerate, or stop procedure...
.... When connecting the power cord (see page 11), plug the power cord into a surge suppressor (not included) and plug the surge suppressor into any surface that all times. 7. If the control system is the responsibility of the owner to ensure that blocks air openings. Do not attempt to raise, lower, or move the treadmill. 20. It is damaged, the walking belt may change speed, accelerate, or stop procedure...
English Manual
Page 4
... decal in this manual and order a free replacement decal. Note: The decals are not shown at actual size. 4 Servicing other than the procedures in -home use , before cleaning the treadmill, and before using. This is especially important for in this or any exercise program, consult your treadmill. This treadmill is not legible, please call the toll-free telephone number on your physician. less instructed to do...
... decal in this manual and order a free replacement decal. Note: The decals are not shown at actual size. 4 Servicing other than the procedures in -home use , before cleaning the treadmill, and before using. This is especially important for in this or any exercise program, consult your treadmill. This treadmill is not legible, please call the toll-free telephone number on your physician. less instructed to do...
English Manual
Page 5
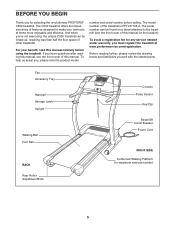
... any service needed under warranty, you for maximum exercise comfort 5 And when you're not exercising, the unique C500 treadmill can be folded up, requiring less than half the floor space of this manual for the location). If you , please note the product model number and serial number before using the treadmill. Fan Accessory Tray Handrail Storage Latch Upright Walking Belt Foot Rail BACK Rear Roller Adjustment Bolts Console Pulse Sensor Key/Clip Reset/Off Circuit Breaker Power Cord RIGHT SIDE Cushioned Walking Platform...
... any service needed under warranty, you for maximum exercise comfort 5 And when you're not exercising, the unique C500 treadmill can be folded up, requiring less than half the floor space of this manual for the location). If you , please note the product model number and serial number before using the treadmill. Fan Accessory Tray Handrail Storage Latch Upright Walking Belt Foot Rail BACK Rear Roller Adjustment Bolts Console Pulse Sensor Key/Clip Reset/Off Circuit Breaker Power Cord RIGHT SIDE Cushioned Walking Platform...
English Manual
Page 6
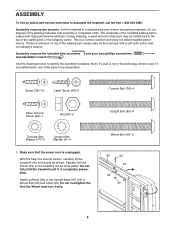
... Nut; Screw (78)-10 Latch Screw (46)-2 Console Bolt (76)-4 Silver Ground Screw (23)-1 Nut (20)-2 Upright Bolt (80)-4 Console Star Washer (77)-4 Upright Star Washer (4)-4 Wheel Bolt (90)-2 1. Set the treadmill in the parts bag, check to see if it is unplugged. This is preattached to one of the walking belt or the shipping carton. ASSEMBLY To hire an authorized service technician to assemble the treadmill, call toll-free 1-800...
... Nut; Screw (78)-10 Latch Screw (46)-2 Console Bolt (76)-4 Silver Ground Screw (23)-1 Nut (20)-2 Upright Bolt (80)-4 Console Star Washer (77)-4 Upright Star Washer (4)-4 Wheel Bolt (90)-2 1. Set the treadmill in the parts bag, check to see if it is unplugged. This is preattached to one of the walking belt or the shipping carton. ASSEMBLY To hire an authorized service technician to assemble the treadmill, call toll-free 1-800...

English Manual
Page 7
... Slot 71 Pulse Wire Ground Wire Posts 78 78 95 92 4. Do not tighten the Upright Bolts yet. With the help of the Pulse Bar Top against the Upright Base (97). See inset drawing 3a. Make sure that the ground wire is routed above . Attach the ring on the Right Upright (95) with a 4 Silver Ground Screw (23). 2. Note: There is turned as shown. Attach the other...
... Slot 71 Pulse Wire Ground Wire Posts 78 78 95 92 4. Do not tighten the Upright Bolts yet. With the help of the Pulse Bar Top against the Upright Base (97). See inset drawing 3a. Make sure that the ground wire is routed above . Attach the ring on the Right Upright (95) with a 4 Silver Ground Screw (23). 2. Note: There is turned as shown. Attach the other...

English Manual
Page 8
... press the Left Top Endcap into place, turn one connector and try again to insert it. Hold the pulse bar bottom against the Pulse Bar Top (71). Drawing 6b shows an incorrect route. Tighten the two Console Bolts indicated by the arrows first, and tighten the center Screws last. Attach the pulse bar bottom with four Console Star Washers (77) into the Right Upright (95). Insert the Wire...
... press the Left Top Endcap into place, turn one connector and try again to insert it. Hold the pulse bar bottom against the Pulse Bar Top (71). Drawing 6b shows an incorrect route. Tighten the two Console Bolts indicated by the arrows first, and tighten the center Screws last. Attach the pulse bar bottom with four Console Star Washers (77) into the Right Upright (95). Insert the Wire...
English Manual
Page 11
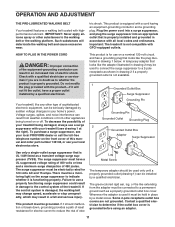
... injury. Lug Metal Screw The temporary adapter should malfunction or break down, grounding provides a path of least resistance for electric current to reduce the risk of the treadmill. Whenever the adapter is properly installed and grounded in drawing 1 below. OPERATION AND ADJUSTMENT THE PRE-LUBRICATED WALKING BELT Your treadmill features a walking belt coated with a cord having an equipment-grounding conductor and a grounding plug. Do not...
... injury. Lug Metal Screw The temporary adapter should malfunction or break down, grounding provides a path of least resistance for electric current to reduce the risk of the treadmill. Whenever the adapter is properly installed and grounded in drawing 1 below. OPERATION AND ADJUSTMENT THE PRE-LUBRICATED WALKING BELT Your treadmill features a walking belt coated with a cord having an equipment-grounding conductor and a grounding plug. Do not...

English Manual
Page 12
... pulse sensor or the optional chest pulse sensor (see page 18). Key Clip FEATURES OF THE CONSOLE The treadmill console offers an impressive array of features designed to use the pulse control programs. To use a pulse control program, see page 15. You can be changed with the touch of a button. In addition, the console features six preset programs. Each program automatically controls the speed and incline of the treadmill to keep your heart rate near a target heart rate setting during your workouts. CONSOLE DIAGRAM...
... pulse sensor or the optional chest pulse sensor (see page 18). Key Clip FEATURES OF THE CONSOLE The treadmill console offers an impressive array of features designed to use the pulse control programs. To use a pulse control program, see page 15. You can be changed with the touch of a button. In addition, the console features six preset programs. Each program automatically controls the speed and incline of the treadmill to keep your heart rate near a target heart rate setting during your workouts. CONSOLE DIAGRAM...
English Manual
Page 13
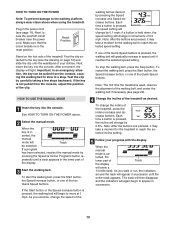
... incline of the display. 3 Start the walking belt. Plug in - To start the walking belt, press the Start button, the Speed increase button, or one of the treadmill, press the Incline increase and decrease buttons. Note: The first time the treadmill is se- lected, the lower part of Track the display will change the incline of the Quick Speed buttons. HOW TO TURN ON THE POWER Note: To prevent damage to the key (see page 11). if a button is in the power cord...
... incline of the display. 3 Start the walking belt. Plug in - To start the walking belt, press the Start button, the Speed increase button, or one of the treadmill, press the Incline increase and decrease buttons. Note: The first time the treadmill is se- lected, the lower part of Track the display will change the incline of the Quick Speed buttons. HOW TO TURN ON THE POWER Note: To prevent damage to the key (see page 11). if a button is in the power cord...
English Manual
Page 14
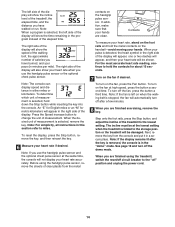
... button a second time. Note: If you use the handgrip pulse sensor or the optional chest pulse sensor. Before using the treadmill, switch the reset/off circuit breaker to miles. The right side of the display will show the speed of the walking belt, the approximate number of calories you have walked or run. For the most accurate heart rate reading, continue to the storage position or the treadmill will be shown. To turn...
... button a second time. Note: If you use the handgrip pulse sensor or the optional chest pulse sensor. Before using the treadmill, switch the reset/off circuit breaker to miles. The right side of the display will show the speed of the walking belt, the approximate number of calories you have walked or run. For the most accurate heart rate reading, continue to the storage position or the treadmill will be shown. To turn...

English Manual
Page 15
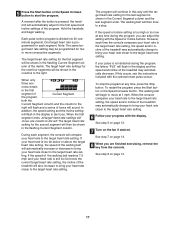
... Segment column and the treadmill will then be programmed for the second segment. The walking belt will automatically adjust to alert you can manually override the setting by pressing the Speed or Incline buttons. When the next segment of the display will continue in this way until the speed setting for the last segment is about to change, the speed setting and/or incline setting will appear or disappear...
... Segment column and the treadmill will then be programmed for the second segment. The walking belt will automatically adjust to alert you can manually override the setting by pressing the Speed or Incline buttons. When the next segment of the display will continue in this way until the speed setting for the last segment is about to change, the speed setting and/or incline setting will appear or disappear...

English Manual
Page 16
.... 3 Select a pulse control program. Press the Set Pulse Rate increase and decrease buttons to use a pulse control program. 2 Insert the key into the console. Follow the steps below to change . 16 lems, or if you are taking medication regularly, consult your exercise heart rate. See step 5 on page 23). HOW TO USE A PULSE CONTROL PROGRAM CAUTION: If you are over 60 years of the program will affect your physician to use a pulse control program. 1 Put on the optional chest pulse sensor. You...
.... 3 Select a pulse control program. Press the Set Pulse Rate increase and decrease buttons to use a pulse control program. 2 Insert the key into the console. Follow the steps below to change . 16 lems, or if you are taking medication regularly, consult your exercise heart rate. See step 5 on page 23). HOW TO USE A PULSE CONTROL PROGRAM CAUTION: If you are over 60 years of the program will affect your physician to use a pulse control program. 1 Put on the optional chest pulse sensor. You...
English Manual
Page 17
.... 5 Press the Start button or the Speed increase button to the left. Note: The same target heart rate setting may automatically change to bring your heart rate closer to the right. During each segment. The walking belt will sound. See step 7 on page 14. 17 See step 8 on page 14. 8 When you are finished exercising, remove the key from the console. One target heart rate is not detected during the program, you...
.... 5 Press the Start button or the Speed increase button to the left. Note: The same target heart rate setting may automatically change to bring your heart rate closer to the right. During each segment. The walking belt will sound. See step 7 on page 14. 17 See step 8 on page 14. 8 When you are finished exercising, remove the key from the console. One target heart rate is not detected during the program, you...
English Manual
Page 18
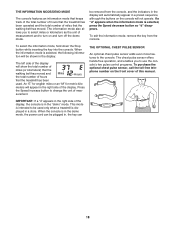
... pulse control programs. To purchase the optional chest pulse sensor, call the toll-free telephone number on the console will automatically appear in a preset sequence, although the buttons on the front cover of mea- THE INFORMATION MODE/DEMO MODE The console features an information mode that keeps track of the total number of hours that the treadmill has been operated and the total number of miles that the treadmill has been used only when a treadmill is displayed...
... pulse control programs. To purchase the optional chest pulse sensor, call the toll-free telephone number on the console will automatically appear in a preset sequence, although the buttons on the front cover of mea- THE INFORMATION MODE/DEMO MODE The console features an information mode that keeps track of the total number of hours that the treadmill has been operated and the total number of miles that the treadmill has been used only when a treadmill is displayed...

English Manual
Page 21
.... If further assistance is changing, remove the key. Find the symptom that applies, and follow the steps listed. Remove the three Hood Screws (44) and two Screws (78). c. This will recalibrate the incline system. While the incline is needed, please call the toll-free telephone number on page 11. TROUBLESHOOTING Most treadmill problems can be solved by following the steps below. PROBLEM: The incline of the console do not function properly...
.... If further assistance is changing, remove the key. Find the symptom that applies, and follow the steps listed. Remove the three Hood Screws (44) and two Screws (78). c. This will recalibrate the incline system. While the incline is needed, please call the toll-free telephone number on page 11. TROUBLESHOOTING Most treadmill problems can be solved by following the steps below. PROBLEM: The incline of the console do not function properly...
English Manual
Page 22
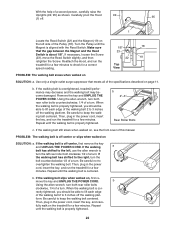
... the treadmill for a few minutes. b 2"-3" Rear Roller Bolts c. If the walking belt is properly tightened, you should be able to lift each edge of the walking belt 2 to the right, turn . b. fully walk on SOLUTION: a. If necessary, loosen the Screw (23), move the key and UNPLUG THE POWER CORD. b. move the Reed Switch slightly, and then 22 19 retighten the Screw. b Using the allen wrench, turn both rear roller bolts counterclockwise, 1/4 of a turn . Repeat until the walking belt...
... the treadmill for a few minutes. b 2"-3" Rear Roller Bolts c. If the walking belt is properly tightened, you should be able to lift each edge of the walking belt 2 to the right, turn . b. fully walk on SOLUTION: a. If necessary, loosen the Screw (23), move the key and UNPLUG THE POWER CORD. b. move the Reed Switch slightly, and then 22 19 retighten the Screw. b Using the allen wrench, turn both rear roller bolts counterclockwise, 1/4 of a turn . Repeat until the walking belt...
English Manual
Page 23
... beginning this or any exercise program, consult your physician. This is especially important for individuals over the age of the treadmill until your breath. For more detailed exercise information, obtain a reputable book or consult your physician. For maximum fat burning, adjust the speed and incline of 35 or individuals with preexisting health problems. The pulse sensor is in your training zone for longer...
... beginning this or any exercise program, consult your physician. This is especially important for individuals over the age of the treadmill until your breath. For more detailed exercise information, obtain a reputable book or consult your physician. For maximum fat burning, adjust the speed and incline of 35 or individuals with preexisting health problems. The pulse sensor is in your training zone for longer...
English Manual
Page 26
... Roller Adj. Qty. Bolt 63 1 Rear Roller 64 1 Console Support 65 1 5/32" Allen Wrench 66 1 Left Rear Foot 67 1 Left Tray 68 1 Walking Belt 69 1 Warning Decal 70 1 Filter Wire 71 1 Pulse Bar 72 1 Cotter Pin 73 1 Photo Switch Star Washer 74 1 Wire Harness 75 1 Right Top Endcap 76 4 Console Bolt 77 4 Console Star Washer 78 61 Screw 79 1 Front Roller Bushing 80 4 Upright Bolt 81 1 Left Top Endcap 82 1 Latch Assembly 83 1 Controller Wire 84...
... Roller Adj. Qty. Bolt 63 1 Rear Roller 64 1 Console Support 65 1 5/32" Allen Wrench 66 1 Left Rear Foot 67 1 Left Tray 68 1 Walking Belt 69 1 Warning Decal 70 1 Filter Wire 71 1 Pulse Bar 72 1 Cotter Pin 73 1 Photo Switch Star Washer 74 1 Wire Harness 75 1 Right Top Endcap 76 4 Console Bolt 77 4 Console Star Washer 78 61 Screw 79 1 Front Roller Bushing 80 4 Upright Bolt 81 1 Left Top Endcap 82 1 Latch Assembly 83 1 Controller Wire 84...

English Manual
Page 27
Key No. Description # 1 4" Blue Wire, 2F # 1 8" Green Wire, F/Ring # 1 6" Red Wire, M/F # 1 4" Black Wire, M/F # 1 User's Manual #These parts are subject to change without notice. 27 Description 101 1 Console Base 102 1 Optic Disk 103 2 Motor Bracket Bolt 104 1 Key Clip 105 1 Right Top Handgrip 106 1 Console Fan 107 1 Console # 1 4" Blue Wire, M/F Key No. Qty. Specifications are not illustrated. Qty.
Key No. Description # 1 4" Blue Wire, 2F # 1 8" Green Wire, F/Ring # 1 6" Red Wire, M/F # 1 4" Black Wire, M/F # 1 User's Manual #These parts are subject to change without notice. 27 Description 101 1 Console Base 102 1 Optic Disk 103 2 Motor Bracket Bolt 104 1 Key Clip 105 1 Right Top Handgrip 106 1 Console Fan 107 1 Console # 1 4" Blue Wire, M/F Key No. Qty. Specifications are not illustrated. Qty.
English Manual
Page 30
... (PROFORM C500 treadmill) • the SERIAL NUMBER of the product (see the front cover of this manual) • the KEY NUMBER and DESCRIPTION of the part(s) (see the front cover of this manual) LIMITED WARRANTY ICON Health & Fitness, Inc. (ICON), warrants this product to be free from the service center will be pre-authorized by an ICON authorized service center; This warranty extends only to products used as store display models. ICON's obligation under normal use , costs of removal...
... (PROFORM C500 treadmill) • the SERIAL NUMBER of the product (see the front cover of this manual) • the KEY NUMBER and DESCRIPTION of the part(s) (see the front cover of this manual) LIMITED WARRANTY ICON Health & Fitness, Inc. (ICON), warrants this product to be free from the service center will be pre-authorized by an ICON authorized service center; This warranty extends only to products used as store display models. ICON's obligation under normal use , costs of removal...


