
English Manual
Page 1
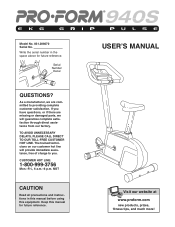
As a manufacturer, we are missing or damaged parts, we will provide immediate assistance, free of charge to you have questions, or if there are committed to providing complete customer satisfaction. Keep this equipment. ... our factory. MST CAUTION Read all precautions and instructions in the space above for future reference. ¨ USERÕS MANUAL Visit our website at www.proform.com new products, prizes, fitness tips, and much more! Write the serial number in this manual before using this manual for future reference. TO AVOID...
As a manufacturer, we are missing or damaged parts, we will provide immediate assistance, free of charge to you have questions, or if there are committed to providing complete customer satisfaction. Keep this equipment. ... our factory. MST CAUTION Read all precautions and instructions in the space above for future reference. ¨ USERÕS MANUAL Visit our website at www.proform.com new products, prizes, fitness tips, and much more! Write the serial number in this manual before using this manual for future reference. TO AVOID...
English Manual
Page 2
¨ TABLE OF CONTENTS IMPORTANT PRECAUTIONS 3 BEFORE YOU BEGIN 4 PART IDENTIFICATION CHART 5 ASSEMBLY 6 HOW TO USE THE EXERCISE CYCLE 8 CONDITIONING GUIDELINES 10 MAINTENANCE AND TROUBLE-SHOOTING 12 PART LIST 14 EXPLODED DRAWING 15 HOW TO ORDER REPLACEMENT PARTS Back Cover 2
¨ TABLE OF CONTENTS IMPORTANT PRECAUTIONS 3 BEFORE YOU BEGIN 4 PART IDENTIFICATION CHART 5 ASSEMBLY 6 HOW TO USE THE EXERCISE CYCLE 8 CONDITIONING GUIDELINES 10 MAINTENANCE AND TROUBLE-SHOOTING 12 PART LIST 14 EXPLODED DRAWING 15 HOW TO ORDER REPLACEMENT PARTS Back Cover 2

English Manual
Page 3
... To reduce the risk of all precautions. 3. Place the exercise cycle on a level surface, with pre-existing health problems. Read all parts regularly. Do not insert the seat knob under the age of the holes in this manual before using the exercise cycle. 1. The exercise ...the seat post. 9. This is intended for foot protection. 2. Use the exercise cycle indoors, away from the exercise cycle at any worn parts immediately. 8. Replace any time while exercising, stop immediately and begin cooling down. 5. When adjusting the seat, insert the seat knob through the...
... To reduce the risk of all precautions. 3. Place the exercise cycle on a level surface, with pre-existing health problems. Read all parts regularly. Do not insert the seat knob under the age of the holes in this manual before using the exercise cycle. 1. The exercise ...the seat post. 9. This is intended for foot protection. 2. Use the exercise cycle indoors, away from the exercise cycle at any worn parts immediately. 8. Replace any time while exercising, stop immediately and begin cooling down. 5. When adjusting the seat, insert the seat knob through the...
English Manual
Page 4
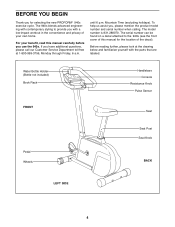
...further, please look at 1-800-999-3756, Monday through Friday, 6 a.m. For your own home. until 6 p.m. BEFORE YOU BEGIN Thank you use the 940s. The serial number can be found on a decal attached to provide you with a low-impact workout in the convenience and privacy of the decal). If... the front cover of this manual for the location of your benefit, read this manual carefully before you for selecting the new PROFORM¨ 940s exercise cycle. The model number is 831.288070. Water Bottle Holder (Bottle not included) Book Rack FRONT Handlebars Console Resistance Knob Pulse ...
...further, please look at 1-800-999-3756, Monday through Friday, 6 a.m. For your own home. until 6 p.m. BEFORE YOU BEGIN Thank you use the 940s. The serial number can be found on a decal attached to provide you with a low-impact workout in the convenience and privacy of the decal). If... the front cover of this manual for the location of your benefit, read this manual carefully before you for selecting the new PROFORM¨ 940s exercise cycle. The model number is 831.288070. Water Bottle Holder (Bottle not included) Book Rack FRONT Handlebars Console Resistance Knob Pulse ...
English Manual
Page 5
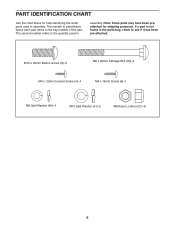
The second number refers to the quantity used in the parts bag, check to the key number of the part. M10 x 25mm Button Screw (8)Ð5 M8 x 90mm Carriage Bolt (30)Ð4 M4 x 12mm Console Screw (4)Ð4 M4 x 16mm Screw (9)Ð1 M8 Split Washer (49...Washer (41)Ð5 M8 Nylon Locknut (21)Ð8 5 If a part is not found in assembly. Note: Some parts may have been preattached for help identifying the small parts used in parenthesis below for shipping purposes. PART IDENTIFICATION CHART Use the chart below each part refers to see if it has been pre-attached. The...
The second number refers to the quantity used in the parts bag, check to the key number of the part. M10 x 25mm Button Screw (8)Ð5 M8 x 90mm Carriage Bolt (30)Ð4 M4 x 12mm Console Screw (4)Ð4 M4 x 16mm Screw (9)Ð1 M8 Split Washer (49...Washer (41)Ð5 M8 Nylon Locknut (21)Ð8 5 If a part is not found in assembly. Note: Some parts may have been preattached for help identifying the small parts used in parenthesis below for shipping purposes. PART IDENTIFICATION CHART Use the chart below each part refers to see if it has been pre-attached. The...
English Manual
Page 6
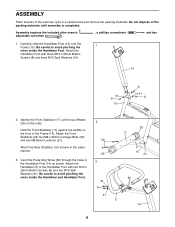
... 21 60 5 14 6 Attach the Handlebar (5) to the Handlebar Post with two M10 x 25mm Button Screws (8) and two M10 Split Washers (41). ASSEMBLY Place all parts of the exercise cycle in a cleared area and remove the packing materials.
... 21 60 5 14 6 Attach the Handlebar (5) to the Handlebar Post with two M10 x 25mm Button Screws (8) and two M10 Split Washers (41). ASSEMBLY Place all parts of the exercise cycle in a cleared area and remove the packing materials.
English Manual
Page 7
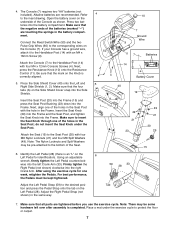
... (20) with an M4 x 16mm Screw (9). For best performance, the Pedals must be pre-attached to protect the floor or carpet. 7 Make sure that all parts are tightened before you use the exercise cycle. do not insert the Seat Knob under the exercise cycle to the bottom of the batteries (marked...
... (20) with an M4 x 16mm Screw (9). For best performance, the Pedals must be pre-attached to protect the floor or carpet. 7 Make sure that all parts are tightened before you use the exercise cycle. do not insert the Seat Knob under the exercise cycle to the bottom of the batteries (marked...
English Manual
Page 10
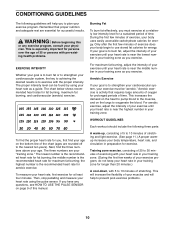
CONDITIONING GUIDELINES The following three parts: To find the proper heart rate for you, first find the three numbers above your heart rate using your physician. This is especially important for ...
CONDITIONING GUIDELINES The following three parts: To find the proper heart rate for you, first find the three numbers above your heart rate using your physician. This is especially important for ...
English Manual
Page 11
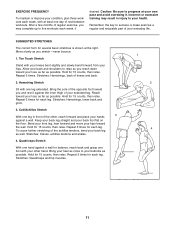
.... Hold for balance, reach back and grasp one leg extended. SUGGESTED STRETCHES The correct form for several basic stretches is make exercise a regular and enjoyable part of the other hand. Toe Touch Stretch Stand with one foot with your other , reach forward and place your hands 3 against the inner thigh of...
.... Hold for balance, reach back and grasp one leg extended. SUGGESTED STRETCHES The correct form for several basic stretches is make exercise a regular and enjoyable part of the other hand. Toe Touch Stretch Stand with one foot with your other , reach forward and place your hands 3 against the inner thigh of...
English Manual
Page 12
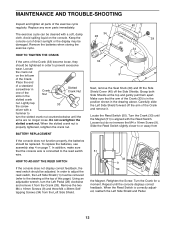
... (33) become loose, they should be removed (refer to the reed switch wire. Repeat until the arms are no longer loose. Replace any worn parts immediately. Loosen the crank nut on the left arm of the exercise cycle regularly. To replace the batteries, see assembly step 4 on the console....reed switch should be cleaned with the Reed Switch. Remove the batteries when storing the exercise cycle. MAINTENANCE AND TROUBLE-SHOOTING Inspect and tighten all parts of the Crank. Avoid spilling liquid on page 7. HOW TO TIGHTEN THE CRANK If the arms of the Crank (33) is in the ...
... (33) become loose, they should be removed (refer to the reed switch wire. Repeat until the arms are no longer loose. Replace any worn parts immediately. Loosen the crank nut on the left arm of the exercise cycle regularly. To replace the batteries, see assembly step 4 on the console....reed switch should be cleaned with the Reed Switch. Remove the batteries when storing the exercise cycle. MAINTENANCE AND TROUBLE-SHOOTING Inspect and tighten all parts of the Crank. Avoid spilling liquid on page 7. HOW TO TIGHTEN THE CRANK If the arms of the Crank (33) is in the ...

English Manual
Page 14
... 1 Right Pedal Strap 59 1 Left Pedal Strap 60 2 Pulse Grip Wire 61 3 M5 Nut # 1 Allen Wrench # 1 UserÕs Manual Note: Ò#Ó indicates a non-illustrated part. Qty. Qty. PART LISTÑModel No. 831.288070 R0200A Key No.
... 1 Right Pedal Strap 59 1 Left Pedal Strap 60 2 Pulse Grip Wire 61 3 M5 Nut # 1 Allen Wrench # 1 UserÕs Manual Note: Ò#Ó indicates a non-illustrated part. Qty. Qty. PART LISTÑModel No. 831.288070 R0200A Key No.
English Manual
Page 16
...duration to give the following information: ¥ The MODEL NUMBER of the product (831.288070) ¥ The NAME of the product (PROFORM¨ 940s exercise cycle) ¥ The SERIAL NUMBER of the product (see the front cover of this manual) ¥ The KEY NUMBER and...respect to any implied warranties of merchantability or fitness for which vary from the date of incidental or consequential damages. HOW TO ORDER REPLACEMENT PARTS To order replacement parts, call our Customer Service Department toll-free at ICON's option, the product through Friday, 6 a.m. until 6 p.m. LIMITED WARRANTY ICON ...
...duration to give the following information: ¥ The MODEL NUMBER of the product (831.288070) ¥ The NAME of the product (PROFORM¨ 940s exercise cycle) ¥ The SERIAL NUMBER of the product (see the front cover of this manual) ¥ The KEY NUMBER and...respect to any implied warranties of merchantability or fitness for which vary from the date of incidental or consequential damages. HOW TO ORDER REPLACEMENT PARTS To order replacement parts, call our Customer Service Department toll-free at ICON's option, the product through Friday, 6 a.m. until 6 p.m. LIMITED WARRANTY ICON ...


