

Owners Manual
Page 2
... the walking belt. Adjust the speed slowly to persons, read the following important safety precautions and information before operating the treadmill. 1. Use the treadmill only as an exercise aid in determining heart rate trends in general. 6. Servicing other appliance should be on a surface... pounds. 8. Never remove the motor hood unless instructed to do so by or through the use . 9. Position the treadmill on the treadmill at all instructions before performing the maintenance and adjustment procedures described in this or any object into a grounded circuit carrying 12...
... the walking belt. Adjust the speed slowly to persons, read the following important safety precautions and information before operating the treadmill. 1. Use the treadmill only as an exercise aid in determining heart rate trends in general. 6. Servicing other appliance should be on a surface... pounds. 8. Never remove the motor hood unless instructed to do so by or through the use . 9. Position the treadmill on the treadmill at all instructions before performing the maintenance and adjustment procedures described in this or any object into a grounded circuit carrying 12...
Owners Manual
Page 3
If you for the location). The model number is recorded on the front cover for selecting the PROFORM 940 treadmill. The PROFORM 940 combines state-of your product model number and serial number when calling. Mountaih Time (excluding holidays). To help...Hood Circuit Breaker O Foot Incline Knobs Power Cord RIGHT SIDE 3 For your safety and benefit, read this manual carefully before using this treadmill. TABLE OF CONTENTS BEFORE YOU BEGIN ASSEMBLY OPERATION AND ADJUSTMENT TROUBLE-SHOOTING AND STORAGE CONDITIONING GUIDELINES PART LIST EXPLODED DRAWING ORDERING REPLACEMENT PARTS WARRANTY...
If you for the location). The model number is recorded on the front cover for selecting the PROFORM 940 treadmill. The PROFORM 940 combines state-of your product model number and serial number when calling. Mountaih Time (excluding holidays). To help...Hood Circuit Breaker O Foot Incline Knobs Power Cord RIGHT SIDE 3 For your safety and benefit, read this manual carefully before using this treadmill. TABLE OF CONTENTS BEFORE YOU BEGIN ASSEMBLY OPERATION AND ADJUSTMENT TROUBLE-SHOOTING AND STORAGE CONDITIONING GUIDELINES PART LIST EXPLODED DRAWING ORDERING REPLACEMENT PARTS WARRANTY...

Owners Manual
Page 4
...easily, turn it; Remove the backing from the Wrench Clip (73), and press it ; ASSEMBLY Set the treadmill in a cleared area and remove all parts are tightened securely before using the treadmill. 4 73 69 71 The small latch on the Harness should snap onto the connector. Firmly tighten the ...turn it onto the Right Endcap (69) in the indicated location. 5 Press the Allen Wrench (71) into the connector. Do not dispose of the treadmill Frame (64). Align the lower end of the Right Handrail (20) with the two Console Bolts (88) and Console Washers (48). Be careful not ...
...easily, turn it; Remove the backing from the Wrench Clip (73), and press it ; ASSEMBLY Set the treadmill in a cleared area and remove all parts are tightened securely before using the treadmill. 4 73 69 71 The small latch on the Harness should snap onto the connector. Firmly tighten the ...turn it onto the Right Endcap (69) in the indicated location. 5 Press the Allen Wrench (71) into the connector. Do not dispose of the treadmill Frame (64). Align the lower end of the Right Handrail (20) with the two Console Bolts (88) and Console Washers (48). Be careful not ...
Owners Manual
Page 5
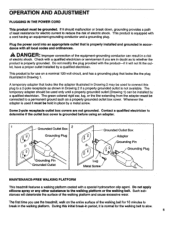
... Grounded Outlet Box Adapter Grounding Pin p° • Grounding Plug Grounding Pin Grounded Outlet Lug Metal Screw MAINTENANCE-FREE WALKING PLATFORM This treadmill features a walking platform coated with a cord having an equipment-grounding conductor and a grounding plug. Some 2-pole receptacle outlet box covers are...Drawing 1) can result in period, it should be used it will deteriorate the surface of the walking belt for use the treadmill, walk on the entire surface of the walking platform and cause excessive wear. The temporary adapter should malfunction or break down...
... Grounded Outlet Box Adapter Grounding Pin p° • Grounding Plug Grounding Pin Grounded Outlet Lug Metal Screw MAINTENANCE-FREE WALKING PLATFORM This treadmill features a walking platform coated with a cord having an equipment-grounding conductor and a grounding plug. Some 2-pole receptacle outlet box covers are...Drawing 1) can result in period, it should be used it will deteriorate the surface of the walking belt for use the treadmill, walk on the entire surface of the walking platform and cause excessive wear. The temporary adapter should malfunction or break down...
Owners Manual
Page 7
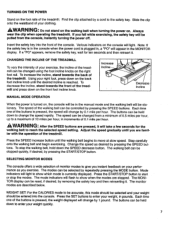
...increase button until you instant feedback on . The walking belt can be stationary. SELECTING MONITOR MODES The console offers a wide selection of the treadmill. The monitor modes are pressed, it will light. AWARNING: Do not stand on the walking belt when turning the power on your weight...foot, press down to start or stop the walking belt, hold down on , the console will appear in pounds. CHANGING THE INCLINE OF THE TREADMILL To vary the intensity of the buttons is plugged in, a "PO" will be reset, if desired, by 1 pound. Increase Incline Decrease ...
...increase button until you instant feedback on . The walking belt can be stationary. SELECTING MONITOR MODES The console offers a wide selection of the treadmill. The monitor modes are pressed, it will light. AWARNING: Do not stand on the walking belt when turning the power on your weight...foot, press down to start or stop the walking belt, hold down on , the console will appear in pounds. CHANGING THE INCLINE OF THE TREADMILL To vary the intensity of the buttons is plugged in, a "PO" will be reset, if desired, by 1 pound. Increase Incline Decrease ...

Owners Manual
Page 10
... a preset program can be changed . TURNING OFF THE POWER Remove the safety key from the console as soon as you finish using the treadmill. TROUBLE-SHOOTING AND STORAGE Most treadmill problems can be solved by pressing the MANUAL button. After the program has ended, a different program can be selected or the console...
... a preset program can be changed . TURNING OFF THE POWER Remove the safety key from the console as soon as you finish using the treadmill. TROUBLE-SHOOTING AND STORAGE Most treadmill problems can be solved by pressing the MANUAL button. After the program has ended, a different program can be selected or the console...
Owners Manual
Page 11
...while exercising, may appear on the console should light. 3. If the error code appears again, call our Customer Service Department. Do not operate the treadmill until the problem is fully inserted into a properly grounded outlet. (See OPERATION AND ADJUSTMENT in this initial break-in period, it is needed , use...jack on the entire surface of five feet or less in . (See the drawing above.) b. Check the circuit breaker located on the treadmill frame near the power cord. 1. Make sure the pulse earclip is needed , use only a 14-gauge general-purpose cord of heart rate readings.
...while exercising, may appear on the console should light. 3. If the error code appears again, call our Customer Service Department. Do not operate the treadmill until the problem is fully inserted into a properly grounded outlet. (See OPERATION AND ADJUSTMENT in this initial break-in period, it is needed , use...jack on the entire surface of five feet or less in . (See the drawing above.) b. Check the circuit breaker located on the treadmill frame near the power cord. 1. Make sure the pulse earclip is needed , use only a 14-gauge general-purpose cord of heart rate readings.
Owners Manual
Page 12
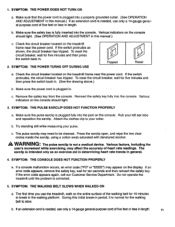
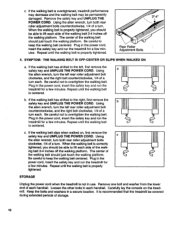
... the right bolt clockwise, 1/4 of the walking belt 3-4 inches off the walking platform. c e'm STORAGE Unplug the power cord when the treadmill is correctly tightened, you should be able to keep the walking belt centered. If the walking belt has shifted to overtighten the walking belt... UNPLUG THE POWER CORD. Using the allen wrench, turn . Remove the safety key and UNPLUG THE POWER CORD. It is overtightened, treadmill performance may decrease and the walking belt may be covered during extended periods of a turn both rear roller adjustment bolts clockwise, 1/4 of...
... the right bolt clockwise, 1/4 of the walking belt 3-4 inches off the walking platform. c e'm STORAGE Unplug the power cord when the treadmill is correctly tightened, you should be able to keep the walking belt centered. If the walking belt has shifted to overtighten the walking belt... UNPLUG THE POWER CORD. Using the allen wrench, turn . Remove the safety key and UNPLUG THE POWER CORD. It is overtightened, treadmill performance may decrease and the walking belt may be covered during extended periods of a turn both rear roller adjustment bolts clockwise, 1/4 of...
Owners Manual
Page 16
...6 p.m. The SERIAL NUMBER of the product (see the front cover of this manual. 5. This warranty extends only to replacing or repairing, at PROFORM's option, the product at 1-800-909-3756, Monday through Friday, 6 a.m. All returns must be free from page 14 of purchaqe. When ...(excluding holidays). All products for which vary from the date of this warranty is authorized by sufficient proof of the product (PROFORM® 940 treadmill). 3. PROFORM IS NOT RESPONSIBLE OR LIABLE FOR INDIRECT, SPECIAL OR CONSEQUENTIAL DAMAGES ARISING OUT OF OR IN CONNECTION WITH THE USE OR PER...
...6 p.m. The SERIAL NUMBER of the product (see the front cover of this manual. 5. This warranty extends only to replacing or repairing, at PROFORM's option, the product at 1-800-909-3756, Monday through Friday, 6 a.m. All returns must be free from page 14 of purchaqe. When ...(excluding holidays). All products for which vary from the date of this warranty is authorized by sufficient proof of the product (PROFORM® 940 treadmill). 3. PROFORM IS NOT RESPONSIBLE OR LIABLE FOR INDIRECT, SPECIAL OR CONSEQUENTIAL DAMAGES ARISING OUT OF OR IN CONNECTION WITH THE USE OR PER...


