
Owners Manual
Page 4
...using the treadmill. Always unplug the power cord before operating the treadmill. 1. Do not place the treadmill near water, outdoors or on the walking belt. If an extension cord is turned off and adjust the roller guards, if necessary. 5. Keep small children away from the treadmill at least 8... before performing the maintenance and adjustment procedures described In this manual if the treadmill is capable of this manual. Never move the walking belt while the power is needed, use the treadmill with at all times. Do not operate the treadmill if the power cord or plug...
...using the treadmill. Always unplug the power cord before operating the treadmill. 1. Do not place the treadmill near water, outdoors or on the walking belt. If an extension cord is turned off and adjust the roller guards, if necessary. 5. Keep small children away from the treadmill at least 8... before performing the maintenance and adjustment procedures described In this manual if the treadmill is capable of this manual. Never move the walking belt while the power is needed, use the treadmill with at all times. Do not operate the treadmill if the power cord or plug...

Owners Manual
Page 5
... through Friday, 6 a.m. Console "itatit„ Speed Control Knob Incline Control Safety Key/Clip Handrail Upright Lock Knob Circuit Breaker FRONT Motor Hood Walking Belt Walking Platform Roller Guards 0 Foot Rail Power Cord LEFT SIDE • BACK Rear Roller Adjustment Bolts The serial number can be found on a decal... front cover of this manual carefully before calling. The model number of your safety and benefit, read this manual for selecting the PROFORM® 920 treadmill. The PROFORM 920 treadmill blends advanced technology with the parts that are labeled.
... through Friday, 6 a.m. Console "itatit„ Speed Control Knob Incline Control Safety Key/Clip Handrail Upright Lock Knob Circuit Breaker FRONT Motor Hood Walking Belt Walking Platform Roller Guards 0 Foot Rail Power Cord LEFT SIDE • BACK Rear Roller Adjustment Bolts The serial number can be found on a decal... front cover of this manual carefully before calling. The model number of your safety and benefit, read this manual for selecting the PROFORM® 920 treadmill. The PROFORM 920 treadmill blends advanced technology with the parts that are labeled.

Owners Manual
Page 7
... product is for electric current to whether the product is properly grounded. OPERATION AND ADJUSTMENT APPLYING SILICONE LUBRICANT To reduce the friction of the walking belt and minimize wear, a non-oil-, non-petroleum-base silicone lubricant must be applied to a 2-pole receptacle as shown in Drawing 2 if a properly grounded outlet is... that looks like the plug illustrated in Drawing 1. Some 2-pole receptacle outlet box covers are in doubt as to reduce the risk of the walking belt and spray lubricant generously onto the indicated area.
... product is for electric current to whether the product is properly grounded. OPERATION AND ADJUSTMENT APPLYING SILICONE LUBRICANT To reduce the friction of the walking belt and minimize wear, a non-oil-, non-petroleum-base silicone lubricant must be applied to a 2-pole receptacle as shown in Drawing 2 if a properly grounded outlet is... that looks like the plug illustrated in Drawing 1. Some 2-pole receptacle outlet box covers are in doubt as to reduce the risk of the walking belt and spray lubricant generously onto the indicated area.

Owners Manual
Page 8
..., turn the knob to the safety key. Replace the battery clip in the console and close the battery cover. The four displays of the walking belt as 8 desired by a cord to "reset." GALORE Battery Cover SPEED DISTANCE • • • Speed Control Knob Power Indicator ON/CLEAR ( I ...batteries into the power switch. Change the speed of the motivational fitness monitor will be turned. A CAUTION: Do not stand on the walking belt while turning on the power. Insert the safety key into the battery clip. Locate the clip attached by turning the speed control knob.
..., turn the knob to the safety key. Replace the battery clip in the console and close the battery cover. The four displays of the walking belt as 8 desired by a cord to "reset." GALORE Battery Cover SPEED DISTANCE • • • Speed Control Knob Power Indicator ON/CLEAR ( I ...batteries into the power switch. Change the speed of the motivational fitness monitor will be turned. A CAUTION: Do not stand on the walking belt while turning on the power. Insert the safety key into the battery clip. Locate the clip attached by turning the speed control knob.

Owners Manual
Page 9
... displays will appear again when the ON/CLEAR button is pressed, or the walking belt is reached, release the lever. When the desired incline is restarted. To decrease the...shows the elapsed time. MOTIVATIONAL FITNESS MONITOR The four displays of the walking belt. TURNING OFF THE POWER To turn off the power, remove the safety key from the console. Note: When ...the walking belt is reached. 9 Note: If the walking belt is stopped and remains stationary for about four minutes, the four displays of the treadmill can...
... displays will appear again when the ON/CLEAR button is pressed, or the walking belt is reached, release the lever. When the desired incline is restarted. To decrease the...shows the elapsed time. MOTIVATIONAL FITNESS MONITOR The four displays of the walking belt. TURNING OFF THE POWER To turn off the power, remove the safety key from the console. Note: When ...the walking belt is reached. 9 Note: If the walking belt is stopped and remains stationary for about four minutes, the four displays of the treadmill can...

Owners Manual
Page 10
... or less in length. Repeat until 6 p.m. Mountain Time (excluding holidays). 1. Remove the safety key from the console. c. If the walking belt is plugged in this manual.) c. Remove the safety key and UNPLUG THE POWER CORD. After the power cord has been plugged in, make sure...NOT TURN ON a. Make sure that applies to lift each side of a turn both rear roller adjustment bolts counterclockwise, 1/4 of the walking belt 2-3 inches off the walking platform. b. Various indicators on the console should be able to your treadmill and follow the steps listed. Check the...
... or less in length. Repeat until 6 p.m. Mountain Time (excluding holidays). 1. Remove the safety key from the console. c. If the walking belt is plugged in this manual.) c. Remove the safety key and UNPLUG THE POWER CORD. After the power cord has been plugged in, make sure...NOT TURN ON a. Make sure that applies to lift each side of a turn both rear roller adjustment bolts counterclockwise, 1/4 of the walking belt 2-3 inches off the walking platform. b. Various indicators on the console should be able to your treadmill and follow the steps listed. Check the...
Owners Manual
Page 11
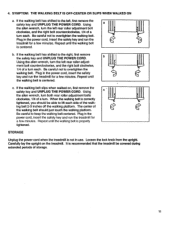
... periods of the walk- Loosen the lock knob from the upright. SYMPTOM: THE WALKING BELT IS OFF-CENTER OR SLIPS WHEN WALKED ON a. Repeat until the walking belt is centered. Plug in use. When the walking belt is recommended that the treadmill be able to the left, first remove the safety key... and UNPLUG THE POWER CORD. Using a the allen wrench, turn each. Repeat until the walking belt is not in the power cord, insert the safety key and run the treadmill for a few minutes. Carefully lay the upright on , first remove ...
... periods of the walk- Loosen the lock knob from the upright. SYMPTOM: THE WALKING BELT IS OFF-CENTER OR SLIPS WHEN WALKED ON a. Repeat until the walking belt is centered. Plug in use. When the walking belt is recommended that the treadmill be able to the left, first remove the safety key... and UNPLUG THE POWER CORD. Using a the allen wrench, turn each. Repeat until the walking belt is not in the power cord, insert the safety key and run the treadmill for a few minutes. Carefully lay the upright on , first remove ...

Owners Manual
Page 14
... Hood Screw/Handrail Screw Incline Leg Bolt Incline Leg Roller Adjustment Washer Front Roller Adjustment Bolt Front Roller/Pulley Platform Screw Walking Belt Walking Platform Frame Rear Leg Pad Right Roller Bracket Small Screw Rear Roller Adjustment Bolt Allen Wrench Wrench Clip Rear Roller Roller ...Nut/Incline Leg Nut Rear Roller Spacer Left Roller Bracket Motor Hood w/Decal Magnet Reed Switch Washer Hood Bracket Screw Reed Switch/Sensor Wire Belt Owner's Manual Note: 11#11 indicates a non-illustrated part. See th 14 back cover for information about ordering replacement parts. Specifications...
... Hood Screw/Handrail Screw Incline Leg Bolt Incline Leg Roller Adjustment Washer Front Roller Adjustment Bolt Front Roller/Pulley Platform Screw Walking Belt Walking Platform Frame Rear Leg Pad Right Roller Bracket Small Screw Rear Roller Adjustment Bolt Allen Wrench Wrench Clip Rear Roller Roller ...Nut/Incline Leg Nut Rear Roller Spacer Left Roller Bracket Motor Hood w/Decal Magnet Reed Switch Washer Hood Bracket Screw Reed Switch/Sensor Wire Belt Owner's Manual Note: 11#11 indicates a non-illustrated part. See th 14 back cover for information about ordering replacement parts. Specifications...


