
Uk Manual
Page 1
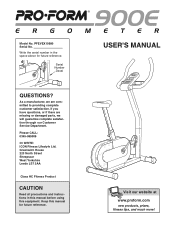
... parts, we will guarantee complete satisfaction through our Customer Service Department. Write the serial number in this manual before using this manual for future reference. Serial Number Decal QUESTIONS? Greenwich House 223 North Street Sheepscar West Yorkshire Leeds LS7 2AA Class HC Fitness Product CAUTION Read all precautions and instructions in the space above for future reference. USER'S MANUAL Visit our website at www.proform...
... parts, we will guarantee complete satisfaction through our Customer Service Department. Write the serial number in this manual before using this manual for future reference. Serial Number Decal QUESTIONS? Greenwich House 223 North Street Sheepscar West Yorkshire Leeds LS7 2AA Class HC Fitness Product CAUTION Read all precautions and instructions in the space above for future reference. USER'S MANUAL Visit our website at www.proform...
Uk Manual
Page 2
® TABLE OF CONTENTS IMPORTANT PRECAUTIONS 3 BEFORE YOU BEGIN 4 ASSEMBLY 5 HOW TO USE THE EXERCISE CYCLE 8 HOW TO USE THE HAND PULSE MONITOR 11 MAINTENANCE AND TROUBLE-SHOOTING 11 CONDITIONING GUIDELINES 13 PART LIST 14 EXPLODED DRAWING 15 HOW TO ORDER REPLACEMENT PARTS Back Cover 2
® TABLE OF CONTENTS IMPORTANT PRECAUTIONS 3 BEFORE YOU BEGIN 4 ASSEMBLY 5 HOW TO USE THE EXERCISE CYCLE 8 HOW TO USE THE HAND PULSE MONITOR 11 MAINTENANCE AND TROUBLE-SHOOTING 11 CONDITIONING GUIDELINES 13 PART LIST 14 EXPLODED DRAWING 15 HOW TO ORDER REPLACEMENT PARTS Back Cover 2
Uk Manual
Page 3
... factors, including the user's movement, may affect the accuracy of all parts regularly. Read all times. 9. The exercise cycle is not legible, please call our Customer Service Department at 0345-089009 to order a free replacement decal. Apply the decal in -home use of this or any worn parts immediately. 5. ICON assumes no responsibility for foot protection. 8. The pulse monitor is intended only...
... factors, including the user's movement, may affect the accuracy of all parts regularly. Read all times. 9. The exercise cycle is not legible, please call our Customer Service Department at 0345-089009 to order a free replacement decal. Apply the decal in -home use of this or any worn parts immediately. 5. ICON assumes no responsibility for foot protection. 8. The pulse monitor is intended only...
Uk Manual
Page 4
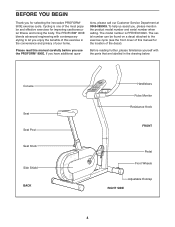
The PROFORM® 900E blends advanced engineering with the parts that are labelled in the convenience and privacy of your home. To help us assist you have additional ques- Console Seat Seat Post Seat Knob Side Shield BACK Handlebars Pulse Monitor Resistance Knob FRONT Pedal Front Wheels Adjustable Endcap RIGHT SIDE 4 If you , please mention the product model number and serial number when calling. tions, please call our Customer Service Department...
The PROFORM® 900E blends advanced engineering with the parts that are labelled in the convenience and privacy of your home. To help us assist you have additional ques- Console Seat Seat Post Seat Knob Side Shield BACK Handlebars Pulse Monitor Resistance Knob FRONT Pedal Front Wheels Adjustable Endcap RIGHT SIDE 4 If you , please mention the product model number and serial number when calling. tions, please call our Customer Service Department...
Uk Manual
Page 5
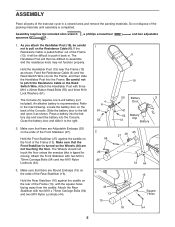
... then be difficult to assemble and the resistance knob may not function properly. Feed the Resistance Cable (6) and the Reed Switch Wire (4) into the Frame, and then slide the Handlebar Post into the Console. Slide the battery door to the left and open it to pull on the ends of the Frame (13), with three M10 x 22mm Button Head Bolts (55) and three...
... then be difficult to assemble and the resistance knob may not function properly. Feed the Resistance Cable (6) and the Reed Switch Wire (4) into the Frame, and then slide the Handlebar Post into the Console. Slide the battery door to the left and open it to pull on the ends of the Frame (13), with three M10 x 22mm Button Head Bolts (55) and three...

Uk Manual
Page 6
... wires down slightly until it . Next, attach the Seat (8) to the Seat Post (9) with tags are connected to the two console wires, making sure that the wires with the three M8 Nylon Locknuts (56) and M8 Lock Washers (59). Using an adjustable 5 wrench, tighten the Left Pedal counterclockwise into the Left Crank Arm (66). 66 Tighten the Right Pedal (not shown) clockwise into place. Connect the two Pulse Wires...
... wires down slightly until it . Next, attach the Seat (8) to the Seat Post (9) with tags are connected to the two console wires, making sure that the wires with the three M8 Nylon Locknuts (56) and M8 Lock Washers (59). Using an adjustable 5 wrench, tighten the Left Pedal counterclockwise into the Left Crank Arm (66). 66 Tighten the Right Pedal (not shown) clockwise into place. Connect the two Pulse Wires...

Uk Manual
Page 7
Note: There may be some hardware left over after assembly is completed. Attach the Handlebar (18) to the Handlebar Post (19) with two M10 x 22mm Button Head Bolts (55) 7 and two M10 Lock Washers (61). 55 61 18 19 8. To protect the floor or carpet from damage, place a mat beneath the exercise cycle. 7 Make sure that all parts are tightened before you use the exercise cycle. 7.
Note: There may be some hardware left over after assembly is completed. Attach the Handlebar (18) to the Handlebar Post (19) with two M10 x 22mm Button Head Bolts (55) 7 and two M10 Lock Washers (61). 55 61 18 19 8. To protect the floor or carpet from damage, place a mat beneath the exercise cycle. 7 Make sure that all parts are tightened before you use the exercise cycle. 7.

Uk Manual
Page 8
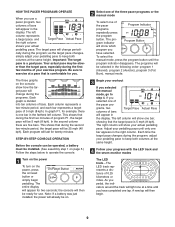
... number of calories you exercise, seven monitor modes will show the time remaining in 45 the Pedal Strap with the Resistance Knob 6 (6). Turn the Seat Knob clockwise to help you have burned. HOW TO ADJUST THE PEDALLING RESISTANCE To vary the intensi- The innovative console offers a manual mode and three pacer programs. The pacer programs are at the proper height; Time-If you select the manual mode, this mode will provide continuous exercise...
... number of calories you exercise, seven monitor modes will show the time remaining in 45 the Pedal Strap with the Resistance Knob 6 (6). Turn the Seat Knob clockwise to help you have burned. HOW TO ADJUST THE PEDALLING RESISTANCE To vary the intensi- The innovative console offers a manual mode and three pacer programs. The pacer programs are at the proper height; Time-If you select the manual mode, this mode will provide continuous exercise...
Uk Manual
Page 9
... in the display. Adjust your progress with the LED track and the seven monitor modes The LED track-The LED track represents a distance of the pacer pro- A new lap will change during the program; The target pace will then begin pedalling. To select the manual mode, press the program button until only one bar in the following order: program 1 (Interval), program 2 (Aerobic), program 3 (Fat Burn), manual mode. 3 Begin your pedalling pace to exercise at the...
... in the display. Adjust your progress with the LED track and the seven monitor modes The LED track-The LED track represents a distance of the pacer pro- A new lap will change during the program; The target pace will then begin pedalling. To select the manual mode, press the program button until only one bar in the following order: program 1 (Interval), program 2 (Aerobic), program 3 (Fat Burn), manual mode. 3 Begin your pedalling pace to exercise at the...

Uk Manual
Page 10
... pedals are not turned and the console buttons are not pressed for 5 seconds each, in miles. 1 Screws 2 To change the unit of measurement, Battery Switch Door first remove the four screws attach- The scan mode- To reset the display, press the on the wires. Lift the console a few inches and turn off the power To turn it over, being careful not to change the unit of measurement. Mode rie mode- if a "KPH" does not appear, distance...
... pedals are not turned and the console buttons are not pressed for 5 seconds each, in miles. 1 Screws 2 To change the unit of measurement, Battery Switch Door first remove the four screws attach- The scan mode- To reset the display, press the on the wires. Lift the console a few inches and turn off the power To turn it over, being careful not to change the unit of measurement. Mode rie mode- if a "KPH" does not appear, distance...
Uk Manual
Page 11
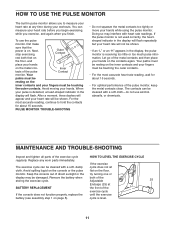
... your heart rate at BATTERY REPLACEMENT the front of the exercise cycle If the console does not function properly, replace the until the exercise battery (see assembly step 1 on page 5). MAINTENANCE AND TROUBLE-SHOOTING Inspect and tighten all parts of the pulse Contact monitor. You can be shown. • If an "L" or an "H" appears in the display will not be cleaned with heart rate readings. Avoid moving your hands while using the pulse monitor...
... your heart rate at BATTERY REPLACEMENT the front of the exercise cycle If the console does not function properly, replace the until the exercise battery (see assembly step 1 on page 5). MAINTENANCE AND TROUBLE-SHOOTING Inspect and tighten all parts of the pulse Contact monitor. You can be shown. • If an "L" or an "H" appears in the display will not be cleaned with heart rate readings. Avoid moving your hands while using the pulse monitor...
Uk Manual
Page 12
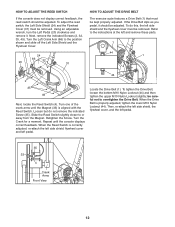
... 4 Crank Arms Front View 12 Retighten the Screw. To tighten the Drive Belt, loosen the bottom M10 Nylon Locknut (44) and then tighten the upper M10 Nylon Locknut slightly; Using an adjustable wrench, turn the Left Pedal (20) clockwise and remove it should be removed. Loosen but do this, the left and remove these parts. 1 44 1 2 35 49 Next, locate the Reed Switch (4). HOW TO ADJUST THE REED SWITCH If the console...
... 4 Crank Arms Front View 12 Retighten the Screw. To tighten the Drive Belt, loosen the bottom M10 Nylon Locknut (44) and then tighten the upper M10 Nylon Locknut slightly; Using an adjustable wrench, turn the Left Pedal (20) clockwise and remove it should be removed. Loosen but do this, the left and remove these parts. 1 44 1 2 35 49 Next, locate the Reed Switch (4). HOW TO ADJUST THE REED SWITCH If the console...
Uk Manual
Page 13
... your heart rate is to five workouts each week, with pre-existing health problems. The pulse monitor is the heart rate for maximum fat burning; Aerobic Exercise If your goal is near the lowest number in your heart rate as an exercise aid in determining heart rate trends in preparation for energy. For aerobic exercise, adjust the intensity of your exercise until your heart rate is intended only as a guide. WORKOUT GUIDELINES Each workout...
... your heart rate is to five workouts each week, with pre-existing health problems. The pulse monitor is the heart rate for maximum fat burning; Aerobic Exercise If your goal is near the lowest number in your heart rate as an exercise aid in determining heart rate trends in preparation for energy. For aerobic exercise, adjust the intensity of your exercise until your heart rate is intended only as a guide. WORKOUT GUIDELINES Each workout...

Uk Manual
Page 14
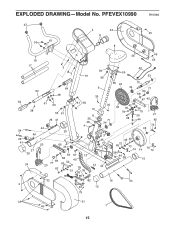
... 2 Drive Belt M4 x 38mm Screw Seat Knob w/Pin Reed Switch w/Wire Console Resistance Knob w/Cable M4 x 16mm Screw Seat Seat Post Seat Collar Seat Tube Spacer Spring Frame Flywheel Round Endcap Rear Stabiliser Foam Grip Handlebar Handlebar Post Left Pedal w/Strap Right Pedal w/Strap Pulley Right Side Shield Left Side Shield Adjustable Endcap Wheel Front Stabiliser M10 x 50mm Button Bolt Idler Wheel Bracket Flywheel Axle Flywheel Cover M4 x 25mm Screw Magnet Crank Bearing M4 x 16mm Washer Head Screw 6000 Bearing Cable Clamp Pulse...
... 2 Drive Belt M4 x 38mm Screw Seat Knob w/Pin Reed Switch w/Wire Console Resistance Knob w/Cable M4 x 16mm Screw Seat Seat Post Seat Collar Seat Tube Spacer Spring Frame Flywheel Round Endcap Rear Stabiliser Foam Grip Handlebar Handlebar Post Left Pedal w/Strap Right Pedal w/Strap Pulley Right Side Shield Left Side Shield Adjustable Endcap Wheel Front Stabiliser M10 x 50mm Button Bolt Idler Wheel Bracket Flywheel Axle Flywheel Cover M4 x 25mm Screw Magnet Crank Bearing M4 x 16mm Washer Head Screw 6000 Bearing Cable Clamp Pulse...
Uk Manual
Page 15
PFEVEX10990 R1099A 47 55 61 5 23 6 35 8 35 49 18 35 17 7 43 59 59 7 19 56 53 56 22 70 64 9 34 77 63 69 38 35 68 67 45 64 38 61 55 55 61 61 55 10 11 35 33 42 83 36 36 76 75 29 21 26 41 35 48 4 71 34 28 44 65 72 44 46 54 25 44 56 3 26 41 27 25 24 44 50 66 34 53 57 13 68 20 69 77 60 52 40 62 78 51 35 35 35 37 12 44 46 30 6572 73 74 39 44 58 14 73 74 15 80 32 2 82 16 54 81 15 79 35 49 31 1 15 EXPLODED DRAWING-Model No.
PFEVEX10990 R1099A 47 55 61 5 23 6 35 8 35 49 18 35 17 7 43 59 59 7 19 56 53 56 22 70 64 9 34 77 63 69 38 35 68 67 45 64 38 61 55 55 61 61 55 10 11 35 33 42 83 36 36 76 75 29 21 26 41 35 48 4 71 34 28 44 65 72 44 46 54 25 44 56 3 26 41 27 25 24 44 50 66 34 53 57 13 68 20 69 77 60 52 40 62 78 51 35 35 35 37 12 44 46 30 6572 73 74 39 44 58 14 73 74 15 80 32 2 82 16 54 81 15 79 35 49 31 1 15 EXPLODED DRAWING-Model No.
Uk Manual
Page 16
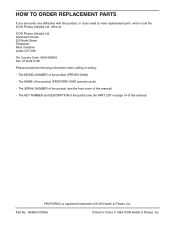
...: • The MODEL NUMBER of the product (PFEVEX10990) • The NAME of the product (PROFORM® 900E exercise cycle) • The SERIAL NUMBER of the product (see the front cover of this manual) • The KEY NUMBER and DESCRIPTION of the part(s) (see the PART LIST on page 14 of ICON Health & Fitness, Inc. Part No. 160859 R1099A Printed in China © 1999 ICON Health & Fitness, Inc. office at: ICON Fitness Lifestyle Ltd...
...: • The MODEL NUMBER of the product (PFEVEX10990) • The NAME of the product (PROFORM® 900E exercise cycle) • The SERIAL NUMBER of the product (see the front cover of this manual) • The KEY NUMBER and DESCRIPTION of the part(s) (see the PART LIST on page 14 of ICON Health & Fitness, Inc. Part No. 160859 R1099A Printed in China © 1999 ICON Health & Fitness, Inc. office at: ICON Fitness Lifestyle Ltd...

