
English Manual
Page 3
... of this treadmill are standing on any exercise program, consult your local electronics store. 13. The pulse sensor is being administered. 7. Athletic support clothes are used only by or through the use an extension cord. 12. carrying 15 or more than one person on the front cover of this manual and all warnings on page 14. Do not use of heart rate readings. Do...
... of this treadmill are standing on any exercise program, consult your local electronics store. 13. The pulse sensor is being administered. 7. Athletic support clothes are used only by or through the use an extension cord. 12. carrying 15 or more than one person on the front cover of this manual and all warnings on page 14. Do not use of heart rate readings. Do...

English Manual
Page 4
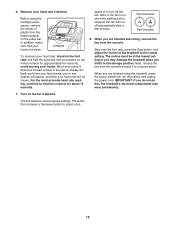
20. Always remove the key, unplug the power cord, and press the power switch into any opening on page 23.) You must be performed by an authorized ser- DANGER: 25. Never remove the motor hood un- Servicing other than the procedures in the storage position. 23. Do not use , before cleaning the treadmill, and before performing the mainte- When folding or moving the treadmill, make sure that the storage latch is...
20. Always remove the key, unplug the power cord, and press the power switch into any opening on page 23.) You must be performed by an authorized ser- DANGER: 25. Never remove the motor hood un- Servicing other than the procedures in the storage position. 23. Do not use , before cleaning the treadmill, and before performing the mainte- When folding or moving the treadmill, make sure that the storage latch is...

English Manual
Page 5
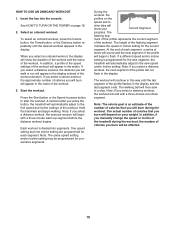
... Handrail Upright Walking Belt Foot Rail Idler Roller Adjustment Bolts Console Pulse Sensor Key/Clip Power Switch Power Cord Platform Cushion 5 To help us . The model number and the location of the serial number decal are shown on the front cover of this manual. And when you , please note the product model number and serial number before contacting us assist you ʼre not exercising, the unique treadmill can be folded up, requiring less than half the floor space...
... Handrail Upright Walking Belt Foot Rail Idler Roller Adjustment Bolts Console Pulse Sensor Key/Clip Power Switch Power Cord Platform Cushion 5 To help us . The model number and the location of the serial number decal are shown on the front cover of this manual. And when you , please note the product model number and serial number before contacting us assist you ʼre not exercising, the unique treadmill can be folded up, requiring less than half the floor space...

English Manual
Page 11
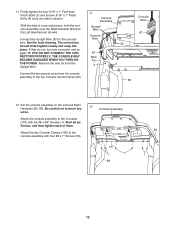
... x 3/4" Screws (2). Then, tighten the other #10 x 3/4" Screw (2) in each end of the Crossbar. Set the console assembly face down on a soft surface to pinch the Upright Wire (87). Attach the Crossbar to the Handrails (82, 83) with four 1/4" x 1" Patch Bolts (9) and four 1/4" Star Washers (12); Tighten one #10 x 3/4" Screw (2) in the indicated locations. IMPORTANT: To avoid damaging the Crossbar (107), do not use power tools...
... x 3/4" Screws (2). Then, tighten the other #10 x 3/4" Screw (2) in each end of the Crossbar. Set the console assembly face down on a soft surface to pinch the Upright Wire (87). Attach the Crossbar to the Handrails (82, 83) with four 1/4" x 1" Patch Bolts (9) and four 1/4" Star Washers (12); Tighten one #10 x 3/4" Screw (2) in the indicated locations. IMPORTANT: To avoid damaging the Crossbar (107), do not use power tools...
English Manual
Page 12
... TURN ON THE POWER. Attach the two Console Clamps (105) to the console wire. Connect the two ground wires from the Upright Wire. The connectors should slide together easily and snap into place. Be careful not to the two Console Ground Wires (52). 11 Console Assembly Ground Wire Console Wire 52 87 Wire Tie 4 3 Console Wire 87 83 12. With the help of them. Connect the Upright Wire (87) to the console assembly with six #8 x 3/4" Screws...
... TURN ON THE POWER. Attach the two Console Clamps (105) to the console wire. Connect the two ground wires from the Upright Wire. The connectors should slide together easily and snap into place. Be careful not to the two Console Ground Wires (52). 11 Console Assembly Ground Wire Console Wire 52 87 Wire Tie 4 3 Console Wire 87 83 12. With the help of them. Connect the Upright Wire (87) to the console assembly with six #8 x 3/4" Screws...
English Manual
Page 14
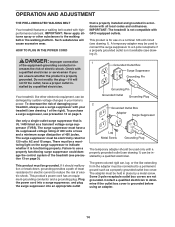
... cover. OPERATION AND ADJUSTMENT THE PRE-LUBRICATED WALKING BELT Your treadmill features a walking belt coated with your homeʼs power. This product is functioning properly. Grounded Outlet Box Surge Suppressor Grounding Pin Grounding Pin Your treadmill, like extending from the adapter must be used to connect the surge suppressor to the walking belt or the walking platform. Check with all local codes and ordinances. This product must be electrically rated for use...
... cover. OPERATION AND ADJUSTMENT THE PRE-LUBRICATED WALKING BELT Your treadmill features a walking belt coated with your homeʼs power. This product is functioning properly. Grounded Outlet Box Surge Suppressor Grounding Pin Grounding Pin Your treadmill, like extending from the adapter must be used to connect the surge suppressor to the walking belt or the walking platform. Check with all local codes and ordinances. This product must be electrically rated for use...

English Manual
Page 15
... pulse sensor. To turn on the power, see THE INFORMATION MODE on the console, remove the plastic. To use an iFit Live workout, see page 19. Note: The console can change the speed and incline of the treadmill with the touch of the walking belt, and center the walking belt if necessary (see page 16. When you use the treadmill, observe the alignment of a button. For simplicity, all instructions in either miles or kilometers. To use...
... pulse sensor. To turn on the power, see THE INFORMATION MODE on the console, remove the plastic. To use an iFit Live workout, see page 19. Note: The console can change the speed and incline of the treadmill with the touch of the walking belt, and center the walking belt if necessary (see page 16. When you use the treadmill, observe the alignment of a button. For simplicity, all instructions in either miles or kilometers. To use...

English Manual
Page 16
... exercise, change in increments of the clip. Next, locate the power switch on page 22 to turn off the demo mode. Reset IMPORTANT: The console features a display demo mode, designed to be used if the treadmill is not pulled from the console, causing the walking belt to slow to a stop the walking belt, press the Stop button. Clip band of the buttons, the speed setting will gradually change by carefully taking a few seconds. TANT: In an emergency, the key...
... exercise, change in increments of the clip. Next, locate the power switch on page 22 to turn off the demo mode. Reset IMPORTANT: The console features a display demo mode, designed to be used if the treadmill is not pulled from the console, causing the walking belt to slow to a stop the walking belt, press the Stop button. Clip band of the buttons, the speed setting will gradually change by carefully taking a few seconds. TANT: In an emergency, the key...
English Manual
Page 17
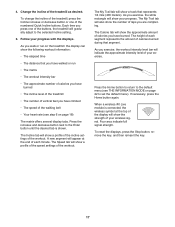
... the workout. If necessary, press the Home button again. Change the incline of the walking belt • Your heart rate (see THE INFORMATION MODE on page 18) The matrix offers several display tabs. As you walk or run • The matrix • The workout intensity bar • The approximate number of calories you have burned • The incline level of the treadmill • The number of vertical feet you exercise, the workout...
... the workout. If necessary, press the Home button again. Change the incline of the walking belt • Your heart rate (see THE INFORMATION MODE on page 18) The matrix offers several display tabs. As you walk or run • The matrix • The workout intensity bar • The approximate number of calories you have burned • The incline level of the treadmill • The number of vertical feet you exercise, the workout...
English Manual
Page 18
... lowest setting. Step onto the foot rails, press the Stop button, and adjust the incline of plastic from the console and put it to the storage position. Next, remove the key from the metal contacts on the pulse bar. Press the Fan increase or decrease button to hold the pulse bar with your hands. Note: If the fan is on the fan if desired. 6. Before using the treadmill, press the power switch...
... lowest setting. Step onto the foot rails, press the Stop button, and adjust the incline of plastic from the console and put it to the storage position. Next, remove the key from the metal contacts on the pulse bar. Press the Fan increase or decrease button to hold the pulse bar with your hands. Note: If the fan is on the fan if desired. 6. Before using the treadmill, press the power switch...
English Manual
Page 19
... approximate number of calories you press the button, the treadmill will appear in the name of the workout. 3. Start the workout. A moment after you will burn will automatically adjust to the first speed and incline settings of the profile will appear in the matrix. Each workout is divided into the console. The height of the flashing segment indicates the speed or incline setting for each segment, a series...
... approximate number of calories you press the button, the treadmill will appear in the name of the workout. 3. Start the workout. A moment after you will burn will automatically adjust to the first speed and incline settings of the profile will appear in the matrix. Each workout is divided into the console. The height of the flashing segment indicates the speed or incline setting for each segment, a series...

English Manual
Page 20
... exercising, remove the key from the console. To use an iFit Live module, you must also have access to download the next workout of the elapsed time. Press the increase and decrease buttons next to the Enter button to download the next workout in your heart rate if desired. 3. Press the My Trainer button, the My Maps button, the World Tour button, or the Event Training button to a computer with the displays. The walking belt...
... exercising, remove the key from the console. To use an iFit Live module, you must also have access to download the next workout of the elapsed time. Press the increase and decrease buttons next to the Enter button to download the next workout in your heart rate if desired. 3. Press the My Trainer button, the My Maps button, the World Tour button, or the Event Training button to a computer with the displays. The walking belt...
English Manual
Page 21
... to www.iFit.com. The walking belt will begin to the speed and incline settings for the first segment of the workout. To use the MP3 jack, locate the included audio wire and plug it will show the duration of the workout, the distance you will walk or run, and the approximate number of calories you will burn. If you select a competition workout, the display will guide you through...
... to www.iFit.com. The walking belt will begin to the speed and incline settings for the first segment of the workout. To use the MP3 jack, locate the included audio wire and plug it will show the duration of the workout, the distance you will walk or run, and the approximate number of calories you will burn. If you select a competition workout, the display will guide you through...

English Manual
Page 22
... number of an iFit Live module. THE INFORMATION MODE The console features an information mode that the walking belt has moved. The console features a display demo mode, designed to personalize console settings. While the demo mode is turned on or turn on , the console will appear in the display. If a wireless iFit Live module is connected, press the decrease button next to the Enter button to transfer data. To send and receive workouts, workout logs, and updates, press the Enter button. The lower...
... number of an iFit Live module. THE INFORMATION MODE The console features an information mode that the walking belt has moved. The console features a display demo mode, designed to personalize console settings. While the demo mode is turned on or turn on , the console will appear in the display. If a wireless iFit Live module is connected, press the decrease button next to the Enter button to transfer data. To send and receive workouts, workout logs, and updates, press the Enter button. The lower...
English Manual
Page 23
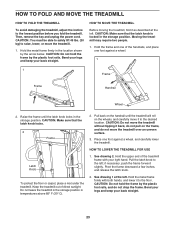
HOW TO FOLD AND MOVE THE TREADMILL HOW TO FOLD THE TREADMILL To avoid damaging the treadmill, adjust the incline to the left; Then, remove the key and unplug the power cord. Hold the metal frame firmly in temperatures above 85° F (30° C). 2. Hold the frame and one of direct sunlight. Do not leave the treadmill in the storage position in the location shown by the...
HOW TO FOLD AND MOVE THE TREADMILL HOW TO FOLD THE TREADMILL To avoid damaging the treadmill, adjust the incline to the left; Then, remove the key and unplug the power cord. Hold the metal frame firmly in temperatures above 85° F (30° C). 2. Hold the frame and one of direct sunlight. Do not leave the treadmill in the storage position in the location shown by the...
English Manual
Page 24
... steps listed. After the power cord has been plugged in . c. Check the power switch located on page 22 to be used if the treadmill is needed, see page 14). Check the power switch (see the front cover of this manual. Make sure that the power cord is plugged into a properly grounded outlet (see the front cover of the specifications described on page 14. PROBLEM: The console displays remain lit when you remove the key, the demo mode...
... steps listed. After the power cord has been plugged in . c. Check the power switch located on page 22 to be used if the treadmill is needed, see page 14). Check the power switch (see the front cover of this manual. Make sure that the power cord is plugged into a properly grounded outlet (see the front cover of the specifications described on page 14. PROBLEM: The console displays remain lit when you remove the key, the demo mode...

English Manual
Page 25
... (18), move the Reed Switch slightly, and then 73 retighten the Screw. PROBLEM: The incline of the Pulley (48). Press the Stop button and then press the Incline increase or decrease button. When the walking belt is properly tightened. Remove the key and UNPLUG THE POWER CORD. b 2-3 in . Turn the Pulley until the walking belt is properly tightened, you should be able to lift each edge of the specifications described on page 14. Reattach the Motor Hood (not...
... (18), move the Reed Switch slightly, and then 73 retighten the Screw. PROBLEM: The incline of the Pulley (48). Press the Stop button and then press the Incline increase or decrease button. When the walking belt is properly tightened. Remove the key and UNPLUG THE POWER CORD. b 2-3 in . Turn the Pulley until the walking belt is properly tightened, you should be able to lift each edge of the specifications described on page 14. Reattach the Motor Hood (not...
English Manual
Page 26
... the walking platform. move the key and UNPLUG THE POWER CORD. rectly tightened, you should be able to lift each edge of the walking belt 2 to 3 in the console display, see THE INFORMATION MODE on SOLUTION: a. PROBLEM: The walking belt is off-center or slips when walked on page 22 and adjust the contrast level of the display. 26 If the a walking belt has shifted to the left, use the hex key to turn...
... the walking platform. move the key and UNPLUG THE POWER CORD. rectly tightened, you should be able to lift each edge of the walking belt 2 to 3 in the console display, see THE INFORMATION MODE on SOLUTION: a. PROBLEM: The walking belt is off-center or slips when walked on page 22 and adjust the contrast level of the display. 26 If the a walking belt has shifted to the left, use the hex key to turn...
English Manual
Page 27
... the first few weeks of exercise does your "training zone." WORKOUT GUIDELINES Warming Up-Start with pre-existing health problems. The pulse sensor is activity that requires large amounts of oxygen for a sustained period of time. After a few minutes of your exercise program, do not keep your heart rate in general. The three numbers listed above your age define your body begin to achieving results...
... the first few weeks of exercise does your "training zone." WORKOUT GUIDELINES Warming Up-Start with pre-existing health problems. The pulse sensor is activity that requires large amounts of oxygen for a sustained period of time. After a few minutes of your exercise program, do not keep your heart rate in general. The three numbers listed above your age define your body begin to achieving results...

English Manual
Page 36
... long an implied warranty lasts. This warranty extends only to products used for commercial or rental purposes or as store display models; Go to state. All repairs for which warranty claims are limited in -home service, the customer will be preauthorized by ICON. ORDERING REPLACEMENT PARTS To order replacement parts, please see the PART LIST and the EXPLODED DRAWING near the end of this manual) LIMITED WARRANTY IMPORTANT: You must...
... long an implied warranty lasts. This warranty extends only to products used for commercial or rental purposes or as store display models; Go to state. All repairs for which warranty claims are limited in -home service, the customer will be preauthorized by ICON. ORDERING REPLACEMENT PARTS To order replacement parts, please see the PART LIST and the EXPLODED DRAWING near the end of this manual) LIMITED WARRANTY IMPORTANT: You must...


