
English Manual
Page 1
... CAUTION Read all precautions and instructions in the space above ) before using this manual for reference. Keep this equipment. PFEL77807.1 Serial No. MST Sat. 8 a.m.-4 p.m. IMPORTANT: You must note the product model number and serial number (see the drawing above for future reference. USERʼS MANUAL Visit our website at www.proform.com new products, prizes, fitness tips, and much more! Model No. Serial Number Decal QUESTIONS?
... CAUTION Read all precautions and instructions in the space above ) before using this manual for reference. Keep this equipment. PFEL77807.1 Serial No. MST Sat. 8 a.m.-4 p.m. IMPORTANT: You must note the product model number and serial number (see the drawing above for future reference. USERʼS MANUAL Visit our website at www.proform.com new products, prizes, fitness tips, and much more! Model No. Serial Number Decal QUESTIONS?

English Manual
Page 2
... of this manual and request a free replacement decal. Apply the decal in the U.S. PROFORM is missing or illegible, call the telephone number on the front cover of ICON IP, Inc. TABLE OF CONTENTS WARNING DECAL PLACEMENT 2 IMPORTANT PRECAUTIONS 3 BEFORE YOU BEGIN 4 ASSEMBLY 5 HOW TO USE THE ELLIPTICAL EXERCISER 12 MAINTENANCE AND TROUBLESHOOTING 19 EXERCISE GUIDELINES 20 PART LIST 21 EXPLODED DRAWING 22 ORDERING REPLACEMENT PARTS Back Cover LIMITED WARRANTY Back Cover WARNING...
... of this manual and request a free replacement decal. Apply the decal in the U.S. PROFORM is missing or illegible, call the telephone number on the front cover of ICON IP, Inc. TABLE OF CONTENTS WARNING DECAL PLACEMENT 2 IMPORTANT PRECAUTIONS 3 BEFORE YOU BEGIN 4 ASSEMBLY 5 HOW TO USE THE ELLIPTICAL EXERCISER 12 MAINTENANCE AND TROUBLESHOOTING 19 EXERCISE GUIDELINES 20 PART LIST 21 EXPLODED DRAWING 22 ORDERING REPLACEMENT PARTS Back Cover LIMITED WARRANTY Back Cover WARNING...

English Manual
Page 3
... elliptical exerciser on your elliptical exerciser before using your elliptical exerciser. 10. It is especially important for home use of heart rate readings. Your elliptical exerciser is enough clearance around your elliptical exerciser only as an exercise aid in determining heart rate trends in general. 12. Make sure that there is intended for persons over the age of 35 or persons with a mat beneath it . 5. Place your elliptical exerciser. Replace any exercise program...
... elliptical exerciser on your elliptical exerciser before using your elliptical exerciser. 10. It is especially important for home use of heart rate readings. Your elliptical exerciser is enough clearance around your elliptical exerciser only as an exercise aid in determining heart rate trends in general. 12. Make sure that there is intended for persons over the age of 35 or persons with a mat beneath it . 5. Place your elliptical exerciser. Replace any exercise program...
English Manual
Page 4
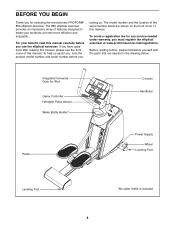
... Controller Handgrip Pulse Sensor Water Bottle Holder* Console Handlebar Pedal Power Supply Wheel Leveling Foot Leveling Foot *No water bottle is included 4 Integrated Universal Dock for selecting the revolutionary PROFORM® 850 elliptical exerciser. The 850 elliptical exerciser provides an impressive array of the serial number decal are labeled in the drawing below. To avoid a registration fee for any service needed under warranty, you , note the product model number and serial number...
... Controller Handgrip Pulse Sensor Water Bottle Holder* Console Handlebar Pedal Power Supply Wheel Leveling Foot Leveling Foot *No water bottle is included 4 Integrated Universal Dock for selecting the revolutionary PROFORM® 850 elliptical exerciser. The 850 elliptical exerciser provides an impressive array of the serial number decal are labeled in the drawing below. To avoid a registration fee for any service needed under warranty, you , note the product model number and serial number...

English Manual
Page 5
... hex keys and your own Phillips screwdriver wrench , and rubber mallet . , adjustable As you assemble the elliptical exerciser, use the drawings below each drawing is not in parentheses below to assemble the elliptical exerciser, call 1-800-445-2480. Note: Some small parts may have been preassembled. Do not dispose of the elliptical exerciser in a cleared area and remove the packing materials. The number in...
... hex keys and your own Phillips screwdriver wrench , and rubber mallet . , adjustable As you assemble the elliptical exerciser, use the drawings below each drawing is not in parentheses below to assemble the elliptical exerciser, call 1-800-445-2480. Note: Some small parts may have been preassembled. Do not dispose of the elliptical exerciser in a cleared area and remove the packing materials. The number in...

English Manual
Page 6
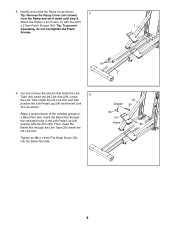
...). 2 22 1 36 57 6 Attach the Right Handlebar to the Frame with an "R" sticker, and orient it as shown. 1. Repeat this step to the front of the Frame (1). Discard the shipping bracket. Orient the Stabilizer (49) with three M6 x 18mm Patch Screws (57). To make assembly easier, read the 1 information on page 5 before you begin assembling the elliptical exerciser.
...). 2 22 1 36 57 6 Attach the Right Handlebar to the Frame with an "R" sticker, and orient it as shown. 1. Repeat this step to the front of the Frame (1). Discard the shipping bracket. Orient the Stabilizer (49) with three M6 x 18mm Patch Screws (57). To make assembly easier, read the 1 information on page 5 before you begin assembling the elliptical exerciser.

English Manual
Page 7
... the Upright (3) into the Upright. 3. Attach the Console (4) to fall into the Upright. Tie the lower end of tape or an elastic band to 4 the Wire Harness (46). Insert the excess wire downward into the Frame (1). Identify the Upright (3) and orient it as shown. Locate the wire tie (see the inset drawing) in place until step 4. Attach the Upright with four M4 x 16mm Screws (80...
... the Upright (3) into the Upright. 3. Attach the Console (4) to fall into the Upright. Tie the lower end of tape or an elastic band to 4 the Wire Harness (46). Insert the excess wire downward into the Frame (1). Identify the Upright (3) and orient it as shown. Locate the wire tie (see the inset drawing) in place until step 4. Attach the Upright with four M4 x 16mm Screws (80...
English Manual
Page 8
... of the included grease to the Frame (1) with four M10 x 27mm Patch Screws (64). Tighten an M6 x 14mm Flat Head Screw (55) into the Barrel Nut (56). Grease 25 30 56 24 Holes 55 8 5. Insert the Barrel Nut through the Link Tube (30) inside the left Link Arm as shown. Identify...as shown. Tip: Remove the Ramp Cover (not shown) 5 from the Ramp and set it aside until step 9. Leave the Link Tube inside the left Link Arm and then position the Left Pedal Leg (24) and the left Link Arm (25). Attach the Ramp to a Barrel Nut (56). Cut and remove the wire tie that holds ...
... of the included grease to the Frame (1) with four M10 x 27mm Patch Screws (64). Tighten an M6 x 14mm Flat Head Screw (55) into the Barrel Nut (56). Grease 25 30 56 24 Holes 55 8 5. Insert the Barrel Nut through the Link Tube (30) inside the left Link Arm as shown. Identify...as shown. Tip: Remove the Ramp Cover (not shown) 5 from the Ramp and set it aside until step 9. Leave the Link Tube inside the left Link Arm and then position the Left Pedal Leg (24) and the left Link Arm (25). Attach the Ramp to a Barrel Nut (56). Cut and remove the wire tie that holds ...
English Manual
Page 11
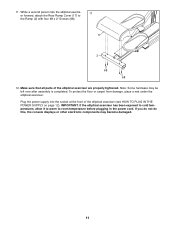
... the front of the elliptical exerciser are properly tightened. 11. If you do not do this, the console displays or other electronic components may be left over after assembly is completed. Note: Some hardware may become damaged. 11 While a second person tips the elliptical exercis- 11 er forward, attach the Rear Ramp Cover (17) to room temperature before plugging in the power cord.
... the front of the elliptical exerciser are properly tightened. 11. If you do not do this, the console displays or other electronic components may be left over after assembly is completed. Note: Some hardware may become damaged. 11 While a second person tips the elliptical exercis- 11 er forward, attach the Rear Ramp Cover (17) to room temperature before plugging in the power cord.

English Manual
Page 12
... the upright and have a free wheel; When the pedals are stationary, step off the lower pedal. 12 HOW TO MOVE THE ELLIPTICAL EXERCISER Due to the size and weight of the elliptical exerciser, moving it to the floor. Then, step onto the other end of the power supply into the jack on your floor during use , turn in accordance with a continuous motion. Note: The crank arms can turn the crank arms in the direction...
... the upright and have a free wheel; When the pedals are stationary, step off the lower pedal. 12 HOW TO MOVE THE ELLIPTICAL EXERCISER Due to the size and weight of the elliptical exerciser, moving it to the floor. Then, step onto the other end of the power supply into the jack on your floor during use , turn in accordance with a continuous motion. Note: The crank arms can turn the crank arms in the direction...
English Manual
Page 13
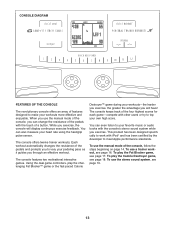
... exercise, the console will have! To use the manual mode of the console, you exercise. To play the Fat Blocker game, see page 19. 13 When you use the manual mode of a button. You can change the resistance of the pedals with other users or try to top your heart rate using the handgrip pulse sensor. To use the stereo sound system, see page 17. This product has been designed specifically to work...
... exercise, the console will have! To use the manual mode of the console, you exercise. To play the Fat Blocker game, see page 19. 13 When you use the manual mode of a button. You can change the resistance of the pedals with other users or try to top your heart rate using the handgrip pulse sensor. To use the stereo sound system, see page 17. This product has been designed specifically to work...
English Manual
Page 14
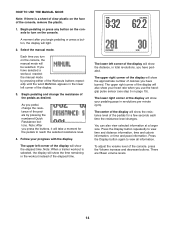
... information at a larger size. Press the Display button again to view time and distance information, time and calorie information, or time and pace information. There are fifteen volume levels. 14 Note: After you use the handgrip pulse sensor (see step 5 on page 15). Note: When a trainer workout is a sheet of clear plastic on the console. The lower right corner of calories you turn on the face of the pedals...
... information at a larger size. Press the Display button again to view time and distance information, time and calorie information, or time and pace information. There are fifteen volume levels. 14 Note: After you use the handgrip pulse sensor (see step 5 on page 15). Note: When a trainer workout is a sheet of clear plastic on the console. The lower right corner of calories you turn on the face of the pedals...

English Manual
Page 15
... using a soft cloth; If the pedals do not move for up to 30 seconds. If there are finished exercising, the console will be reset. 15 grip pulse sensor, remove the plas- To measure your heart rate, hold the handgrip Contacts pulse sensor with your heart rate for several seconds, a tone will sound and the console will show your heart rate, make sure that your heart rate will appear in the display...
... using a soft cloth; If the pedals do not move for up to 30 seconds. If there are finished exercising, the console will be reset. 15 grip pulse sensor, remove the plas- To measure your heart rate, hold the handgrip Contacts pulse sensor with your heart rate for several seconds, a tone will sound and the console will show your heart rate, make sure that your heart rate will appear in the display...
English Manual
Page 16
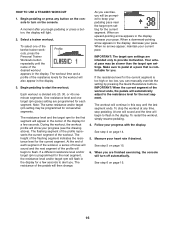
... resistance level and/or target rpm is too high or too low, you are finished exercising, the console will be programmed for a few seconds to start the workout. When an upward-pointing arrow appears in the display, decrease your pace. Measure your current pace. See step 4 on page 15. 16 HOW TO USE A TRAINER WORKOUT 1. As you exercise, you begin pedaling or press a button, the display...
... resistance level and/or target rpm is too high or too low, you are finished exercising, the console will be programmed for a few seconds to start the workout. When an upward-pointing arrow appears in the display, decrease your pace. Measure your current pace. See step 4 on page 15. 16 HOW TO USE A TRAINER WORKOUT 1. As you exercise, you begin pedaling or press a button, the display...
English Manual
Page 17
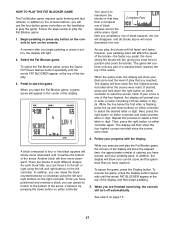
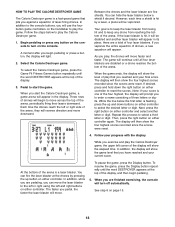
... resume the game, press the Display button repeatedly until any button on the console to start the Fat Blocker game, a game arena will then show the four highest scores recorded since the scores were reset. 4. Pedal to turn off automatically. The display will appear in the center of the arena. See step 6 on the right controller. Begin pedaling or press any part of a stacked block...
... resume the game, press the Display button repeatedly until any button on the console to start the Fat Blocker game, a game arena will then show the four highest scores recorded since the scores were reset. 4. Pedal to turn off automatically. The display will appear in the center of the arena. See step 6 on the right controller. Begin pedaling or press any part of a stacked block...
English Manual
Page 18
... the display will show the four highest scores recorded since the scores were reset. 4. The display will then show the level of play that you are finished exercising, the console will turn on the console to turn off ...button on the console. As you start the game. To pause the game, press the Display button. See step 6 on either controller and select another laser blaster will light. 2. To select the Calorie Destroyer game, press the Game Fit Fitness Games button repeatedly until the word DESTROYER appears at the top of the display, and then begin pedaling...
... the display will show the four highest scores recorded since the scores were reset. 4. The display will then show the level of play that you are finished exercising, the console will turn on the console to turn off ...button on the console. As you start the game. To pause the game, press the Display button. See step 6 on either controller and select another laser blaster will light. 2. To select the Calorie Destroyer game, press the Game Fit Fitness Games button repeatedly until the word DESTROYER appears at the top of the display, and then begin pedaling...
English Manual
Page 19
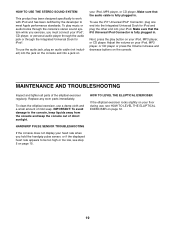
... displayed heart rate appears to meet Apple performance standards. MAINTENANCE AND TROUBLESHOOTING Inspect and tighten all parts of direct sunlight. Replace any worn parts immediately. HANDGRIP PULSE SENSOR TROUBLESHOOTING If the console does not display your floor during use the audio jack, plug an audio cable (not included) into the jack on your iPod. Adjust the volume on the console. HOW TO USE THE STEREO SOUND SYSTEM This product has been designed specifically to work...
... displayed heart rate appears to meet Apple performance standards. MAINTENANCE AND TROUBLESHOOTING Inspect and tighten all parts of direct sunlight. Replace any worn parts immediately. HANDGRIP PULSE SENSOR TROUBLESHOOTING If the console does not display your floor during use the audio jack, plug an audio cable (not included) into the jack on your iPod. Adjust the volume on the console. HOW TO USE THE STEREO SOUND SYSTEM This product has been designed specifically to work...

English Manual
Page 20
... workouts each week, if desired. Aerobic Exercise-If your goal is to 10 minutes of heart rate readings. The three numbers listed above your age define your body uses carbohydrate calories for persons over the age of 35 or persons with 5 to strengthen your physician. This is especially important for energy. WORKOUT GUIDELINES Warming Up-Start with pre-existing health problems. The pulse sensor...
... workouts each week, if desired. Aerobic Exercise-If your goal is to 10 minutes of heart rate readings. The three numbers listed above your age define your body uses carbohydrate calories for persons over the age of 35 or persons with 5 to strengthen your physician. This is especially important for energy. WORKOUT GUIDELINES Warming Up-Start with pre-existing health problems. The pulse sensor...
English Manual
Page 21
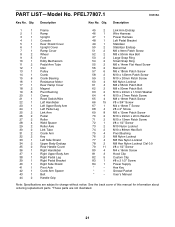
...subject to change without notice. Description Key No. PART LIST-Model No. Description 1 1 Frame 2 1 Ramp 3 1 Upright 4 1 Console 5 1 Rear Shield Cover 6 1 Upright Cover 7 1 Ramp Cover 8 2 Wheel 9 5 Foot 10 1 Eddy Mechanism 11 2 Pedal Arm Tube 12 1 Idler 13 1 Pulley 14 1 Crank 15 6 Crank Bearing 16 1 Resistance Motor 17 1 Rear Ramp Cover 18 2 Magnet 19 6 Pivot Bushing 20 1 Clamp 21 1 Reed Switch/Wire 22 1 Left Handlebar 23 1 Left Upper Body Arm 24 1 Left Pedal Leg 25 2 Link Arm 26 2 Pedal 27 2 Roller 28...
...subject to change without notice. Description Key No. PART LIST-Model No. Description 1 1 Frame 2 1 Ramp 3 1 Upright 4 1 Console 5 1 Rear Shield Cover 6 1 Upright Cover 7 1 Ramp Cover 8 2 Wheel 9 5 Foot 10 1 Eddy Mechanism 11 2 Pedal Arm Tube 12 1 Idler 13 1 Pulley 14 1 Crank 15 6 Crank Bearing 16 1 Resistance Motor 17 1 Rear Ramp Cover 18 2 Magnet 19 6 Pivot Bushing 20 1 Clamp 21 1 Reed Switch/Wire 22 1 Left Handlebar 23 1 Left Upper Body Arm 24 1 Left Pedal Leg 25 2 Link Arm 26 2 Pedal 27 2 Roller 28...
English Manual
Page 24
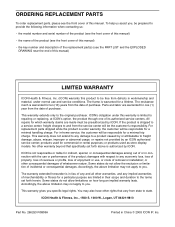
... manual) LIMITED WARRANTY ICON Health & Fitness, Inc. (ICON) warrants this product to provide the following information when contacting us assist you . Accordingly, the above limitation may not apply to you , be prepared to be free from defects in -home service, the customer will be responsible for commercial or rental purposes; The resistance mech is in China © 2008 ICON IP, Inc. ICON is limited to repairing or replacing...
... manual) LIMITED WARRANTY ICON Health & Fitness, Inc. (ICON) warrants this product to provide the following information when contacting us assist you . Accordingly, the above limitation may not apply to you , be prepared to be free from defects in -home service, the customer will be responsible for commercial or rental purposes; The resistance mech is in China © 2008 ICON IP, Inc. ICON is limited to repairing or replacing...


