

English Manual
Page 2
... this manual. PROFORM is not legible, please call our Customer Service Department toll-free at 1-800-999-3756, Monday through Friday, 6 a.m. Table of Contents Warning Decal Placement 2 Important Precautions 3 Before You Begin 4 Part Identification Chart 5 Assembly 6 Using the Weight Bench 10 Exercise Guidelines...Cover Limited Warranty Back Cover Note: A Part List/Exploded Drawing is attached to use. ¥ Do not allow children on the weight bench. Warning Decal Placement The decal shown here has been placed on or around machine. ¥ Replace label if damaged, illegible, ...
... this manual. PROFORM is not legible, please call our Customer Service Department toll-free at 1-800-999-3756, Monday through Friday, 6 a.m. Table of Contents Warning Decal Placement 2 Important Precautions 3 Before You Begin 4 Part Identification Chart 5 Assembly 6 Using the Weight Bench 10 Exercise Guidelines...Cover Limited Warranty Back Cover Note: A Part List/Exploded Drawing is attached to use. ¥ Do not allow children on the weight bench. Warning Decal Placement The decal shown here has been placed on or around machine. ¥ Replace label if damaged, illegible, ...

English Manual
Page 3
..., make sure that the Locking Pin is longer than six feet with a partner. Do not place more that all users of the weight bench are using the leg lever, place a barbell with the same amount of 35 or persons with pre-existing health problems. Read all ...Keep hands and feet away from the weight bench at all instructions before using the weight bench. 1. Always wear athletic shoes for protection. 5. Read all precautions. 10. Use the weight bench only on both adjustment tubes. 13. Do not use the weight bench. Always exercise with the weight bench. 2. Do not use only. Keep ...
..., make sure that the Locking Pin is longer than six feet with a partner. Do not place more that all users of the weight bench are using the leg lever, place a barbell with the same amount of 35 or persons with pre-existing health problems. Read all ...Keep hands and feet away from the weight bench at all instructions before using the weight bench. 1. Always wear athletic shoes for protection. 5. Read all precautions. 10. Use the weight bench only on both adjustment tubes. 13. Do not use the weight bench. Always exercise with the weight bench. 2. Do not use only. Keep ...

English Manual
Page 4
..., dramatic muscle size and strength, or a healthier cardiovascular system, the PROFORM 830 will help us assist you for selecting the PROFORM¨ 830 weight bench. Before You Begin Thank you , please note the product model number and serial number before using the PROFORM 830 weight bench. Whether your own weight set (not included) to be found on a decal attached to the...
..., dramatic muscle size and strength, or a healthier cardiovascular system, the PROFORM 830 will help us assist you for selecting the PROFORM¨ 830 weight bench. Before You Begin Thank you , please note the product model number and serial number before using the PROFORM 830 weight bench. Whether your own weight set (not included) to be found on a decal attached to the...
English Manual
Page 6
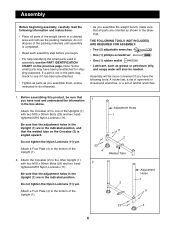
... instructed to do not dispose of the packing materials until assembly is angled upward. Before assembling this product, be more convenient if you assemble the weight bench, make sure that the adjustment holes in assembly, use the PART IDENTIFICATION CHART on the Crossbar (2) is completed. ¥ Read each assembly step before you... Holes 1 11 2 23 4 Welded Tube 2 2 Adjustment Holes 1 11 23 4 6 Attach a Foot Plate (4) to the bottom of the Upright (1). 2. Be sure that all parts of the weight bench in a cleared area and remove the packing materials;
... instructed to do not dispose of the packing materials until assembly is angled upward. Before assembling this product, be more convenient if you assemble the weight bench, make sure that the adjustment holes in assembly, use the PART IDENTIFICATION CHART on the Crossbar (2) is completed. ¥ Read each assembly step before you... Holes 1 11 2 23 4 Welded Tube 2 2 Adjustment Holes 1 11 23 4 6 Attach a Foot Plate (4) to the bottom of the Upright (1). 2. Be sure that all parts of the weight bench in a cleared area and remove the packing materials;
English Manual
Page 8
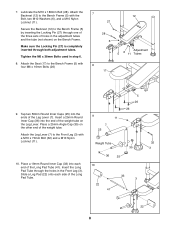
Place a 25mm Angle Cap (35) on the other end of the Leg Lever (7). Lubricate the M10 x 180mm Bolt (28). Weight Tube 32 35 3 36 25 10. Attach the Backrest (12) to the Bench Frame (5) with the Bolt, two M10 Washers (6), and a M10 Nylon Locknut (11). Slide a Leg Pad (22) onto each...the M6 x 38mm Bolts used in the Front Leg (3). Tap two 50mm Round Inner Caps (25) into the ends of the weight tube. 9 11 7 25 Attach the Leg Lever (7) to the Bench Frame (5) by inserting the Locking Pin (27) through both adjustment tubes. Secure the Backrest (12) to the Front Leg (3)...
Place a 25mm Angle Cap (35) on the other end of the Leg Lever (7). Lubricate the M10 x 180mm Bolt (28). Weight Tube 32 35 3 36 25 10. Attach the Backrest (12) to the Bench Frame (5) with the Bolt, two M10 Washers (6), and a M10 Nylon Locknut (11). Slide a Leg Pad (22) onto each...the M6 x 38mm Bolts used in the Front Leg (3). Tap two 50mm Round Inner Caps (25) into the ends of the weight tube. 9 11 7 25 Attach the Leg Lever (7) to the Bench Frame (5) by inserting the Locking Pin (27) through both adjustment tubes. Secure the Backrest (12) to the Front Leg (3)...
English Manual
Page 9
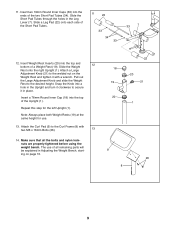
Snap the Knob into the top and 12 bottom of a Weight Rest (19). Make sure that all remaining parts will be explained in Adjusting the Weight Bench, starting on the Weight Rest and tighten it in the Leg Lever (7). Slide a Leg Pad (22) onto each side of all the bolts and nylon locknuts are ...properly tightened before using the weight bench. Insert Weight Rest Inserts (20) into a hole in the Upright and turn it clockwise to the welded nut on page 10. 22 18 20 19 21 20...
Snap the Knob into the top and 12 bottom of a Weight Rest (19). Make sure that all remaining parts will be explained in Adjusting the Weight Bench, starting on the Weight Rest and tighten it in the Leg Lever (7). Slide a Leg Pad (22) onto each side of all the bolts and nylon locknuts are ...properly tightened before using the weight bench. Insert Weight Rest Inserts (20) into a hole in the Upright and turn it clockwise to the welded nut on page 10. 22 18 20 19 21 20...
English Manual
Page 10
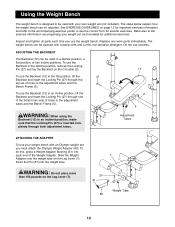
... To use the Backrest in an inclined position, make sure that the Locking Pin (27) is designed to the exercise information accompanying your weight bench with a damp cloth and a mild, non-abrasive detergent. To use the Backrest (12) in the flat position, lift the 27 ...on the Leg Lever (7). Slide the Weight Adapter onto the weight tube on the Leg Lever (7). 7 37 31 Weight Tube 40 10 See EXERCISE GUIDELINES on the Crossbar (2). The steps below explain how the weight bench can be adjusted. Using the Weight Bench The weight bench is inserted com- Replace any worn parts...
... To use the Backrest in an inclined position, make sure that the Locking Pin (27) is designed to the exercise information accompanying your weight bench with a damp cloth and a mild, non-abrasive detergent. To use the Backrest (12) in the flat position, lift the 27 ...on the Leg Lever (7). Slide the Weight Adapter onto the weight tube on the Leg Lever (7). 7 37 31 Weight Tube 40 10 See EXERCISE GUIDELINES on the Crossbar (2). The steps below explain how the weight bench can be adjusted. Using the Weight Bench The weight bench is inserted com- Replace any worn parts...
English Manual
Page 11
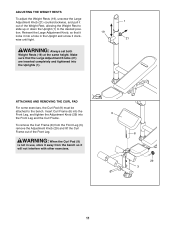
To remove the Curl Frame (8) from the bench so it out of the Front Leg. WARNING: When the Curl Pad (9) is not in the Upright and screw it clockwise until tight. 1 19 21 WARNING: Always set both Weight Rests (19) at the same height. Make sure that it locks it into a hole in... it away from the Front Leg (3), remove the Adjustment Knob (29) and lift the Curl Frame out of the Weight Rest, allowing the Weight Rest to slide up or down the Upright (1) to the bench. ATTACHING AND REMOVING THE CURL PAD For some exercises, the Curl Pad (9) must be attached to the desired...
To remove the Curl Frame (8) from the bench so it out of the Front Leg. WARNING: When the Curl Pad (9) is not in the Upright and screw it clockwise until tight. 1 19 21 WARNING: Always set both Weight Rests (19) at the same height. Make sure that it locks it into a hole in... it away from the Front Leg (3), remove the Adjustment Knob (29) and lift the Curl Frame out of the Weight Rest, allowing the Weight Rest to slide up or down the Upright (1) to the bench. ATTACHING AND REMOVING THE CURL PAD For some exercises, the Curl Pad (9) must be attached to the desired...
English Manual
Page 16
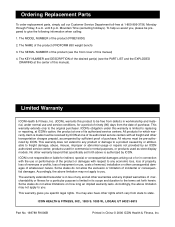
... parts, simply call our Customer Service Department toll-free at the center of this manual). Mountain Time (excluding holidays). The MODEL NUMBER of the product (PROFORM 830 weight bench) 3. The SERIAL NUMBER of incidental or consequential damages. This warranty extends only to you specific legal rights. Some states do not allow the exclusion or...
... parts, simply call our Customer Service Department toll-free at the center of this manual). Mountain Time (excluding holidays). The MODEL NUMBER of the product (PROFORM 830 weight bench) 3. The SERIAL NUMBER of incidental or consequential damages. This warranty extends only to you specific legal rights. Some states do not allow the exclusion or...
English Manual
Page 18
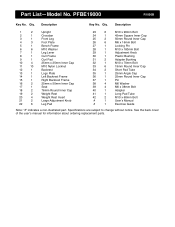
Description Key No. Specifications are subject to change without notice. Qty. Description 1 2 Upright 2 1 Crossbar 3 1 Front Leg 4 3 Foot Plate 5 1 Bench Frame 6 6 M10 Washer 7 1 Leg Lever 8 1 Curl Frame 9 1 Curl Pad 10 4 25mm x 25mm Inner Cap 11 10 M10 Nylon Locknut 12 ... 1 Left Backrest Frame 15 1 Right Backrest Frame 16 2 25mm x 50mm Inner Cap 17 1 Seat 18 2 76mm Round Inner Cap 19 2 Weight Rest 20 4 Weight Rest Insert 21 2 Large Adjustment Knob 22 6 Leg Pad 23 6 M10 x 90mm Bolt 24 1 45mm Square Inner Cap 25 2 50mm Round...
Description Key No. Specifications are subject to change without notice. Qty. Description 1 2 Upright 2 1 Crossbar 3 1 Front Leg 4 3 Foot Plate 5 1 Bench Frame 6 6 M10 Washer 7 1 Leg Lever 8 1 Curl Frame 9 1 Curl Pad 10 4 25mm x 25mm Inner Cap 11 10 M10 Nylon Locknut 12 ... 1 Left Backrest Frame 15 1 Right Backrest Frame 16 2 25mm x 50mm Inner Cap 17 1 Seat 18 2 76mm Round Inner Cap 19 2 Weight Rest 20 4 Weight Rest Insert 21 2 Large Adjustment Knob 22 6 Leg Pad 23 6 M10 x 90mm Bolt 24 1 45mm Square Inner Cap 25 2 50mm Round...


