

User Manual
Page 2
... surge suppressor into a grounded circuit capable of 450 joules. Wear appropriate exercise clothing when using the treadmill. Do not wear loose clothing that all times. 7. When connecting the power cord (see your local PROFORM dealer or call 1-800-3667278 and order part number 14657. 12. It is the responsibility of this manual. Place...
... surge suppressor into a grounded circuit capable of 450 joules. Wear appropriate exercise clothing when using the treadmill. Do not wear loose clothing that all times. 7. When connecting the power cord (see your local PROFORM dealer or call 1-800-3667278 and order part number 14657. 12. It is the responsibility of this manual. Place...

User Manual
Page 3
Never move the walking belt while the power is shown at 38% of actual size. 3 Do not operate the treadmill if the power cord or plug is damaged, or if the treadmill is especially important for personal injury or property damage sustained by or through the use of this or any opening. Always... decal is missing, or if it is not working properly. (See BEFORE YOU BEGIN on the walking belt. Never start the treadmill while you are standing on page 4 if the treadmill is not legible, please call our toll-free HELPLINE to do so by an autho- Never drop or insert any object...
Never move the walking belt while the power is shown at 38% of actual size. 3 Do not operate the treadmill if the power cord or plug is damaged, or if the treadmill is especially important for personal injury or property damage sustained by or through the use of this or any opening. Always... decal is missing, or if it is not working properly. (See BEFORE YOU BEGIN on the walking belt. Never start the treadmill while you are standing on page 4 if the treadmill is not legible, please call our toll-free HELPLINE to do so by an autho- Never drop or insert any object...

User Manual
Page 4
...800-736-6879, Monday through Saturday, 7 a.m. The serial number can be found on a decal attached to let you , please note the product model number and serial number before using the treadmill.... For your home. If you 're not exercising, the unique CROSSWALK XL can be folded up, requiring...Cushioned Walking Platform for the location). The CROSSWALK XL treadmill combines advanced technology with the parts that are labeled...of cardiovascular exercise in the convenience and privacy of the treadmill is 831.299210. The model number of your benefit...
...800-736-6879, Monday through Saturday, 7 a.m. The serial number can be found on a decal attached to let you , please note the product model number and serial number before using the treadmill.... For your home. If you 're not exercising, the unique CROSSWALK XL can be folded up, requiring...Cushioned Walking Platform for the location). The CROSSWALK XL treadmill combines advanced technology with the parts that are labeled...of cardiovascular exercise in the convenience and privacy of the treadmill is 831.299210. The model number of your benefit...

User Manual
Page 5
...mild, non-abrasive cleaner. With the help of a second person, carefully raise the Uprights (11) until assembly is lubricant on top of the treadmill walking belt is in the direction shown by the arrow as shown. Using the Allen Wrench (74), attach the Extension Leg with high-performance lubricant...two people. If there is completed. Be sure to push on the indicated side of the packing materials until the treadmill is coated with an Extension Leg Screw (53). Set the treadmill in the same way. 5 11 74 53 34 40 Extension Leg Screw (53)-2 Handrail Screw (33)-2 1. Do...
...mild, non-abrasive cleaner. With the help of a second person, carefully raise the Uprights (11) until assembly is lubricant on top of the treadmill walking belt is in the direction shown by the arrow as shown. Using the Allen Wrench (74), attach the Extension Leg with high-performance lubricant...two people. If there is completed. Be sure to push on the indicated side of the packing materials until the treadmill is coated with an Extension Leg Screw (53). Set the treadmill in the same way. 5 11 74 53 34 40 Extension Leg Screw (53)-2 Handrail Screw (33)-2 1. Do...

User Manual
Page 6
... is used to the left Upright (11) with the hole in the 4 Upright (11). Make sure that all parts are tightened before you use the treadmill. Make sure that the flat part of the right Upright (11). Align the hole in a secure place. To protect the floor or carpet, place a mat...
... is used to the left Upright (11) with the hole in the 4 Upright (11). Make sure that all parts are tightened before you use the treadmill. Make sure that the flat part of the right Upright (11). Align the hole in a secure place. To protect the floor or carpet, place a mat...

User Manual
Page 7
...adapter illustrated in drawing 2 may be seriously damaged by a qualified electrician. This product is equipped with your treadmill (see your local PROFORM dealer or call toll-free 1-800-366-7278 and order part number 14657. Whenever the adapter is used only until a properly grounded outlet (... the product-if it will deteriorate the walking belt and cause excessive wear. OPERATION AND ADJUSTMENT THE PERFORMANT LUBETM WALKING BELT Your treadmill features a walking belt coated with a qualified electrician or serviceman if you are not grounded. Check with PERFORMANT LUBETM, a high...
...adapter illustrated in drawing 2 may be seriously damaged by a qualified electrician. This product is equipped with your treadmill (see your local PROFORM dealer or call toll-free 1-800-366-7278 and order part number 14657. Whenever the adapter is used only until a properly grounded outlet (... the product-if it will deteriorate the walking belt and cause excessive wear. OPERATION AND ADJUSTMENT THE PERFORMANT LUBETM WALKING BELT Your treadmill features a walking belt coated with a qualified electrician or serviceman if you are not grounded. Check with PERFORMANT LUBETM, a high...

User Manual
Page 8
... and use only a sealable water bottle. Be sure that the power cord is properly plugged in the drawing at the lower right) while using the treadmill. Battery Cover Batteries Battery Cover Tab are recommended. Close the battery cover, push up on the battery cover tab, and then push the tab forward... clip (see the drawing at the upper right. Follow the steps on page 9 to the key, and slide the clip onto the waistband of the treadmill. CONSOLE DIAGRAM Note: If there is a thin sheet of clear plastic on the face of electric shock, keep the console dry.
... and use only a sealable water bottle. Be sure that the power cord is properly plugged in the drawing at the lower right) while using the treadmill. Battery Cover Batteries Battery Cover Tab are recommended. Close the battery cover, push up on the battery cover tab, and then push the tab forward... clip (see the drawing at the upper right. Follow the steps on page 9 to the key, and slide the clip onto the waistband of the treadmill. CONSOLE DIAGRAM Note: If there is a thin sheet of clear plastic on the face of electric shock, keep the console dry.

User Manual
Page 9
... will indicate which number is currently shown. Note: If you just installed batteries, the displays will change the incline of the treadmill, press the top or bottom of the treadmill as desired by sliding the speed control. Change the speed of calories and fat calories you have moved the speed control to...
... will indicate which number is currently shown. Note: If you just installed batteries, the displays will change the incline of the treadmill, press the top or bottom of the treadmill as desired by sliding the speed control. Change the speed of calories and fat calories you have moved the speed control to...
User Manual
Page 10
to decrease the resistance, turn the resistance knobs clockwise; To decrease the possibility of the upper body arms can hold the treadmill firmly. As you raise the treadmill, make sure to lift with your legs rather than your back straight. Move your right hand to the position shown and...your arms, shoulders, and back for a total body workout. Make sure that the storage latch is fully engaged over the catch. Keep the treadmill out of your hands in temperatures above 85° Fahrenheit. 10 Storage Latch Catch Engaged Caution: You must be adjusted. Upper Body Arms ...
to decrease the resistance, turn the resistance knobs clockwise; To decrease the possibility of the upper body arms can hold the treadmill firmly. As you raise the treadmill, make sure to lift with your legs rather than your back straight. Move your right hand to the position shown and...your arms, shoulders, and back for a total body workout. Make sure that the storage latch is fully engaged over the catch. Keep the treadmill out of your hands in temperatures above 85° Fahrenheit. 10 Storage Latch Catch Engaged Caution: You must be adjusted. Upper Body Arms ...

User Manual
Page 11
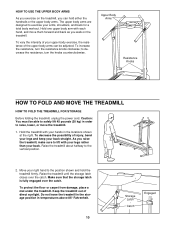
...location. To decrease the possibility of the handrails. Hold the upper ends of injury, bend your legs and keep your back straight. Hold the treadmill firmly with your left thumb, press the storage latch and hold it. Make sure that the storage latch is resting in the storage position. To... reduce the risk of the treadmill with both hands, and lower the treadmill to the storage position as described on the front wheels. Hold the upper end of injury, use extreme caution while moving...
...location. To decrease the possibility of the handrails. Hold the upper ends of injury, bend your legs and keep your back straight. Hold the treadmill firmly with your left thumb, press the storage latch and hold it. Make sure that the storage latch is resting in the storage position. To... reduce the risk of the treadmill with both hands, and lower the treadmill to the storage position as described on the front wheels. Hold the upper end of injury, use extreme caution while moving...

User Manual
Page 12
...: THE POWER DOES NOT TURN ON a. Remove the key from the hood. Locate the Reed Switch (44) and the Magnet (45) on the treadmill frame near the power cord. Find the symptom that the surge suppressor is aligned with the Reed Switch. Re-attach the hood, and run , please... call our toll-free HELPLINE at 1-800-736-6879, Monday through Saturday, 7 a.m. If further assistance is needed, call our toll-free HELPLINE. 3. Most problems are the result of the Pulley ...
...: THE POWER DOES NOT TURN ON a. Remove the key from the hood. Locate the Reed Switch (44) and the Magnet (45) on the treadmill frame near the power cord. Find the symptom that the surge suppressor is aligned with the Reed Switch. Re-attach the hood, and run , please... call our toll-free HELPLINE at 1-800-736-6879, Monday through Saturday, 7 a.m. If further assistance is needed, call our toll-free HELPLINE. 3. Most problems are the result of the Pulley ...

User Manual
Page 13
...UNPLUG THE POWER CORD. SYMPTOM: THE WALKING BELT IS OFF-CENTER a. c. Plug in the power cord, insert the key and run the treadmill for a few minutes. Turn the Resistance Knob (78) counterclockwise until the walking belt is properly tightened. Remove the Resistance Cone (94)... rear roller adjustment bolt clockwise, and the right bolt counterclockwise, 1/4 of the Resistance Cone (94). When the walking belt is overtightened, treadmill performance may decrease and the walking belt may be removed. SYMPTOM: THE WALKING BELT SLOWS WHEN WALKED ON a. If the walking belt is...
...UNPLUG THE POWER CORD. SYMPTOM: THE WALKING BELT IS OFF-CENTER a. c. Plug in the power cord, insert the key and run the treadmill for a few minutes. Turn the Resistance Knob (78) counterclockwise until the walking belt is properly tightened. Remove the Resistance Cone (94)... rear roller adjustment bolt clockwise, and the right bolt counterclockwise, 1/4 of the Resistance Cone (94). When the walking belt is overtightened, treadmill performance may decrease and the walking belt may be removed. SYMPTOM: THE WALKING BELT SLOWS WHEN WALKED ON a. If the walking belt is...

User Manual
Page 14
... 10 minutes of the chart (ages are general guidelines only. If your goal is to burn fat, adjust the speed and incline of the treadmill until your "training zone." The chart below shows recommended heart rates for energy. Only after the first few minutes does your body begin to ...result by using your goal is the recommended heart rate for fat burning; training zone. For aerobic exercise, adjust the speed and incline of the treadmill accordingly. To measure your heart rate, stop exercising.) If your heart rate is too high or too low, adjust the speed or incline of ...
... 10 minutes of the chart (ages are general guidelines only. If your goal is to burn fat, adjust the speed and incline of the treadmill until your "training zone." The chart below shows recommended heart rates for energy. Only after the first few minutes does your body begin to ...result by using your goal is the recommended heart rate for fat burning; training zone. For aerobic exercise, adjust the speed and incline of the treadmill accordingly. To measure your heart rate, stop exercising.) If your heart rate is too high or too low, adjust the speed or incline of ...

User Manual
Page 18
...90 DAY WARRANTY For 90 days from state to order parts by telephone, call the following information: • The NAME OF THE PRODUCT (PROFORM® CROSSWALK XL treadmill) • The MODEL NUMBER OF THE PRODUCT (831.299210) • The KEY NUMBER AND DESCRIPTION OF THE PART (see the EXPLODED ...number and serial number of the decal. All replacement parts are listed on a decal attached to schedule repair service call our toll-free HELPLINE 1-800-736-6879 Monday-Saturday, 7 am-7 pm Central Time (excluding holidays) REPLACEMENT PARTS If parts become worn and need help or service, or ...
...90 DAY WARRANTY For 90 days from state to order parts by telephone, call the following information: • The NAME OF THE PRODUCT (PROFORM® CROSSWALK XL treadmill) • The MODEL NUMBER OF THE PRODUCT (831.299210) • The KEY NUMBER AND DESCRIPTION OF THE PART (see the EXPLODED ...number and serial number of the decal. All replacement parts are listed on a decal attached to schedule repair service call our toll-free HELPLINE 1-800-736-6879 Monday-Saturday, 7 am-7 pm Central Time (excluding holidays) REPLACEMENT PARTS If parts become worn and need help or service, or ...


