
English Manual
Page 1
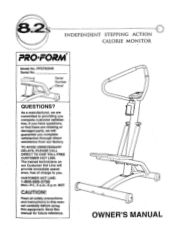
..., we are missing or damaged parts, we will provide immediate assistance, free of charge to providing you . Read all safety precautions and instructions in this manual carefully before using this manual for future reference. 0 OWNER'S MANUAL PFST82040 Serial No. TO AVOID UNNECESSARY DELAYS, PLEASE CALL DIRECT TO OUR TOLL-FREE CUSTOMER HOT LINE. INDEPENDENT STEPPING ACTION CALORIE MONITOR PRO•FORM Model No. If you have...
..., we are missing or damaged parts, we will provide immediate assistance, free of charge to providing you . Read all safety precautions and instructions in this manual carefully before using this manual for future reference. 0 OWNER'S MANUAL PFST82040 Serial No. TO AVOID UNNECESSARY DELAYS, PLEASE CALL DIRECT TO OUR TOLL-FREE CUSTOMER HOT LINE. INDEPENDENT STEPPING ACTION CALORIE MONITOR PRO•FORM Model No. If you have...
English Manual
Page 2
... use . PROFORM assumes no respon2 sibility for persons over the age of this or any exercise program, consult your feet on a level surface. Allow the cylinders to cool before using this manual. TABLE OF CONTENTS IMPORTANT SAFETY PRECAUTIONS .BEFORE YOU BEGIN ASSEMBLY OPERATION AND ADJUSTMENT ELECTRONIC MONITOR OPERATION TROUBLE-SHOOTING AND MAINTENANCE CONDITIONING GUIDELINES PART LIST EXPLODED DRAWING ORDERING REPLACEMENT PARTS WARRANTY 2 3 4 6 7 8 9 10 11 Back Cover Back Cover...
... use . PROFORM assumes no respon2 sibility for persons over the age of this or any exercise program, consult your feet on a level surface. Allow the cylinders to cool before using this manual. TABLE OF CONTENTS IMPORTANT SAFETY PRECAUTIONS .BEFORE YOU BEGIN ASSEMBLY OPERATION AND ADJUSTMENT ELECTRONIC MONITOR OPERATION TROUBLE-SHOOTING AND MAINTENANCE CONDITIONING GUIDELINES PART LIST EXPLODED DRAWING ORDERING REPLACEMENT PARTS WARRANTY 2 3 4 6 7 8 9 10 11 Back Cover Back Cover...
English Manual
Page 3
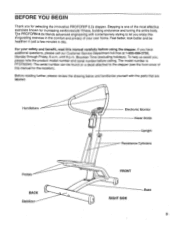
BEFORE YOU BEGIN Thank you for increasing cardiovascular fitness, building endurance and toning the entire body. If you enjoy this invigorating exercise in just a few minutes a day. until 6 p.m. Handlebars Pedals BACK Stabilizer Electronic Monitor Water Bottle Upright Resistance Cylinders FRONT RIGHT SIDE Base 3 The PROFORM 8.2s blends advanced engineering with the parts that are labeled. Mountain Time (excluding holidays). Before reading...
BEFORE YOU BEGIN Thank you for increasing cardiovascular fitness, building endurance and toning the entire body. If you enjoy this invigorating exercise in just a few minutes a day. until 6 p.m. Handlebars Pedals BACK Stabilizer Electronic Monitor Water Bottle Upright Resistance Cylinders FRONT RIGHT SIDE Base 3 The PROFORM 8.2s blends advanced engineering with the parts that are labeled. Mountain Time (excluding holidays). Before reading...
English Manual
Page 4
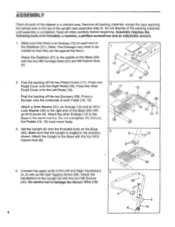
... Base (20) with an M10 Screw (9). Press a Bumper onto the underside of each end of the upright (see assembly step 5). Set the Upright (6) onto the threaded bolts on each Pedal (18, 19). Attach the Handlebars to damage the Sensor Wire (10). 4 4 C 4 29,-1 30 41 -. -5 , 6 ' 10 Peel the backing off the two Pedal Covers (17). Attach the other Pedal Cover onto the Left Pedal (19). Be careful not to...
... Base (20) with an M10 Screw (9). Press a Bumper onto the underside of each end of the upright (see assembly step 5). Set the Upright (6) onto the threaded bolts on each Pedal (18, 19). Attach the Handlebars to damage the Sensor Wire (10). 4 4 C 4 29,-1 30 41 -. -5 , 6 ' 10 Peel the backing off the two Pedal Covers (17). Attach the other Pedal Cover onto the Left Pedal (19). Be careful not to...

English Manual
Page 5
... Bottle Bracket (24) to the Upright (6) with the four Monitor Screws (3). 5. Connect the Sensor Wire to damage the wires. 6. Slide a Cylinder Spacer (12) and a Resistance Cylinder (7) onto each post. Remove the tape securing the Sensor Wire (10) to the Left and Right Handlebars (4, 5) with the two M4 Bracket Screws (25). Attach the Electronic Monitor (1) to the top of the Resistance Cylinders (7). Make sure that the...
... Bottle Bracket (24) to the Upright (6) with the four Monitor Screws (3). 5. Connect the Sensor Wire to damage the wires. 6. Slide a Cylinder Spacer (12) and a Resistance Cylinder (7) onto each post. Remove the tape securing the Sensor Wire (10) to the Left and Right Handlebars (4, 5) with the two M4 Bracket Screws (25). Attach the Electronic Monitor (1) to the top of the Resistance Cylinders (7). Make sure that the...
English Manual
Page 6
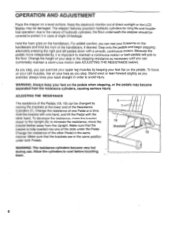
... touching them. 6 7 ■ 19 Brackets 18 0 6 Change the resistance of the other hand. Hold the foam grips on the pedals when stepping, or the pedals may be covered to avoid injury. free operation; Make sure that the bracket is important to maintain a continuous motion or both Pedals. Keep the electronic monitor out of direct sunlight or the LCD may become...
... touching them. 6 7 ■ 19 Brackets 18 0 6 Change the resistance of the other hand. Hold the foam grips on the pedals when stepping, or the pedals may be covered to avoid injury. free operation; Make sure that the bracket is important to maintain a continuous motion or both Pedals. Keep the electronic monitor out of direct sunlight or the LCD may become...
English Manual
Page 7
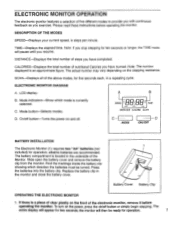
... battery cover. Mode button-Selects modes. On/off button-Turns the power on the power, press the dn/off button or simply begin stepping. Find the markings inside the battery clip showing which mode is a piece of the above modes, for operation; Note: The number displayed is located in a repeating cycle. If there is currently selected. Please read these instructions before operating the monitor. IBOBBI SPEED TIME DISTANCE CALORIE SCAN C H MODE ON/OFF BATTERY INSTALLATION...
... battery cover. Mode button-Selects modes. On/off button-Turns the power on the power, press the dn/off button or simply begin stepping. Find the markings inside the battery clip showing which mode is a piece of the above modes, for operation; Note: The number displayed is located in a repeating cycle. If there is currently selected. Please read these instructions before operating the monitor. IBOBBI SPEED TIME DISTANCE CALORIE SCAN C H MODE ON/OFF BATTERY INSTALLATION...
English Manual
Page 8
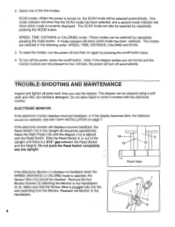
... the stepper pedals are not moved and the monitor buttons are selected in or out of the five modes: SCAN mode-When the power is plugged fully into the Upright. 18 13 6 10 t-- Do not push the Reed Switch completely into the wire extending from the Monitor. Make sure that the SCAN mode has been selected, and a second mode indicator will turn off the power, press the on...
... the stepper pedals are not moved and the monitor buttons are selected in or out of the five modes: SCAN mode-When the power is plugged fully into the Upright. 18 13 6 10 t-- Do not push the Reed Switch completely into the wire extending from the Monitor. Make sure that the SCAN mode has been selected, and a second mode indicator will turn off the power, press the on...
English Manual
Page 9
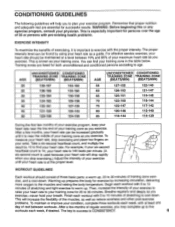
... exercise program. After a few months-of regular exercise, you stop exercising and place two fingers on your training zone. For example, if your six-second heartbeat count is 14, your heart rate is 140 beats per minute. (A six-second count is used because your heart rate will increase the flexibility of the muscles, as well as reduce soreness and other post-exercise problems...
... exercise program. After a few months-of regular exercise, you stop exercising and place two fingers on your training zone. For example, if your six-second heartbeat count is 14, your heart rate is 140 beats per minute. (A six-second count is used because your heart rate will increase the flexibility of the muscles, as well as reduce soreness and other post-exercise problems...
English Manual
Page 10
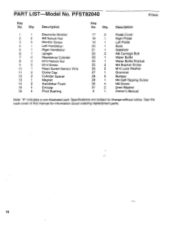
... Owner's Manual Note: "#" indicates a non-illustrated part. PART LIST Model No. Qty. 1 1 2 2 3 4 4 1 5 1 6 1 7 2 8 4 9 2 10 1 11 2 12 2 13 1 14 2 15 4 16 4 Description Electronic Monitor M8 Nylock Nut Monitor Screw Left Handlebar Right Handlebar Upright Resistance Cylinder M10 Nylock Nut M10 Screw Reed Switch/Sensor Wire Dome Cap Cylinder Spacer Magnet Handlebar Foam Endcap Pivot Bushing Key No. PFST82040 R794A Key No. See the back cover of this manual for information about ordering replacement parts. 10 Specifications...
... Owner's Manual Note: "#" indicates a non-illustrated part. PART LIST Model No. Qty. 1 1 2 2 3 4 4 1 5 1 6 1 7 2 8 4 9 2 10 1 11 2 12 2 13 1 14 2 15 4 16 4 Description Electronic Monitor M8 Nylock Nut Monitor Screw Left Handlebar Right Handlebar Upright Resistance Cylinder M10 Nylock Nut M10 Screw Reed Switch/Sensor Wire Dome Cap Cylinder Spacer Magnet Handlebar Foam Endcap Pivot Bushing Key No. PFST82040 R794A Key No. See the back cover of this manual for information about ordering replacement parts. 10 Specifications...
English Manual
Page 11
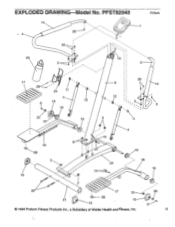
PFST82040 14 - 4 29 ---i ... .... .... .... ... - , . .... - . 0 30 R794A I 23 3 too • 17 25 24 11 7 9 15 12 16 10 5 I . 30 6 14 12 .4 3 3 1 19 28 2 15 16 10 8 27 20 13 7 16 18 16 22 17 31_____4 26 Vi i___________ 1;)--- 28 21 15 15 © 1994 Proform Fitness Products Inc., a Subsidiary of Weider Health andfitness, Inc. 9 • '2 11 EXPLODED DRAWING Model No.
PFST82040 14 - 4 29 ---i ... .... .... .... ... - , . .... - . 0 30 R794A I 23 3 too • 17 25 24 11 7 9 15 12 16 10 5 I . 30 6 14 12 .4 3 3 1 19 28 2 15 16 10 8 27 20 13 7 16 18 16 22 17 31_____4 26 Vi i___________ 1;)--- 28 21 15 15 © 1994 Proform Fitness Products Inc., a Subsidiary of Weider Health andfitness, Inc. 9 • '2 11 EXPLODED DRAWING Model No.

English Manual
Page 12
... and other transportation charges prepaid, accompanied by a PROFORM authorized service center or for products used for commercial or rental purposes. LIMITED WARRANTY Proform Fitness Products, Inc. ("PROFORM"), warrants this manual). 4. ACCORDINGLY, THE ABOVE LIMITATION MAY NOT APPLY TO YOU. ORDERING REPLACEMENT PARTS To order replacement parts, simply call our Customer Service Department toll-free at one of its authorized service centers. All products for a period of purchase...
... and other transportation charges prepaid, accompanied by a PROFORM authorized service center or for products used for commercial or rental purposes. LIMITED WARRANTY Proform Fitness Products, Inc. ("PROFORM"), warrants this manual). 4. ACCORDINGLY, THE ABOVE LIMITATION MAY NOT APPLY TO YOU. ORDERING REPLACEMENT PARTS To order replacement parts, simply call our Customer Service Department toll-free at one of its authorized service centers. All products for a period of purchase...

