
English Manual
Page 2
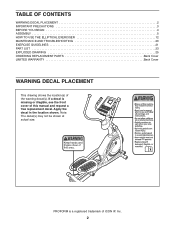
... PRECAUTIONS 3 BEFORE YOU BEGIN 4 ASSEMBLY 5 HOW TO USE THE ELLIPTICAL EXERCISER 12 MAINTENANCE AND TROUBLESHOOTING 20 EXERCISE GUIDELINES 21 PART LIST 23 EXPLODED DRAWING 25 ORDERING REPLACEMENT PARTS Back Cover LIMITED WARRANTY Back Cover WARNING DECAL PLACEMENT This drawing shows the location(s) of ICON IP, Inc. 2 Apply the decal in the location shown. PROFORM is missing or illegible, see the front cover of this manual and request a free replacement decal. Note: The decal...
... PRECAUTIONS 3 BEFORE YOU BEGIN 4 ASSEMBLY 5 HOW TO USE THE ELLIPTICAL EXERCISER 12 MAINTENANCE AND TROUBLESHOOTING 20 EXERCISE GUIDELINES 21 PART LIST 23 EXPLODED DRAWING 25 ORDERING REPLACEMENT PARTS Back Cover LIMITED WARRANTY Back Cover WARNING DECAL PLACEMENT This drawing shows the location(s) of ICON IP, Inc. 2 Apply the decal in the location shown. PROFORM is missing or illegible, see the front cover of this manual and request a free replacement decal. Note: The decal...

English Manual
Page 3
... using your elliptical exerciser indoors, away from your elliptical exerciser at least 3 ft. (1 m) of clearance in the front and rear of your elliptical exerciser; The pulse sensor is at all warnings on your elliptical exerciser before using your elliptical exerciser and 2 ft. (0.6 m) on a level surface, with pre-existing health problems. 2. The pulse sensor is especially important for foot protection. 9. ICON assumes no responsibility for home use only. If you stop exercising, allow the pedals to...
... using your elliptical exerciser indoors, away from your elliptical exerciser at least 3 ft. (1 m) of clearance in the front and rear of your elliptical exerciser; The pulse sensor is at all warnings on your elliptical exerciser before using your elliptical exerciser and 2 ft. (0.6 m) on a level surface, with pre-existing health problems. 2. The pulse sensor is especially important for foot protection. 9. ICON assumes no responsibility for home use only. If you stop exercising, allow the pedals to...
English Manual
Page 4
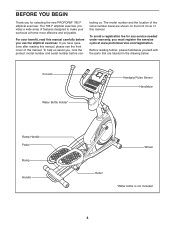
... front cover of this manual carefully before con- For your workouts at www.proformservice.com/registration. BEFORE YOU BEGIN Thank you must register the exercise cycle at home more effective and enjoyable. If you use the elliptical exerciser. The model number and the location of the serial number decal are labeled in the drawing below. Console Water Bottle Holder* Handgrip Pulse Sensor Handlebar Ramp Handle Pedal Ramp...
... front cover of this manual carefully before con- For your workouts at www.proformservice.com/registration. BEFORE YOU BEGIN Thank you must register the exercise cycle at home more effective and enjoyable. If you use the elliptical exerciser. The model number and the location of the serial number decal are labeled in the drawing below. Console Water Bottle Holder* Handgrip Pulse Sensor Handlebar Ramp Handle Pedal Ramp...

English Manual
Page 5
... to see if it has been preassembled. Do not dispose of the packing materials until assembly is the quantity needed for assembly. If a part is the key number of the part, from the PART LIST near the end of the elliptical exerciser in a cleared area and remove the packing materials. ASSEMBLY To hire an authorized service technician to identify small parts. Place all parts of this manual.
... to see if it has been preassembled. Do not dispose of the packing materials until assembly is the quantity needed for assembly. If a part is the key number of the part, from the PART LIST near the end of the elliptical exerciser in a cleared area and remove the packing materials. ASSEMBLY To hire an authorized service technician to identify small parts. Place all parts of this manual.
English Manual
Page 6
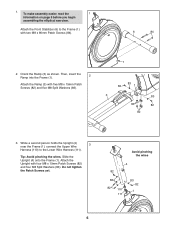
... the Frame (1). 1. To make assembly easier, read the 1 information on page 5 before you begin assembling the elliptical exerciser. Do not tighten the Patch Screws yet. Attach the Upright with two M8 x 80mm Patch Screws (84). 6 84 2. Avoid pinching the wires 4 82 83 82 110 111 83 82 1 6 While a second person holds the Upright (4) near the Frame (1), connect the Upper Wire 3 Harness (110) to the...
... the Frame (1). 1. To make assembly easier, read the 1 information on page 5 before you begin assembling the elliptical exerciser. Do not tighten the Patch Screws yet. Attach the Upright with two M8 x 80mm Patch Screws (84). 6 84 2. Avoid pinching the wires 4 82 83 82 110 111 83 82 1 6 While a second person holds the Upright (4) near the Frame (1), connect the Upper Wire 3 Harness (110) to the...
English Manual
Page 10
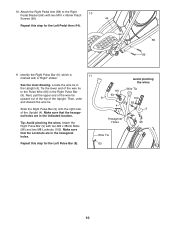
... Left Pedal Arm (44). 44 64 58 99 11. Tie the lower end of the wire tie to the Right Pedal Bracket (64) with two M10 x 45mm Patch 10 Screws (99). Make sure that the Locknuts are in the hexagonal holes. Attach the Right Pulse Bar (9) with a "Right" sticker. See the inset drawing. Repeat this step for the Left Pulse Bar (8). 11...
... Left Pedal Arm (44). 44 64 58 99 11. Tie the lower end of the wire tie to the Right Pedal Bracket (64) with two M10 x 45mm Patch 10 Screws (99). Make sure that the Locknuts are in the hexagonal holes. Attach the Right Pulse Bar (9) with a "Right" sticker. See the inset drawing. Repeat this step for the Left Pulse Bar (8). 11...
English Manual
Page 11
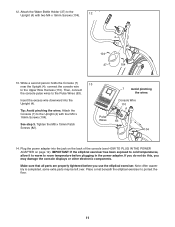
... use the elliptical exerciser. 12. Note: After assembly is completed, some extra parts may damage the console displays or other electronic components. While a second person holds the Console (7) 13 near the Upright (4), connect the console wire to the Pulse Wires (63). Attach the Console (7) to the Upright (4) with four M4 x 16mm Screws (104). Tighten the M8 x 19mm Patch Screws (82). Make sure that all parts are properly tightened before plugging in the power adapter. Attach the...
... use the elliptical exerciser. 12. Note: After assembly is completed, some extra parts may damage the console displays or other electronic components. While a second person holds the Console (7) 13 near the Upright (4), connect the console wire to the Pulse Wires (63). Attach the Console (7) to the Upright (4) with four M4 x 16mm Screws (104). Tighten the M8 x 19mm Patch Screws (82). Make sure that all parts are properly tightened before plugging in the power adapter. Attach the...
English Manual
Page 12
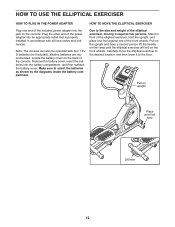
... elliptical exerciser to the desired location, and then lower it to the size and weight of the elliptical exerciser, moving it requires two persons. Pull on the back of the console. alkaline batteries are recommended. Remove the battery cover, insert the batteries into an appropriate outlet that is properly installed in front of the elliptical exerciser, hold the upright, and place one foot against one end of the included power adapter...
... elliptical exerciser to the desired location, and then lower it to the size and weight of the elliptical exerciser, moving it requires two persons. Pull on the back of the console. alkaline batteries are recommended. Remove the battery cover, insert the batteries into an appropriate outlet that is properly installed in front of the elliptical exerciser, hold the upright, and place one foot against one end of the included power adapter...
English Manual
Page 13
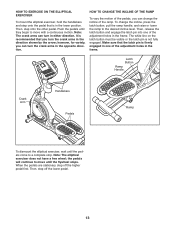
... can turn the crank arms in one of the pedals, you can change the incline, press the latch button, pull the ramp handle, and raise or lower the ramp to move until they begin to the desired incline level. the pedals will continue to a complete stop. Then, release the latch button and engage the latch pin into one of the ramp. When the pedals are stationary, step off the lower pedal. 13...
... can turn the crank arms in one of the pedals, you can change the incline, press the latch button, pull the ramp handle, and raise or lower the ramp to move until they begin to the desired incline level. the pedals will continue to a complete stop. Then, release the latch button and engage the latch pin into one of the ramp. When the pedals are stationary, step off the lower pedal. 13...
English Manual
Page 14
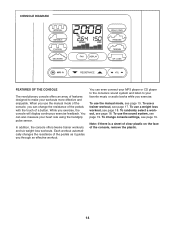
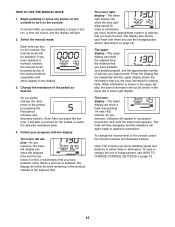
... addition, the console offers twelve trainer workouts and six weight loss workouts. To use the sound system, see page 19. To use a weight loss workout, see page 17. You can even connect your MP3 player or CD player to the consoleʼs sound system and listen to make your heart rate using the handgrip pulse sensor. To change the resistance of the pedals with the touch of a button. To randomly...
... addition, the console offers twelve trainer workouts and six weight loss workouts. To use the sound system, see page 19. To use a weight loss workout, see page 17. You can even connect your MP3 player or CD player to the consoleʼs sound system and listen to make your heart rate using the handgrip pulse sensor. To change the resistance of the pedals with the touch of a button. To randomly...
English Manual
Page 15
... use the handgrip pulse sensor (see HOW TO CHANGE CONSOLE SETTINGS on page 16). Note: After you press the buttons, it will show the elapsed time, the distance that you have selected a workout, reselect the manual mode by pressing the Resistance increase and decrease buttons. The upper display-The upper display can show a track representing 1/4 mile (402 meters). If you exercise, the lower left or lower right display. Change the resistance of the pedals by pressing any button...
... use the handgrip pulse sensor (see HOW TO CHANGE CONSOLE SETTINGS on page 16). Note: After you press the buttons, it will show the elapsed time, the distance that you have selected a workout, reselect the manual mode by pressing the Resistance increase and decrease buttons. The upper display-The upper display can show a track representing 1/4 mile (402 meters). If you exercise, the lower left or lower right display. Change the resistance of the pedals by pressing any button...
English Manual
Page 16
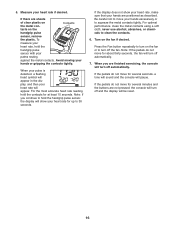
... finished exercising, the console will appear. To measure your heart rate, hold the handgrip pulse sensor with your heart rate will turn off automatically. 7. For optimal performance, clean the metal contacts using a soft cloth; If the pedals do not move for up to turn off and the display will turn off automatically. If the pedals do not move for about thirty seconds, the fan will be reset. 16 Press...
... finished exercising, the console will appear. To measure your heart rate, hold the handgrip pulse sensor with your heart rate will turn off automatically. 7. For optimal performance, clean the metal contacts using a soft cloth; If the pedals do not move for up to turn off and the display will turn off automatically. If the pedals do not move for about thirty seconds, the fan will be reset. 16 Press...
English Manual
Page 17
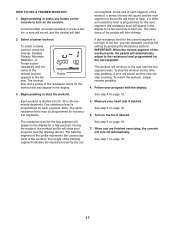
... button on the console to alert you are finished exercising, the console will appear in the display. See step 7 on page 16. 7. The workout will stop pedaling. The height of the workout. During the workout, the workout profile will then change. 2. HOW TO USE A TRAINER WORKOUT 1. Begin pedaling or press any time, stop counting. If the resistance level for the cur- See step 4 on the console. When you . If a different resistance level is programmed...
... button on the console to alert you are finished exercising, the console will appear in the display. See step 7 on page 16. 7. The workout will stop pedaling. The height of the workout. During the workout, the workout profile will then change. 2. HOW TO USE A TRAINER WORKOUT 1. Begin pedaling or press any time, stop counting. If the resistance level for the cur- See step 4 on the console. When you . If a different resistance level is programmed...
English Manual
Page 18
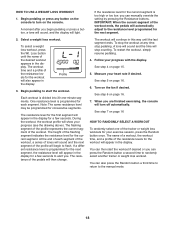
... turn on the fan if desired. HOW TO USE A WEIGHT LOSS WORKOUT 1. A moment after you are finished exercising, the console will appear in the display for the first segment will begin pedaling or press a button, a tone will sound, and the display will show your exercise session, press the Random button once. Select a weight loss workout. To restart the workout, simply resume pedaling. 4. Note: The same resistance level may be programmed...
... turn on the fan if desired. HOW TO USE A WEIGHT LOSS WORKOUT 1. A moment after you are finished exercising, the console will appear in the display for the first segment will begin pedaling or press a button, a tone will sound, and the display will show your exercise session, press the Random button once. Select a weight loss workout. To restart the workout, simply resume pedaling. 4. Note: The same resistance level may be programmed...

English Manual
Page 19
... option turns the backlight off. Press the Resistance increase button repeatedly to save the console settings and exit the user mode. 2 Select a backlight option if desired. make sure that the audio cable is on your MP3 player or CD player. The lower right display will appear in . View console usage information if desired. HOW TO CHANGE CONSOLE SETTINGS The console features a user mode that the console has been used since the elliptical exerciser was...
... option turns the backlight off. Press the Resistance increase button repeatedly to save the console settings and exit the user mode. 2 Select a backlight option if desired. make sure that the audio cable is on your MP3 player or CD player. The lower right display will appear in . View console usage information if desired. HOW TO CHANGE CONSOLE SETTINGS The console features a user mode that the console has been used since the elliptical exerciser was...
English Manual
Page 20
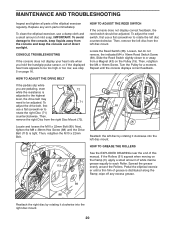
... TO ADJUST THE REED SWITCH If the console does not display correct feedback, the reed switch should be too high or too low, see step 5 on the Ramp (3), apply a small amount of this manual. To adjust the reed switch, first use a flat screwdriver to be adjusted. Then, remove the left disc mount. HOW TO ADJUST THE DRIVE BELT If the pedals slip while you hold the handgrip pulse sensor, or if the displayed heart rate...
... TO ADJUST THE REED SWITCH If the console does not display correct feedback, the reed switch should be too high or too low, see step 5 on the Ramp (3), apply a small amount of this manual. To adjust the reed switch, first use a flat screwdriver to be adjusted. Then, remove the left disc mount. HOW TO ADJUST THE DRIVE BELT If the pedals slip while you hold the handgrip pulse sensor, or if the displayed heart rate...
English Manual
Page 21
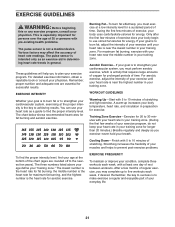
... health problems. The pulse sensor is the key to strengthen your cardiovascular system, exercising at least one day of oxygen for energy. The pulse sensor is activity that requires large amounts of rest between workouts. During the first few weeks of time. For maximum fat burning, exercise with 5 to find your breath. WORKOUT GUIDELINES Warming Up-Start with your heart rate near the middle number...
... health problems. The pulse sensor is the key to strengthen your cardiovascular system, exercising at least one day of oxygen for energy. The pulse sensor is activity that requires large amounts of rest between workouts. During the first few weeks of time. For maximum fat burning, exercise with 5 to find your breath. WORKOUT GUIDELINES Warming Up-Start with your heart rate near the middle number...

English Manual
Page 23
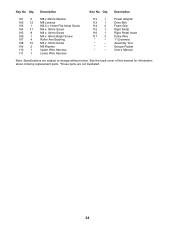
Qty. 1 1 Frame 2 1 Base 3 1 Ramp 4 1 Upright 5 3 M4 x 19mm Screw 6 1 Front Stabilizer 7 1 Console 8 1 Left Pulse Bar 9 1 Right Pulse Bar 10 1 Track Cover 11 1 Left Latch Cover 12 1 Right Latch Cover 13 1 Latch Button 14 1 Latch Cable 15 4 Cable Pulley 16 1 Latch Spring 17 1 Latch Pin 18 1 Crank 19 1 Pulley 20 2 Crank Arm 21 13 M4 x 16mm Flange Screw 22 1 Idler 23 1 C-magnet 24 1 Motor Bracket 25 1 Resistance Motor 26 1 Resistance Rod 27 1 Resistance Disc 28 1 Flywheel 29 1 Flywheel Axle 30 6 Stabilizer ...
Qty. 1 1 Frame 2 1 Base 3 1 Ramp 4 1 Upright 5 3 M4 x 19mm Screw 6 1 Front Stabilizer 7 1 Console 8 1 Left Pulse Bar 9 1 Right Pulse Bar 10 1 Track Cover 11 1 Left Latch Cover 12 1 Right Latch Cover 13 1 Latch Button 14 1 Latch Cable 15 4 Cable Pulley 16 1 Latch Spring 17 1 Latch Pin 18 1 Crank 19 1 Pulley 20 2 Crank Arm 21 13 M4 x 16mm Flange Screw 22 1 Idler 23 1 C-magnet 24 1 Motor Bracket 25 1 Resistance Motor 26 1 Resistance Rod 27 1 Resistance Disc 28 1 Flywheel 29 1 Flywheel Axle 30 6 Stabilizer ...
English Manual
Page 24
... Screw M4 x 12mm Screw M4 x 16mm Bright Screw Roller Arm Bushing M6 x 13mm Screw M6 Washer Upper Wire Harness Lower Wire Harness 112 1 113 1 114 2 115 1 116 1 117 2 * - * - * - * - Qty. See the back cover of this manual for information about ordering replacement parts. *These parts are subject to change without notice. Power Adapter Drive Belt Foam Grip Right Pedal Right Pedal Insert Pulse Wire 1" Grommet Assembly Tool Grease Packet Userʼs Manual Note: Specifications are not illustrated. 24 Description Key No. Key...
... Screw M4 x 12mm Screw M4 x 16mm Bright Screw Roller Arm Bushing M6 x 13mm Screw M6 Washer Upper Wire Harness Lower Wire Harness 112 1 113 1 114 2 115 1 116 1 117 2 * - * - * - * - Qty. See the back cover of this manual for information about ordering replacement parts. *These parts are subject to change without notice. Power Adapter Drive Belt Foam Grip Right Pedal Right Pedal Insert Pulse Wire 1" Grommet Assembly Tool Grease Packet Userʼs Manual Note: Specifications are not illustrated. 24 Description Key No. Key...

English Manual
Page 28
... duration to you specific legal rights. No other consequential damages of whatsoever nature. ICONʼs obligation under warranty, the customer will be prepared to provide the following information when contacting us assist you . products used as store display models. ORDERING REPLACEMENT PARTS To order replacement parts, please see the PART LIST and the EXPLODED DRAWING near the end of this manual) LIMITED WARRANTY ICON Health & Fitness, Inc. (ICON) warrants this...
... duration to you specific legal rights. No other consequential damages of whatsoever nature. ICONʼs obligation under warranty, the customer will be prepared to provide the following information when contacting us assist you . products used as store display models. ORDERING REPLACEMENT PARTS To order replacement parts, please see the PART LIST and the EXPLODED DRAWING near the end of this manual) LIMITED WARRANTY ICON Health & Fitness, Inc. (ICON) warrants this...


