
Uk Manual
Page 1
... Estate Revie Road Beeston Leeds, LS118JG UK email: [email protected] CAUTION Read all precautions and instructions in this manual before using this manual for future reference. PFEVEL34021 Serial No. As a manufacturer, we are missing or damaged parts, please call: 08457 089 009 Or write: ICON Health & Fitness, Ltd. USER'S MANUAL Visit our website at www.iconeurope.com Keep this equipment...
... Estate Revie Road Beeston Leeds, LS118JG UK email: [email protected] CAUTION Read all precautions and instructions in this manual before using this manual for future reference. PFEVEL34021 Serial No. As a manufacturer, we are missing or damaged parts, please call: 08457 089 009 Or write: ICON Health & Fitness, Ltd. USER'S MANUAL Visit our website at www.iconeurope.com Keep this equipment...
Uk Manual
Page 2
TABLE OF CONTENTS IMPORTANT PRECAUTIONS 3 BEFORE YOU BEGIN 4 ASSEMBLY 5 HOW TO USE THE ELLIPTICAL CROSSTRAINER 9 MAINTENANCE AND TROUBLESHOOTING 15 CONDITIONING GUIDELINES 16 PART LIST 18 EXPLODED DRAWING 19 ORDERING REPLACEMENT PARTS Back Cover PROFORM is a registered trademark of ICON Health & Fitness, Inc. 2
TABLE OF CONTENTS IMPORTANT PRECAUTIONS 3 BEFORE YOU BEGIN 4 ASSEMBLY 5 HOW TO USE THE ELLIPTICAL CROSSTRAINER 9 MAINTENANCE AND TROUBLESHOOTING 15 CONDITIONING GUIDELINES 16 PART LIST 18 EXPLODED DRAWING 19 ORDERING REPLACEMENT PARTS Back Cover PROFORM is a registered trademark of ICON Health & Fitness, Inc. 2

Uk Manual
Page 3
... stop exercising, allow the pedals to slowly come to a stop immediately and begin cooling down. 12. Do not use only. do not arch your back. 11. The pulse sensor is intended for foot protection. 8. This is not a medical device. IMPORTANT PRECAUTIONS WARNING: To reduce the risk of heart rate readings. tions before using the elliptical crosstrainer. 1. Always wear athletic shoes for home use the elliptical crosstrainer...
... stop exercising, allow the pedals to slowly come to a stop immediately and begin cooling down. 12. Do not use only. do not arch your back. 11. The pulse sensor is intended for foot protection. 8. This is not a medical device. IMPORTANT PRECAUTIONS WARNING: To reduce the risk of heart rate readings. tions before using the elliptical crosstrainer. 1. Always wear athletic shoes for home use the elliptical crosstrainer...
Uk Manual
Page 4
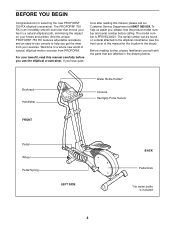
... PROFORM® 750 RX is an incredibly smooth exerciser that are labelled in a natural elliptical path, minimising the impact on a decal attached to -use the elliptical crosstrainer. And the unique PROFORM® 750 RX features adjustable resistance and an easy-to the elliptical crosstrainer (see the front cover of this manual for selecting the new PROFORM® 750 RX elliptical crosstrainer. tions after reading this manual carefully before you , please note the product model number and serial number...
... PROFORM® 750 RX is an incredibly smooth exerciser that are labelled in a natural elliptical path, minimising the impact on a decal attached to -use the elliptical crosstrainer. And the unique PROFORM® 750 RX features adjustable resistance and an easy-to the elliptical crosstrainer (see the front cover of this manual for selecting the new PROFORM® 750 RX elliptical crosstrainer. tions after reading this manual carefully before you , please note the product model number and serial number...
Uk Manual
Page 5
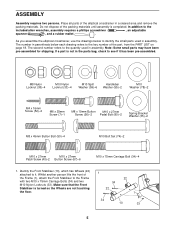
... key number of the Frame (1), attach the Front Stabiliser to see if it . The number in assembly. Place all parts of the packing materials until assembly is turned so the Wheels are not touching the floor. 1 22 34 22 34 10 1 33 5 Do not dispose of the elliptical crosstrainer in assembly. The second number refers to the quantity used in a cleared area and remove...
... key number of the Frame (1), attach the Front Stabiliser to see if it . The number in assembly. Place all parts of the packing materials until assembly is turned so the Wheels are not touching the floor. 1 22 34 22 34 10 1 33 5 Do not dispose of the elliptical crosstrainer in assembly. The second number refers to the quantity used in a cleared area and remove...

Uk Manual
Page 6
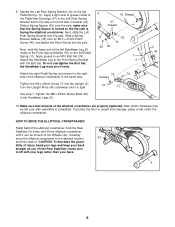
... end of the Frame (1), attach the Rear Stabiliser (9) to the indicated wire harness on the Console (23) with one of the Console. Attach the Upright Extension to remove any slack. See the inset drawing. Press the tab on the Handgrip Pulse Sensor into the tube as shown by the diagram inside the battery compartment. Next, turn the Upright Knob (43) counterclockwise several turns. Make sure that the...
... end of the Frame (1), attach the Rear Stabiliser (9) to the indicated wire harness on the Console (23) with one of the Console. Attach the Upright Extension to remove any slack. See the inset drawing. Press the tab on the Handgrip Pulse Sensor into the tube as shown by the diagram inside the battery compartment. Next, turn the Upright Knob (43) counterclockwise several turns. Make sure that the...

Uk Manual
Page 7
... tighten the Button Bolts yet. Slide a Handlebar Washer (55) onto an M8 x 19mm Button Screw (56), and tighten the Button Screw into the Upright Extension (73). Assemble the Right Handlebar (8) and the other Handlebar Leg (5) in the same pedal position. 80 13 11 78 81 7 Make sure that the Handlebar Leg is marked with an M10 x 27mm Pedal Bolt (80), an M10 Washer (78), and a Pedal Knob...
... tighten the Button Bolts yet. Slide a Handlebar Washer (55) onto an M8 x 19mm Button Screw (56), and tighten the Button Screw into the Upright Extension (73). Assemble the Right Handlebar (8) and the other Handlebar Leg (5) in the same pedal position. 80 13 11 78 81 7 Make sure that the Handlebar Leg is marked with an M10 x 27mm Pedal Bolt (80), an M10 Washer (78), and a Pedal Knob...
Uk Manual
Page 8
... (35) onto an M10 x 27mm Patch 11 Screw (40), and tighten the Patch Screw into the Upright (2). Turn the Upright Knob (43) clockwise until it is completed. HOW TO MOVE THE ELLIPTICAL CROSSTRAINER Stand behind the elliptical crosstrainer, hold the lower end of 16, Grease the Pedal Arm Bushings (37) in the Handlebar Legs (5). 10. make sure 37, Grease that all parts of the Front Spring Bracket (76) on...
... (35) onto an M10 x 27mm Patch 11 Screw (40), and tighten the Patch Screw into the Upright (2). Turn the Upright Knob (43) clockwise until it is completed. HOW TO MOVE THE ELLIPTICAL CROSSTRAINER Stand behind the elliptical crosstrainer, hold the lower end of 16, Grease the Pedal Arm Bushings (37) in the Handlebar Legs (5). 10. make sure 37, Grease that all parts of the Front Spring Bracket (76) on...
Uk Manual
Page 9
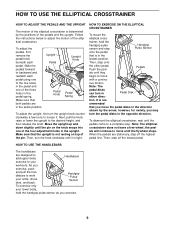
.... Push the ped- the pedals will continue to work your lower body, hold the handgrip pulse sensor and step Handgrip Pulse Sensor onto the pedal that you exercise, push and pull the handlebars to move the pedal disks in the upright. HOW TO EXERCISE ON THE ELLIPTICAL CROSSTRAINER To mount the elliptical cross- Note: The pedal disks can turn the knob clockwise until the flywheel stops. Follow the instructions below to loosen it is...
.... Push the ped- the pedals will continue to work your lower body, hold the handgrip pulse sensor and step Handgrip Pulse Sensor onto the pedal that you exercise, push and pull the handlebars to move the pedal disks in the upright. HOW TO EXERCISE ON THE ELLIPTICAL CROSSTRAINER To mount the elliptical cross- Note: The pedal disks can turn the knob clockwise until the flywheel stops. Follow the instructions below to loosen it is...
Uk Manual
Page 10
... heart rate using the built-in handgrip pulse sensor. Note: If there is selected, the resistance of the elliptical crosstrainer can even measure your pace as it before operating the console. 10 When the manual mode of the console is a thin sheet of clear plastic on the face of a button. You can be adjusted with a touch of the console, remove it guides you pedal, the console will provide continuous exercise...
... heart rate using the built-in handgrip pulse sensor. Note: If there is selected, the resistance of the elliptical crosstrainer can even measure your pace as it before operating the console. 10 When the manual mode of the console is a thin sheet of clear plastic on the face of a button. You can be adjusted with a touch of the console, remove it guides you pedal, the console will provide continuous exercise...
Uk Manual
Page 11
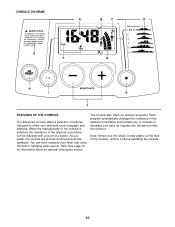
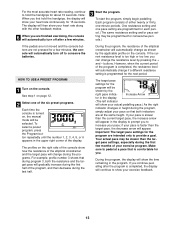
... is selected, the display will be necessary to select the manual mode and workout programs. 11 D. Program profiles-These profiles show speed and distance in the following order: scan, speed, time, distance, resistance level, calories, fat calories, and heart rate (when the handgrip pulse sensor or the optional chest pulse sensor is used ). Warnings-See page 3. Display button-This button is used to select the unit of the elliptical crosstrainer. The modes will change during the first...
... is selected, the display will be necessary to select the manual mode and workout programs. 11 D. Program profiles-These profiles show speed and distance in the following order: scan, speed, time, distance, resistance level, calories, fat calories, and heart rate (when the handgrip pulse sensor or the optional chest pulse sensor is used ). Warnings-See page 3. Display button-This button is used to select the unit of the elliptical crosstrainer. The modes will change during the first...

Uk Manual
Page 12
... metal contacts. HOW TO USE THE MANUAL MODE 1 Turn on the console, press the On/Reset button or begin pedalling. 2 Select the manual mode. To turn on the console. When a program is blank. 3 Begin pedalling and adjust the resistance of the display is selected, the display will show the resistance level for the selected setting to be selected. Press the Display button repeatedly until the upper right corner of the elliptical crosstrainer. In addition, the left...
... metal contacts. HOW TO USE THE MANUAL MODE 1 Turn on the console, press the On/Reset button or begin pedalling. 2 Select the manual mode. To turn on the console. When a program is blank. 3 Begin pedalling and adjust the resistance of the display is selected, the display will show the resistance level for the selected setting to be selected. Press the Display button repeatedly until the upper right corner of the elliptical crosstrainer. In addition, the left...
Uk Manual
Page 13
.... buttons. One resistance setting and one pace setting are programmed for each period. (The same resistance setting and/or pace setting may be selected. See step 1 on , the manual mode will be slower than the tar- The profiles on the right side of the elliptical crosstrainer will automatically change if a different resistance setting is comfortable for a few minutes, the console will automatically turn off to conserve the batteries. The...
.... buttons. One resistance setting and one pace setting are programmed for each period. (The same resistance setting and/or pace setting may be selected. See step 1 on , the manual mode will be slower than the tar- The profiles on the right side of the elliptical crosstrainer will automatically change if a different resistance setting is comfortable for a few minutes, the console will automatically turn off to conserve the batteries. The...

Uk Manual
Page 14
See step 6 on page 12. 5 Measure your heart rate if desired. To purchase the optional chest pulse sensor, call 08457 089 009. 6 When you are finished exercising, the console will automatically turn off after a few minutes. See step 4 on page 13. 14 See step 5 on page 12. THE OPTIONAL CHEST PULSE SENSOR The optional chest pulse sensor provides hands-free operation and continuously monitors your heart rate during your progress with the feedback modes. 4 Follow your workouts.
See step 6 on page 12. 5 Measure your heart rate if desired. To purchase the optional chest pulse sensor, call 08457 089 009. 6 When you are finished exercising, the console will automatically turn off after a few minutes. See step 4 on page 13. 14 See step 5 on page 12. THE OPTIONAL CHEST PULSE SENSOR The optional chest pulse sensor provides hands-free operation and continuously monitors your heart rate during your progress with the feedback modes. 4 Follow your workouts.
Uk Manual
Page 15
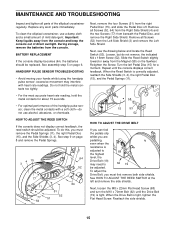
... with heart rate readings. Slide the Reed Switch slightly toward or away from beneath the Pedal Disc, and remove the Right Side Shield. Repeat until the Drive Belt (19) is tight, tighten the Flat Head Screw. Replace any worn parts immediately. Turn the left and remove the side shields. BATTERY REPLACEMENT If the console display becomes dim, the batteries should be adjusted. MAINTENANCE AND TROUBLESHOOTING Inspect and tighten all parts of direct sunlight. Remove all Screws (52...
... with heart rate readings. Slide the Reed Switch slightly toward or away from beneath the Pedal Disc, and remove the Right Side Shield. Repeat until the Drive Belt (19) is tight, tighten the Flat Head Screw. Replace any worn parts immediately. Turn the left and remove the side shields. BATTERY REPLACEMENT If the console display becomes dim, the batteries should be adjusted. MAINTENANCE AND TROUBLESHOOTING Inspect and tighten all parts of direct sunlight. Remove all Screws (52...
Uk Manual
Page 16
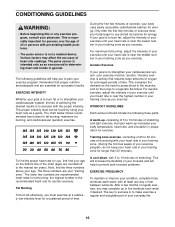
... your body uses easily accessible carbohydrate calories for exercise. For maximum fat burning, adjust the intensity of your exercise until your heart rate is to five workouts each week, with pre-existing health problems. • The pulse sensor is the recommended heart rate for fat burning, maximum fat burning, and cardiovascular (aerobic) exercise. After a few weeks of your exercise program, do not keep your heart rate in your training zone...
... your body uses easily accessible carbohydrate calories for exercise. For maximum fat burning, adjust the intensity of your exercise until your heart rate is to five workouts each week, with pre-existing health problems. • The pulse sensor is the recommended heart rate for fat burning, maximum fat burning, and cardiovascular (aerobic) exercise. After a few weeks of your exercise program, do not keep your heart rate in your training zone...
Uk Manual
Page 17
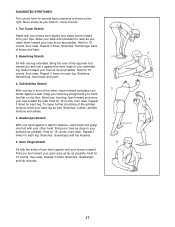
...for several basic stretches is shown at the right. SUGGESTED STRETCHES The correct form for each leg. Move slowly as possible. Hold for each leg. Hamstring Stretch Sit with your other , reach forward and place your extended leg. Repeat 3 times for 15 counts, then relax. Hold for 15 ...Stretches: Hamstrings, lower back and groin. 3. Calf/Achilles Stretch With one leg extended. Hold for balance, reach back and grasp one foot with one leg in front of the other hand. Bend your front leg, lean forward and move your hips toward your back leg as possible. ...
...for several basic stretches is shown at the right. SUGGESTED STRETCHES The correct form for each leg. Move slowly as possible. Hold for each leg. Hamstring Stretch Sit with your other , reach forward and place your extended leg. Repeat 3 times for 15 counts, then relax. Hold for 15 ...Stretches: Hamstrings, lower back and groin. 3. Calf/Achilles Stretch With one leg extended. Hold for balance, reach back and grasp one foot with one leg in front of the other hand. Bend your front leg, lean forward and move your hips toward your back leg as possible. ...

Uk Manual
Page 18
....5mm Bolt 37 4 Pedal Arm Bushing 38 5 M8 Nylon Locknut 39 2 M10 Washer 40 2 M10 x 27mm Patch Screw 41 2 M6 x 72mm Bolt 42 4 M5 Washer 43 1 Upright Knob 44 1 Extension Wire Harness 45 1 Resistance Control Motor 46 2 Handlebar Cap 47 2 Handlebar Spacer 48 2 Upright Spacer 49 4 Small Handlebar Bushing 50 4 M8 x 45mm Button Bolt 51 8 M6 x 30mm Screw 52 12 M4 x 16mm Screw 53 1 Reed Switch/Wire 54 1 Cable Clamp...
....5mm Bolt 37 4 Pedal Arm Bushing 38 5 M8 Nylon Locknut 39 2 M10 Washer 40 2 M10 x 27mm Patch Screw 41 2 M6 x 72mm Bolt 42 4 M5 Washer 43 1 Upright Knob 44 1 Extension Wire Harness 45 1 Resistance Control Motor 46 2 Handlebar Cap 47 2 Handlebar Spacer 48 2 Upright Spacer 49 4 Small Handlebar Bushing 50 4 M8 x 45mm Button Bolt 51 8 M6 x 30mm Screw 52 12 M4 x 16mm Screw 53 1 Reed Switch/Wire 54 1 Cable Clamp...

Uk Manual
Page 19
... 20 52 66 42 75 13 45 20 66 78 36 63 81 11 12 19 37 35 40 37 75 66 19 EXPLODED DRAWING-Model No.
... 20 52 66 42 75 13 45 20 66 78 36 63 81 11 12 19 37 35 40 37 75 66 19 EXPLODED DRAWING-Model No.
Uk Manual
Page 20
... give the following information: • the MODEL NUMBER of the product (PFEVEL34021) • the NAME of the product (PROFORM® 750 RX elliptical crosstrainer) • the SERIAL NUMBER of the product (see the front cover of this manual) • the KEY NUMBER and DESCRIPTION of the part(s) (see page 18 of this manual) Part No. 189962 R0802A Printed in China © 2002 ICON Health & Fitness, Inc. office, or write: ICON Health & Fitness, Ltd.
... give the following information: • the MODEL NUMBER of the product (PFEVEL34021) • the NAME of the product (PROFORM® 750 RX elliptical crosstrainer) • the SERIAL NUMBER of the product (see the front cover of this manual) • the KEY NUMBER and DESCRIPTION of the part(s) (see page 18 of this manual) Part No. 189962 R0802A Printed in China © 2002 ICON Health & Fitness, Inc. office, or write: ICON Health & Fitness, Ltd.

