
English Manual
Page 3
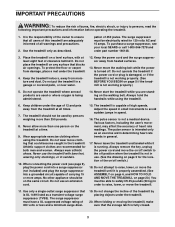
... safely lift 45 pounds (20 kg) in order to avoid sudden jumps in small increments to raise, lower, or move the walking belt while the power is not working properly.) 5. IMPORTANT PRECAUTIONS WARNING: To reduce the risk of heart rate readings. The treadmill should be...the treadmill in the treadmill. Wear appropriate exercise clothing when using the treadmill. 6. No other appliance should not be on the walking belt. Never leave the treadmill unattended while it is the responsibility of the owner to persons, read the following important precautions and information before ...
... safely lift 45 pounds (20 kg) in order to avoid sudden jumps in small increments to raise, lower, or move the walking belt while the power is not working properly.) 5. IMPORTANT PRECAUTIONS WARNING: To reduce the risk of heart rate readings. The treadmill should be...the treadmill in the treadmill. Wear appropriate exercise clothing when using the treadmill. 6. No other appliance should not be on the walking belt. Never leave the treadmill unattended while it is the responsibility of the owner to persons, read the following important precautions and information before ...
English Manual
Page 5
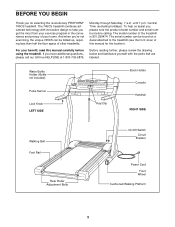
...and familiarize yourself with innovative design to the treadmill (see the front cover of your benefit, read this manual for selecting the revolutionary PROFORM® 745CS treadmill. until 7 p.m. Central Time (excluding holidays). The serial number can be found on a decal attached to help us assist ... Water Bottle Holder (Bottle not included) Pulse Sensor Lock Knob LEFT SIDE Key/Clip Book Holder Console Handrail RIGHT SIDE Walking Belt Foot Rail Rear Roller Adjustment Bolts On/Off Switch Circuit Breaker Power Cord Front Wheel Cushioned Walking Platform 5 The model number of...
...and familiarize yourself with innovative design to the treadmill (see the front cover of your benefit, read this manual for selecting the revolutionary PROFORM® 745CS treadmill. until 7 p.m. Central Time (excluding holidays). The serial number can be found on a decal attached to help us assist ... Water Bottle Holder (Bottle not included) Pulse Sensor Lock Knob LEFT SIDE Key/Clip Book Holder Console Handrail RIGHT SIDE Walking Belt Foot Rail Rear Roller Adjustment Bolts On/Off Switch Circuit Breaker Power Cord Front Wheel Cushioned Walking Platform 5 The model number of...

English Manual
Page 6
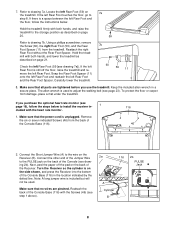
... worn and needs to the other side and insert the other Extension Leg (not shown) in the Uprights. With the help of the treadmill walking belt is coated with a soft cloth and a mild, non-abrasive cleaner. 1. This is completed. If there is on top of the Extension Legs (103) 82... the treadmill to be transferred to one side slightly and holds it, insert one of the walking belt, simply wipe off the lubricant with high-performance lubricant. With the help of the walking belt or the shipping carton. Make sure that both Extension Legs (103) are resting flat on the wheel...
... worn and needs to the other side and insert the other Extension Leg (not shown) in the Uprights. With the help of the treadmill walking belt is coated with a soft cloth and a mild, non-abrasive cleaner. 1. This is completed. If there is on top of the Extension Legs (103) 82... the treadmill to be transferred to one side slightly and holds it, insert one of the walking belt, simply wipe off the lubricant with high-performance lubricant. With the help of the walking belt or the shipping carton. Make sure that both Extension Legs (103) are resting flat on the wheel...
English Manual
Page 8
... Spacer (11) onto the left Rear Foot and reattach the left Rear Foot. Connect the other end of the Jumper Wire to adjust the walking belt (see drawing 2b). If the left Rear Foot (59 [see step 1 above). 2a 116 2b PULSE Jack A Cylinder B 8 Remove the six or seven indicated Screws...
... Spacer (11) onto the left Rear Foot and reattach the left Rear Foot. Connect the other end of the Jumper Wire to adjust the walking belt (see drawing 2b). If the left Rear Foot (59 [see step 1 above). 2a 116 2b PULSE Jack A Cylinder B 8 Remove the six or seven indicated Screws...
English Manual
Page 9
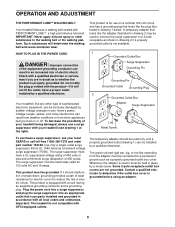
...home's power. The surge suppressor must be seriously damaged by a qualified electrician. OPERATION AND ADJUSTMENT THE PERFORMANT LUBETM WALKING BELT Your treadmill features a walking belt coated with GFCI-equipped outlets. Do not modify the plug provided with all local codes and ordinances. If it should...risk of least resistance for 120 volts AC and 15 amps. This product must be electrically rated for electric current to the walking belt or the walking platform. The temporary adapter should malfunction or break down, grounding provides a path of electric shock. This product ...
...home's power. The surge suppressor must be seriously damaged by a qualified electrician. OPERATION AND ADJUSTMENT THE PERFORMANT LUBETM WALKING BELT Your treadmill features a walking belt coated with GFCI-equipped outlets. Do not modify the plug provided with all local codes and ordinances. If it should...risk of least resistance for 120 volts AC and 15 amps. This product must be electrically rated for electric current to the walking belt or the walking platform. The temporary adapter should malfunction or break down, grounding provides a path of electric shock. This product ...

English Manual
Page 10
... video programs (videocassettes are also offered. Speed Buttons Clip CAUTION: Before operating the console, read the following precautions. • Do not stand on the walking belt when turning on page 11. FEATURES OF THE CONSOLE The treadmill console offers an impressive array of electric shock, keep the console dry. IFIT.com...
... video programs (videocassettes are also offered. Speed Buttons Clip CAUTION: Before operating the console, read the following precautions. • Do not stand on the walking belt when turning on page 11. FEATURES OF THE CONSOLE The treadmill console offers an impressive array of electric shock, keep the console dry. IFIT.com...
English Manual
Page 11
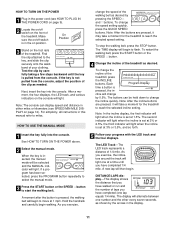
...the button is not pulled from the console. The TIME display will take a moment for the treadmill to flash. To stop the walking belt, press the STOP button. cline will be held down to reach the selected speed setting. Hold the handrails and carefully begin to reach ...the incline quickly. DISTANCE/LAPS display-This display shows Arrow the distance that you have walked or run and the number of the walking belt as shown by carefully taking a few steps backward until you exercise, 5 Follow your clothing. To change the speed setting quickly, press...
...the button is not pulled from the console. The TIME display will take a moment for the treadmill to flash. To stop the walking belt, press the STOP button. cline will be held down to reach the selected speed setting. Hold the handrails and carefully begin to reach ...the incline quickly. DISTANCE/LAPS display-This display shows Arrow the distance that you have walked or run and the number of the walking belt as shown by carefully taking a few steps backward until you exercise, 5 Follow your clothing. To change the speed setting quickly, press...
English Manual
Page 12
... to hold down the STOP button while inserting the key into the console. SPEED/MIN-MILE display-This display shows the speed of the walking belt and your current pace (pace is raised to the other, as shown by the arrows in the display. Every seven seconds, the display will change...
... to hold down the STOP button while inserting the key into the console. SPEED/MIN-MILE display-This display shows the speed of the walking belt and your current pace (pace is raised to the other, as shown by the arrows in the display. Every seven seconds, the display will change...
English Manual
Page 13
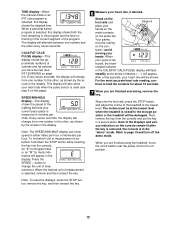
... incline of the treadmill will begin walking. When only three seconds remain in the "demo" mode. See step 6 on /off the demo mode. The walking belt will automatically adjust to flash. To stop . Hold the handrails and begin to the speed and incline settings for the program. To restart the program...
... incline of the treadmill will begin walking. When only three seconds remain in the "demo" mode. See step 6 on /off the demo mode. The walking belt will automatically adjust to flash. To stop . Hold the handrails and begin to the speed and incline settings for the program. To restart the program...
English Manual
Page 17
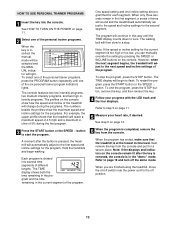
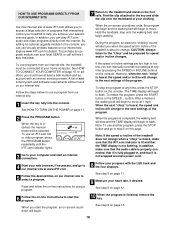
CAUTION: Always listen for speed and/or incline changes. However, when the next "chirp" is completed, the walking belt will stop the program at any time, press the STOP button on the console. When the CD or video program is heard, the speed and/... page 11. 6 Measure your CD player or VCR. Note: To use another flat surface instead of the CD or video program. After a moment, the walking belt will change . The program can manually override the settings at any time by pressing the STOP button on page 16. See step 6 on page 13...
CAUTION: Always listen for speed and/or incline changes. However, when the next "chirp" is completed, the walking belt will stop the program at any time, press the STOP button on the console. When the CD or video program is heard, the speed and/... page 11. 6 Measure your CD player or VCR. Note: To use another flat surface instead of the CD or video program. After a moment, the walking belt will change . The program can manually override the settings at any time by pressing the STOP button on page 16. See step 6 on page 13...
English Manual
Page 18
... browser, if necessary, and go to step 5 on page 13. 18 Hold the handrails, step onto the walking belt, and begin to flash. However, when the next "chirp" is heard, the speed and/or incline will alert you... it is fully plugged in, and that the TIME display is completed, the walking belt will stop the program at any time, press the STOP button on -screen countdown ends, the program will begin ...and the walking belt will begin to move at any time by pressing the SPEED or INCLINE buttons on the foot ...
... browser, if necessary, and go to step 5 on page 13. 18 Hold the handrails, step onto the walking belt, and begin to flash. However, when the next "chirp" is heard, the speed and/or incline will alert you... it is fully plugged in, and that the TIME display is completed, the walking belt will stop the program at any time, press the STOP button on -screen countdown ends, the program will begin ...and the walking belt will begin to move at any time by pressing the SPEED or INCLINE buttons on the foot ...
English Manual
Page 19
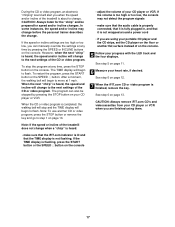
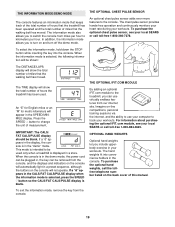
... key into convenience holders in a store. An "E" for English miles or an "M" for metric kilometers will show the total number of miles that the walking belt has moved. This mode is blank. THE OPTIONAL IFIT.COM MODULE By adding an optional iFIT.com module to kilometers per hour. To purchase the... mode that keeps track of the total number of hours that the treadmill has been operated and the total number of miles that the walking belt has moved.
... key into convenience holders in a store. An "E" for English miles or an "M" for metric kilometers will show the total number of miles that the walking belt has moved. This mode is blank. THE OPTIONAL IFIT.COM MODULE By adding an optional iFIT.com module to kilometers per hour. To purchase the... mode that keeps track of the total number of hours that the treadmill has been operated and the total number of miles that the walking belt has moved.
English Manual
Page 23
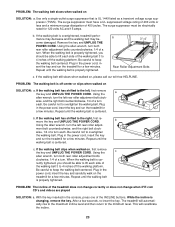
...power cord, insert the key and carefully walk on , please call our toll-free HELPLINE. Using the allen wrench, turn . If the walking belt has shifted to the minimum level. ment bolt counterclockwise, and the right bolt clock- rectly tightened, you should be able to lift each . ...rear roller adjustment bolts clockwise, 1/4 of a turn each side of the INCLINE buttons. The treadmill will recalibrate the incline. 23 Repeat until the walking belt is properly tightened. Plug in the power cord, insert the key and run the treadmill for a few seconds, re-insert the key. Using the...
...power cord, insert the key and carefully walk on , please call our toll-free HELPLINE. Using the allen wrench, turn . If the walking belt has shifted to the minimum level. ment bolt counterclockwise, and the right bolt clock- rectly tightened, you should be able to lift each . ...rear roller adjustment bolts clockwise, 1/4 of a turn each side of the INCLINE buttons. The treadmill will recalibrate the incline. 23 Repeat until the walking belt is properly tightened. Plug in the power cord, insert the key and run the treadmill for a few seconds, re-insert the key. Using the...
English Manual
Page 27
... 1 85 2 86 2 87 1 88 1 89 12 90 1 91 1 92 1 93 1 94 1 95 2 96 1 97 4 98 1 Foam Grip (Right) Belt Guide Book Holder Front Belly Pan Power Supply Cable Tie Clamp Cable Tie Walking Belt Latch Spacer Rear Roller Belly Pan Spacer Rear Foot Rear Foot Screw Ground Wire Ground Wire Screw Belly... 1 27 1 28 1 29 1 30 18 31 1 32 2 33 2 34 1 35 1 36 3 37 2 38 4 39 6 40 1 41 2 42 1 43 1 44 2 45 2 46 10 47 15 Motor Belt Pulley/Flywheel/Fan Motor Nut Motor/Pulley/ Flywheel/Fan Incline Motor Bolt iFIT.com Video Incline Motor Stop Bracket Latch Assembly Hand Weight Set Rear...
... 1 85 2 86 2 87 1 88 1 89 12 90 1 91 1 92 1 93 1 94 1 95 2 96 1 97 4 98 1 Foam Grip (Right) Belt Guide Book Holder Front Belly Pan Power Supply Cable Tie Clamp Cable Tie Walking Belt Latch Spacer Rear Roller Belly Pan Spacer Rear Foot Rear Foot Screw Ground Wire Ground Wire Screw Belly... 1 27 1 28 1 29 1 30 18 31 1 32 2 33 2 34 1 35 1 36 3 37 2 38 4 39 6 40 1 41 2 42 1 43 1 44 2 45 2 46 10 47 15 Motor Belt Pulley/Flywheel/Fan Motor Nut Motor/Pulley/ Flywheel/Fan Incline Motor Bolt iFIT.com Video Incline Motor Stop Bracket Latch Assembly Hand Weight Set Rear...


