

English Manual
Page 2
® TABLE OF CONTENTS IMPORTANT PRECAUTIONS 3 BEFORE YOU BEGIN 5 ASSEMBLY 6 OPERATION AND ADJUSTMENT 8 HOW TO FOLD AND MOVE THE TREADMILL 19 TROUBLE-SHOOTING 20 CONDITIONING GUIDELINES 22 PART LIST 23 ORDERING REPLACEMENT PARTS Back Cover FULL 90-DAY WARRANTY Back Cover Note: An EXPLODED DRAWING is attached in the center of this manual. 2
® TABLE OF CONTENTS IMPORTANT PRECAUTIONS 3 BEFORE YOU BEGIN 5 ASSEMBLY 6 OPERATION AND ADJUSTMENT 8 HOW TO FOLD AND MOVE THE TREADMILL 19 TROUBLE-SHOOTING 20 CONDITIONING GUIDELINES 22 PART LIST 23 ORDERING REPLACEMENT PARTS Back Cover FULL 90-DAY WARRANTY Back Cover Note: An EXPLODED DRAWING is attached in the center of this manual. 2
English Manual
Page 3
... power cord or plug is damaged, or if the treadmill is not working properly.) 14. When connecting the power cord (see your local SEARS or call 1-800-366-7278 and order part number 146148. 12. Use the treadmill only as an exercise aid in determining heart rate trends in order to ensure that the storage latch is properly assembled. (See ASSEMBLY on page 6, and HOW TO FOLD AND MOVE THE TREADMILL on /off switch...
... power cord or plug is damaged, or if the treadmill is not working properly.) 14. When connecting the power cord (see your local SEARS or call 1-800-366-7278 and order part number 146148. 12. Use the treadmill only as an exercise aid in determining heart rate trends in order to ensure that the storage latch is properly assembled. (See ASSEMBLY on page 6, and HOW TO FOLD AND MOVE THE TREADMILL on /off switch...

English Manual
Page 4
... setting. Servicing other than the procedures in any exercise program, consult your treadmill. This is shown at any opening. 21. Inspect and tighten all instructions before using. WARNING: Before beginning this manual. Do not use , before cleaning the treadmill, and before the personal trainer describes the change to order a free replacement decal (see the front cover of the CD or video program. 24. This treadmill is heard, the speed and/or incline...
... setting. Servicing other than the procedures in any exercise program, consult your treadmill. This is shown at any opening. 21. Inspect and tighten all instructions before using. WARNING: Before beginning this manual. Do not use , before cleaning the treadmill, and before the personal trainer describes the change to order a free replacement decal (see the front cover of the CD or video program. 24. This treadmill is heard, the speed and/or incline...
English Manual
Page 5
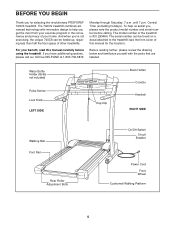
... the location). For your home. And when you have additional questions, please call our toll-free HELPLINE at 1-800-736-6879, Monday through Saturday, 7 a.m. The model number of other treadmills. Water Bottle Holder (Bottle not included) Pulse Sensor Lock Knob LEFT SIDE Key/Clip Book Holder Console Handrail RIGHT SIDE Walking Belt Foot Rail Rear Roller Adjustment Bolts On/Off Switch Circuit Breaker Power Cord Front Wheel Cushioned Walking Platform 5 The 740CS treadmill...
... the location). For your home. And when you have additional questions, please call our toll-free HELPLINE at 1-800-736-6879, Monday through Saturday, 7 a.m. The model number of other treadmills. Water Bottle Holder (Bottle not included) Pulse Sensor Lock Knob LEFT SIDE Key/Clip Book Holder Console Handrail RIGHT SIDE Walking Belt Foot Rail Rear Roller Adjustment Bolts On/Off Switch Circuit Breaker Power Cord Front Wheel Cushioned Walking Platform 5 The 740CS treadmill...
English Manual
Page 6
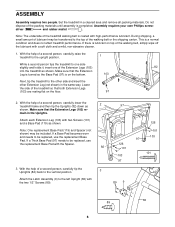
If there is lubricant on top of the walking belt, simply wipe off the lubricant with high-performance lubricant. Lower the side of the treadmill walking belt is completed. If a Thick Base Pad (97) needs to be replaced, use the replacement Base Pad. Set the treadmill in the Uprights. Assembly requires your own Phillips screw- Note: The underside of the treadmill so that the Extension Legs (103) re- Make sure that...
If there is lubricant on top of the walking belt, simply wipe off the lubricant with high-performance lubricant. Lower the side of the treadmill walking belt is completed. If a Thick Base Pad (97) needs to be replaced, use the replacement Base Pad. Set the treadmill in the Uprights. Assembly requires your own Phillips screw- Note: The underside of the treadmill so that the Extension Legs (103) re- Make sure that...

English Manual
Page 7
... (not shown) as described on the treadmill. Hold the treadmill firmly with a rubber mallet to drawing 6a. Note: If there is not used to adjust the walking belt (see drawing 6a]). Using a phillips screwdriver, remove the Screw (60), the right Rear Foot (59), and the Rear Foot Spacer (11) from damage, place a mat under the Console Base (87) as described on page...
... (not shown) as described on the treadmill. Hold the treadmill firmly with a rubber mallet to drawing 6a. Note: If there is not used to adjust the walking belt (see drawing 6a]). Using a phillips screwdriver, remove the Screw (60), the right Rear Foot (59), and the Rear Foot Spacer (11) from damage, place a mat under the Console Base (87) as described on page...

English Manual
Page 8
... or other appliances being damaged, always use on or off. Check with your treadmill (see your treadmill being turned on a nominal 120-volt circuit, and has a grounding plug that is used it will deteriorate the walking belt and cause excessive wear. Your treadmill, like the plug illustrated in place by sudden voltage changes in your home's power. Voltage surges, spikes, and noise interference...
... or other appliances being damaged, always use on or off. Check with your treadmill (see your treadmill being turned on a nominal 120-volt circuit, and has a grounding plug that is used it will deteriorate the walking belt and cause excessive wear. Your treadmill, like the plug illustrated in place by sudden voltage changes in your home's power. Voltage surges, spikes, and noise interference...
English Manual
Page 9
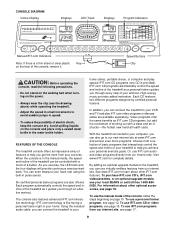
... from your exercise. Using the included audio cable, you can even measure your heart rate using the built-in pulse sensor. Each CD features two different programs designed by certified personal trainers. Visit www.iFIT.com for complete details. To use a personal trainer program, see page 15. CONSOLE DIAGRAM Incline Display Displays LED Track Displays Program Indicators Manual/iFIT.com Indicators Note: If there is in the manual mode, the speed and incline of the treadmill can be controlled with a class...
... from your exercise. Using the included audio cable, you can even measure your heart rate using the built-in pulse sensor. Each CD features two different programs designed by certified personal trainers. Visit www.iFIT.com for complete details. To use a personal trainer program, see page 15. CONSOLE DIAGRAM Incline Display Displays LED Track Displays Program Indicators Manual/iFIT.com Indicators Note: If there is in the manual mode, the speed and incline of the treadmill can be controlled with a class...
English Manual
Page 10
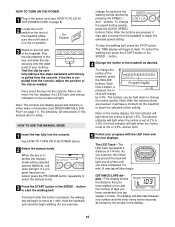
... indicators on the console will change the incline quickly. HOW TO USE THE MANUAL MODE change the speed setting quickly, press the QUICK SPEED buttons. To restart the walking belt, press the START button or the SPEED v button. 4 Change the incline of the walking belt as shown by 0.5%. When the key is not pulled from the console. The LED Track-The LED track represents a distance of the treadmill. HOW TO TURN ON THE POWER 1 Plug in the power cord (see SPEED/MIN-MILE DISPLAY on page 11...
... indicators on the console will change the incline quickly. HOW TO USE THE MANUAL MODE change the speed setting quickly, press the QUICK SPEED buttons. To restart the walking belt, press the START button or the SPEED v button. 4 Change the incline of the walking belt as shown by 0.5%. When the key is not pulled from the console. The LED Track-The LED track represents a distance of the treadmill. HOW TO TURN ON THE POWER 1 Plug in the power cord (see SPEED/MIN-MILE DISPLAY on page 11...
English Manual
Page 11
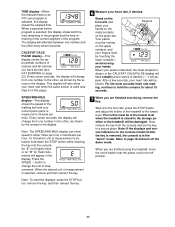
... will flash steadily and a series of the treadmill to change from the console and put the key in the "demo" mode. Press the SPEED v button to the lowest level. When your heart rate when the pulse sensor is selected, this page). When you have burned (see step 6 on the pulse bar. TIME display-When the manual mode or an iFIT.com program is selected, remove and then reinsert the key. To find which unit...
... will flash steadily and a series of the treadmill to change from the console and put the key in the "demo" mode. Press the SPEED v button to the lowest level. When your heart rate when the pulse sensor is selected, this page). When you have burned (see step 6 on the pulse bar. TIME display-When the manual mode or an iFIT.com program is selected, remove and then reinsert the key. To find which unit...
English Manual
Page 12
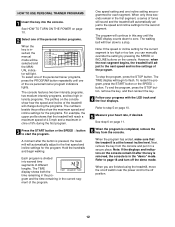
... the demo mode. Note: If the displays and indicators on the console show how the speed and incline of the treadmill will change during the first program. 3 Press the START button or the SPEED v button to zero. See HOW TO TURN ON THE POWER on /off switch near the power cord to the first speed and incline settings for the second segment. A moment after the key is removed, the console is pressed, the treadmill will begin walking. One speed setting...
... the demo mode. Note: If the displays and indicators on the console show how the speed and incline of the treadmill will change during the first program. 3 Press the START button or the SPEED v button to zero. See HOW TO TURN ON THE POWER on /off switch near the power cord to the first speed and incline settings for the second segment. A moment after the key is removed, the console is pressed, the treadmill will begin walking. One speed setting...
English Manual
Page 15
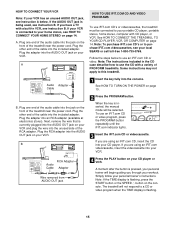
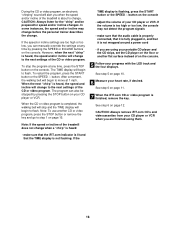
.... 3 Insert the iFIT.com CD or videocassette. Plug the other end of PROFORM treadmills. Next, remove the wire that is currently plugged into your VCR has an unused AUDIO OUT jack, see your personal trainer's instructions. If the AUDIO OUT jack is flashing, press the START button or the SPEED v button on your VCR. IN VIDEO AUDIO IN CH 34 OUT RF OUT 2 Press the PROGRAM button. If you through your workout.
.... 3 Insert the iFIT.com CD or videocassette. Plug the other end of PROFORM treadmills. Next, remove the wire that is currently plugged into your VCR has an unused AUDIO OUT jack, see your personal trainer's instructions. If the AUDIO OUT jack is flashing, press the START button or the SPEED v button on your VCR. IN VIDEO AUDIO IN CH 34 OUT RF OUT 2 Press the PROGRAM button. If you through your workout.
English Manual
Page 16
... video program, press the STOP button or remove the key and go to change when a "chirp" is heard: • make sure that the audio cable is properly connected, that it is fully plugged in, and that the TIME display is completed, the walking belt will stop the program at any time, press the STOP button on the console. See step 6 on page 11. 7 When the iFIT.com CD or video program is heard, the speed and incline...
... video program, press the STOP button or remove the key and go to change when a "chirp" is heard: • make sure that the audio cable is properly connected, that it is fully plugged in, and that the TIME display is completed, the walking belt will stop the program at any time, press the STOP button on the console. See step 6 on page 11. 7 When the iFIT.com CD or video program is heard, the speed and incline...
English Manual
Page 17
... purchase an upgrade module, see your specific exercise goals. To use programs from the internet. Hold the handrails, step onto the walking belt, and begin to the console, you start an internet connection. 4 Start your heart rate, if desired. However, when the next "chirp" is finished, remove the key. See step 6 on page 10. 2 Press the PROGRAM button. When you can play iFIT.com audio and video programs directly from our internet site, the treadmill must...
... purchase an upgrade module, see your specific exercise goals. To use programs from the internet. Hold the handrails, step onto the walking belt, and begin to the console, you start an internet connection. 4 Start your heart rate, if desired. However, when the next "chirp" is finished, remove the key. See step 6 on page 10. 2 Press the PROGRAM button. When you can play iFIT.com audio and video programs directly from our internet site, the treadmill must...
English Manual
Page 18
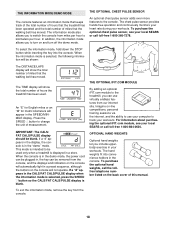
... INFORMATION MODE/DEMO MODE The console features an information mode that keeps track of the total number of hours that the treadmill has been operated and the total number of miles that the walking belt has moved. If a "d" appears in the display, the console is in the demo mode, the power cord can be plugged in, the key can use your computer to kilometers per hour to track your local SEARS or call the tollfree telephone number listed...
... INFORMATION MODE/DEMO MODE The console features an information mode that keeps track of the total number of hours that the treadmill has been operated and the total number of miles that the walking belt has moved. If a "d" appears in the display, the console is in the demo mode, the power cord can be plugged in, the key can use your computer to kilometers per hour to track your local SEARS or call the tollfree telephone number listed...
English Manual
Page 20
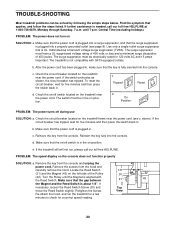
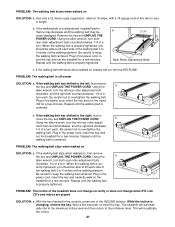
... treadmill is in . Remove the screws from the console. If necessary, loosen the Reed Switch Screw (30) and Top move the Reed Switch slightly. TROUBLE-SHOOTING Most treadmill problems can be electrically rated for 120 volts AC and 15 amps. Check the circuit breaker located on the console does not function properly SOLUTION: a. b. PROBLEM: The speed display on the treadmill near the power cord (see page 8). c Tripped Reset Tripped d On Position Reset PROBLEM: The power turns off switch...
... treadmill is in . Remove the screws from the console. If necessary, loosen the Reed Switch Screw (30) and Top move the Reed Switch slightly. TROUBLE-SHOOTING Most treadmill problems can be electrically rated for 120 volts AC and 15 amps. Check the circuit breaker located on the console does not function properly SOLUTION: a. b. PROBLEM: The speed display on the treadmill near the power cord (see page 8). c Tripped Reset Tripped d On Position Reset PROBLEM: The power turns off switch...
English Manual
Page 21
..., turn both rear roller adjustment bolts clockwise, 1/4 of a turn . Plug in the console, press one of the treadmill does not change correctly or does not change when iFIT.com CD's and videos are played SOLUTION: a. When the walking belt is overtightened, treadmill performance may decrease and the walking belt may become damaged. Be careful not to overtighten the walking belt. PROBLEM: The walking belt slips when walked on , first remove the key and UNPLUG THE POWER CORD. While the incline is...
..., turn both rear roller adjustment bolts clockwise, 1/4 of a turn . Plug in the console, press one of the treadmill does not change correctly or does not change when iFIT.com CD's and videos are played SOLUTION: a. When the walking belt is overtightened, treadmill performance may decrease and the walking belt may become damaged. Be careful not to overtighten the walking belt. PROBLEM: The walking belt slips when walked on , first remove the key and UNPLUG THE POWER CORD. While the incline is...
English Manual
Page 22
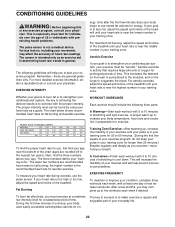
... near the middle number in your age. The chart below shows recommended heart rates for fat burning; For maximum fat burning, adjust the speed and incline of stretching to the nearest ten years). To find the proper heart rate for you exercise-never hold your physician. If your movement, may complete up -Start each week, with preexisting health problems. The pulse sensor is to burn...
... near the middle number in your age. The chart below shows recommended heart rates for fat burning; For maximum fat burning, adjust the speed and incline of stretching to the nearest ten years). To find the proper heart rate for you exercise-never hold your physician. If your movement, may complete up -Start each week, with preexisting health problems. The pulse sensor is to burn...
English Manual
Page 23
... Pan Power Supply Cable Tie Clamp Cable Tie Walking Belt Rubber Ring Rear Roller Belly Pan Spacer Rear Foot Rear Foot Screw Ground Wire Ground Wire Screw Belly Pan Rear Endcap Rear Roller Adj. mation about the optional hand weight set or chest pulse sensor, see your local SEARS dealer or call toll-free 1-800-8840620. Description Key No. Bolt Roller Adj. Qty. Bolt Motor Latch Decal Platform Screw iFIT.com Module Latch Catch Walking Platform 8" Cable Tie Jack Motor Tension Bolt Foot Rail Insert Small Screw Console...
... Pan Power Supply Cable Tie Clamp Cable Tie Walking Belt Rubber Ring Rear Roller Belly Pan Spacer Rear Foot Rear Foot Screw Ground Wire Ground Wire Screw Belly Pan Rear Endcap Rear Roller Adj. mation about the optional hand weight set or chest pulse sensor, see your local SEARS dealer or call toll-free 1-800-8840620. Description Key No. Bolt Roller Adj. Qty. Bolt Motor Latch Decal Platform Screw iFIT.com Module Latch Catch Walking Platform 8" Cable Tie Jack Motor Tension Bolt Foot Rail Insert Small Screw Console...
English Manual
Page 26
... in this manual to provide the following toll-free number 1-800-FON-PART (1-800-366-7278) The model number and serial number of charge. Model No. 831.299464 QUESTIONS? See the front cover of this SEARS TREADMILL EXERCISER, contact the nearest SEARS Service Center throughout the United States and SEARS will repair or replace the TREADMILL EXERCISER, free of your nearest SEARS Service Center. When requesting help assembling or operating the PROFORM 740CS treadmill • a part is used commercially...
... in this manual to provide the following toll-free number 1-800-FON-PART (1-800-366-7278) The model number and serial number of charge. Model No. 831.299464 QUESTIONS? See the front cover of this SEARS TREADMILL EXERCISER, contact the nearest SEARS Service Center throughout the United States and SEARS will repair or replace the TREADMILL EXERCISER, free of your nearest SEARS Service Center. When requesting help assembling or operating the PROFORM 740CS treadmill • a part is used commercially...

