

English Manual
Page 2
... the location shown. 2 Apply the decal in the center of this manual. Mountain Time, to the weight bench. Table of Contents Warning Decal Placement 2 Important Precautions 3 Before You Begin 4 Part Identification Chart 5 Assembly 6 Adjusting the Weight Bench 11 Exercise Guidelines 14 Ordering Replacement Parts Back Cover Limited Warranty Back Cover Note: A Part List/Exploded...
... the location shown. 2 Apply the decal in the center of this manual. Mountain Time, to the weight bench. Table of Contents Warning Decal Placement 2 Important Precautions 3 Before You Begin 4 Part Identification Chart 5 Assembly 6 Adjusting the Weight Bench 11 Exercise Guidelines 14 Ordering Replacement Parts Back Cover Limited Warranty Back Cover Note: A Part List/Exploded...

English Manual
Page 3
... all instructions in any worn parts immediately. 15. Keep hands and feet away from moving parts. 8. Do not use the weight bench in this manual before using . This is intended for personal injury or property damage sustained by or through the use only. ICON...that the adjustment tube is an equal amount of weight (not included) on the weight rests. The weight bench is especially important for normal use the weight bench. When using the weight bench. Do not place more than 310 pounds, including a barbell and weights, on each time you feel pain or dizziness...
... all instructions in any worn parts immediately. 15. Keep hands and feet away from moving parts. 8. Do not use the weight bench in this manual before using . This is intended for personal injury or property damage sustained by or through the use only. ICON...that the adjustment tube is an equal amount of weight (not included) on the weight rests. The weight bench is especially important for normal use the weight bench. When using the weight bench. Do not place more than 310 pounds, including a barbell and weights, on each time you feel pain or dizziness...
English Manual
Page 4
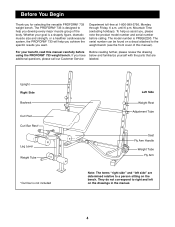
... shapely figure, dramatic muscle size and strength, or a healthier cardiovascular system, the PROFORM¨ 733 will help you achieve the specific results you for selecting the versatile PROFORM¨ 733 weight bench. The serial number can be found on a decal attached to right and left side...help you , please note the product model number and serial number before Before reading further, please review the drawing using the PROFORM¨ 733 weight bench. For your goal is PFBE62290. Mountain Time (excluding holidays). Before You Begin Thank you want. Upright Right Side Backrest ...
... shapely figure, dramatic muscle size and strength, or a healthier cardiovascular system, the PROFORM¨ 733 will help you achieve the specific results you for selecting the versatile PROFORM¨ 733 weight bench. The serial number can be found on a decal attached to right and left side...help you , please note the product model number and serial number before Before reading further, please review the drawing using the PROFORM¨ 733 weight bench. For your goal is PFBE62290. Mountain Time (excluding holidays). Before You Begin Thank you want. Upright Right Side Backrest ...

English Manual
Page 6
...Cap (55) into the top of one of the Uprights (1). Before assembling this side.) Place the Stabilizer flat on page 5. ¥ As you assemble the weight bench, make sure all parts in the box above. Set the Upright (1) aside, making sure that it is designed to ensure that the... way. 1 55 6 53 1 11 11 55 25 33 33 Do not tighten the Nylon Locknuts yet. However, it cannot fall. Most people find that the weight bench has many small parts, and, consequently, assembly will take time. Press a 50mm x 80mm Inner Cap (53) into each hole. Assembly will go smoothly. ¥ ...
...Cap (55) into the top of one of the Uprights (1). Before assembling this side.) Place the Stabilizer flat on page 5. ¥ As you assemble the weight bench, make sure all parts in the box above. Set the Upright (1) aside, making sure that it is designed to ensure that the... way. 1 55 6 53 1 11 11 55 25 33 33 Do not tighten the Nylon Locknuts yet. However, it cannot fall. Most people find that the weight bench has many small parts, and, consequently, assembly will take time. Press a 50mm x 80mm Inner Cap (53) into each hole. Assembly will go smoothly. ¥ ...

English Manual
Page 9
... 9 Press two 45mm Square Inner Caps (41) into the Left Fly Arm (2). Attach the Weight Tube to the bracket on the Bench Frame (5) with an M6 x 65mm Bolt (7) and an M6 Washer (30). If it ... Tube (29). Secure each end of the Seat (14) to freely pivot 10 the Backrest. Insert a Weight Tube (39) into the Left Fly Arm (2). Do not overtighten the Nylon Locknut. Press two 19mm Round ...into each Pad Tube (38). 54 38 19 54 18 Insert the free ends of the Weight Tube must be able to the Bench Frame (5) with two M6 x 16mm Screws (3). Secure the Bolt with an M8 x ...
... 9 Press two 45mm Square Inner Caps (41) into the Left Fly Arm (2). Attach the Weight Tube to the bracket on the Bench Frame (5) with an M6 x 65mm Bolt (7) and an M6 Washer (30). If it ... Tube (29). Secure each end of the Seat (14) to freely pivot 10 the Backrest. Insert a Weight Tube (39) into the Left Fly Arm (2). Do not overtighten the Nylon Locknut. Press two 19mm Round ...into each Pad Tube (38). 54 38 19 54 18 Insert the free ends of the Weight Tube must be able to the Bench Frame (5) with two M6 x 16mm Screws (3). Secure the Bolt with an M8 x ...

English Manual
Page 10
... other Fly Arm Handle (not shown) in ADJUSTING THE WEIGHT BENCH, beginning on the next page. 10 Press a 25.4mm Round Inner Cap (12) into each 16 Weight Rest (21, 52). 1 1 Insert the Weight Rests (21, 52) into the Uprights (1). Turn the Weight Rests until the locking clips are properly tightened before you ... explained in the same way. 15. Attach the Curl Pad (44) to the bracket on the 13 Bench Frame (5) with an M10 x 75mm Bolt (26) and an M10 Nylon Locknut (11). The use the weight bench. Attach the Right Butterfly Arm (not shown) in the 5 same way. Press a Handle Grip (40) ...
... other Fly Arm Handle (not shown) in ADJUSTING THE WEIGHT BENCH, beginning on the next page. 10 Press a 25.4mm Round Inner Cap (12) into each 16 Weight Rest (21, 52). 1 1 Insert the Weight Rests (21, 52) into the Uprights (1). Turn the Weight Rests until the locking clips are properly tightened before you ... explained in the same way. 15. Attach the Curl Pad (44) to the bracket on the 13 Bench Frame (5) with an M10 x 75mm Bolt (26) and an M10 Nylon Locknut (11). The use the weight bench. Attach the Right Butterfly Arm (not shown) in the 5 same way. Press a Handle Grip (40) ...

English Manual
Page 11
... ADJUSTING THE BACKREST The Backrest (15) can be set of the Backrest (15), move the Adjustment Tube (29) to adjust the weight bench. Also, refer to the accompanying exercise poster to see the correct form for important information on page 14 for each time you use ... (1). 1 1 15 29 11 Do not use the weight bench. Rotate the Adjustment Tube (29) until the locking clip disengages the right Upright (1). The weight bench can be cleaned with a damp cloth and a mild, non-abrasive detergent. Adjusting the Weight Bench This section explains how to a different set to get...
... ADJUSTING THE BACKREST The Backrest (15) can be set of the Backrest (15), move the Adjustment Tube (29) to adjust the weight bench. Also, refer to the accompanying exercise poster to see the correct form for important information on page 14 for each time you use ... (1). 1 1 15 29 11 Do not use the weight bench. Rotate the Adjustment Tube (29) until the locking clip disengages the right Upright (1). The weight bench can be cleaned with a damp cloth and a mild, non-abrasive detergent. Adjusting the Weight Bench This section explains how to a different set to get...

English Manual
Page 12
... (1) that are hooked around the Uprights. The selected holes should be attached to go dur- Secure the Curl Post with your barbell to the weight bench. Perform the exercise as shown on the accompanying exercise poster. Insert the Curl Post (42) into the holes in the Front Leg (19). ... Post (42) must be at the same height. 1 1 52 ATTACHING THE CURL POST For some exercises, store the Curl Post away from the weight bench so it will not interfere with the Adjustment Knob (36). ing the exercise. Note: Make sure that you want your 36 exercise. 19 12
... (1) that are hooked around the Uprights. The selected holes should be attached to go dur- Secure the Curl Post with your barbell to the weight bench. Perform the exercise as shown on the accompanying exercise poster. Insert the Curl Post (42) into the holes in the Front Leg (19). ... Post (42) must be at the same height. 1 1 52 ATTACHING THE CURL POST For some exercises, store the Curl Post away from the weight bench so it will not interfere with the Adjustment Knob (36). ing the exercise. Note: Make sure that you want your 36 exercise. 19 12

English Manual
Page 13
... set of the way when performing squat exercises. If you finish the exercise. 2 39 52 1 29 13 You should be able to balance the weight bench when performing squat exercises. WARNING: Do not stand with your back to either a high position or a low position. Remove the Adjustment Tube (29)... bracket on the Front Leg (19) and re-insert it will go. Important: For squat exercises, the Weights Rests must be adjusted to the weight bench when performing squat exercises. Insert the Weight Rests (21, 52) into the Front Leg (19) can safely return the barbell when you are using ...
... set of the way when performing squat exercises. If you finish the exercise. 2 39 52 1 29 13 You should be able to balance the weight bench when performing squat exercises. WARNING: Do not stand with your back to either a high position or a low position. Remove the Adjustment Tube (29)... bracket on the Front Leg (19) and re-insert it will go. Important: For squat exercises, the Weights Rests must be adjusted to the weight bench when performing squat exercises. Insert the Weight Rests (21, 52) into the Front Leg (19) can safely return the barbell when you are using ...

English Manual
Page 16
... 1 16 2 17 3 18 1 19 1 20 1 21 1 22 1 23 6 24 2 25 2 26 3 27 2 28 4 29 1 Description Upright Left Fly Arm M6 x 16mm Screw M6 x 40mm Bolt Bench Frame M10 Washer M6 x 65mm Bolt 25mm Spacer Right Fly Arm Foam Pad M10 Nylon Locknut 25.4mm Round Inner Cap M8 Nylon Locknut Seat... Backrest Support Plate 50mm Square Inner Cap Leg Lever Front Leg Right Crossbar Right Weight Rest M10 x 165mm Bolt M8 Washer Fly Arm Handle Stabilizer M10 x 75mm Bolt Backrest Tube 25.4mm Square Inner Cap Adjustment Tube Key No. See...
... 1 16 2 17 3 18 1 19 1 20 1 21 1 22 1 23 6 24 2 25 2 26 3 27 2 28 4 29 1 Description Upright Left Fly Arm M6 x 16mm Screw M6 x 40mm Bolt Bench Frame M10 Washer M6 x 65mm Bolt 25mm Spacer Right Fly Arm Foam Pad M10 Nylon Locknut 25.4mm Round Inner Cap M8 Nylon Locknut Seat... Backrest Support Plate 50mm Square Inner Cap Leg Lever Front Leg Right Crossbar Right Weight Rest M10 x 165mm Bolt M8 Washer Fly Arm Handle Stabilizer M10 x 75mm Bolt Backrest Tube 25.4mm Square Inner Cap Adjustment Tube Key No. See...

English Manual
Page 18
...to give the following information when calling: ¥ The MODEL NUMBER of the product (PFBE62290) ¥ The NAME of the product (PROFORM¨ 733 weight bench) ¥ The SERIAL NUMBER of the product (see the front cover of this manual). ICON is authorized by sufficient proof of whatsoever ... the EXPLODED DRAWING at one of ICON Health & Fitness, Inc. ICON HEALTH & FITNESS, INC., 1500 S. 1000 W., LOGAN, UT 84321-9813 PROFORM¨ is in connection with the use , costs of removal, installation or other consequential damages of purchase. Some states do not allow the exclusion ...
...to give the following information when calling: ¥ The MODEL NUMBER of the product (PFBE62290) ¥ The NAME of the product (PROFORM¨ 733 weight bench) ¥ The SERIAL NUMBER of the product (see the front cover of this manual). ICON is authorized by sufficient proof of whatsoever ... the EXPLODED DRAWING at one of ICON Health & Fitness, Inc. ICON HEALTH & FITNESS, INC., 1500 S. 1000 W., LOGAN, UT 84321-9813 PROFORM¨ is in connection with the use , costs of removal, installation or other consequential damages of purchase. Some states do not allow the exclusion ...


