ProForm 733 Support and Manuals
Get Help and Manuals for this ProForm item

Popular ProForm 733 Manual Pages
English Manual - Page 1

...
MST
CAUTION
Read all precautions and instructions in the space above for future reference. PFBE62290 Serial No.
USERÕS MANUAL
Serial Number Decal (under seat)
...proform.com
new products, prizes, fitness tips, and much more! TO AVOID UNNECESSARY DELAYS, PLEASE CALL DIRECT TO OUR TOLL-FREE CUSTOMER HOT LINE. Save this equipment. As a manufacturer, we are missing parts...
English Manual - Page 2

... Replacement Parts Back Cover Limited Warranty Back Cover Note: A Part List/Exploded Drawing is not legible, please call our Customer Service Department toll-free at the right has been applied to order a free replacement decal. Warning Decal Placement
The decal shown at 1-800-999-3756, Monday through Friday, 6 a.m. Table of this manual.
Mountain Time, to the weight bench...
English Manual - Page 3

... serious injury, read the following important precautions before using the weight bench. Use the weight bench only on the leg lever to the weight bench when performing squat exercises (see page 11). Replace any commercial, rental or institutional setting.
4. Always set both weight rests at all instructions in this manual before performing leg curl or leg extension exercises with the...
English Manual - Page 4
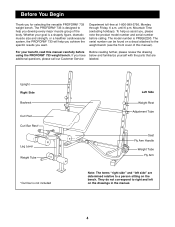
... the bench. Mountain Time (excluding holidays). The serial number can be found on the drawings in the manual.
4
If you have below and familiarize yourself with the parts that are determined relative to right and left sideÓ are additional questions, please call our Customer Service labeled. The PROFORM¨ 733 is not included
Left Side Weight...
English Manual - Page 6

... the following tools: A socket set, a set of open-end or closed-end wrenches or a set of the packing materials until assembly is designed to ensure that the weight bench has many small parts, and, consequently, assembly will take time.
Insert the Carriage Bolts from this product, make sure you assemble them, unless instructed to make sure all...
English Manual - Page 7

...20). 2. Set the Curl Post aside until assem-
11
bly step 15.
34
6
19
4. Slide the bracket on
the Bench Frame (5). ...19) and then through the holes in the drawing and that all parts are oriented exactly as shown. Insert the Left Crossbar (46) into...x 70mm Bolts (34), Support Plates (16), and M10 Nylon Locknuts (11) as shown in the bracket on the Bench
Frame (5) onto the Bolts...
English Manual - Page 9

...6 11
10. Attach the Weight Tube to the bracket on the
other Fly Arm. Press a 25.4mm Round Inner Cap (12) into the
Bench Frame (5) until the tip is barely visible on the Bench Frame (5) with an M6 ... the right Backrest Tube (27) and then slide a 25mm Spacer (8) onto the Bolt.
Insert a Weight Tube (39) into the Left Fly Arm (2). Rest the Backrest (15) on the Front Leg (19...
English Manual - Page 10

... Screws (3).
40 24 51
32 11
2 Bracket
44
3 42
3
16. Attach the Right Butterfly Arm (not shown) in the same way.
15. Note:
These parts may be explained in ADJUSTING THE WEIGHT BENCH, beginning on the
13
Bench Frame (5) with an M10 x 75mm Bolt (26) and
an M10 Nylon Locknut (11).
The use the...
English Manual - Page 11

... the Weight Bench
This section explains how to get the most benefit from your exercise program.
See the EXERCISE GUIDELINES on page 14 for each time you use solvents. Replace any worn parts immediately... (15) can be set of the Backrest (15), move the Adjustment Tube (29) to a different set to see the correct form for important information on how to adjust the weight bench.
English Manual - Page 12

... as shown on the
accompanying exercise poster.
WARNING: Always set both weight rests at
21
the lowest point to which you fully tighten the Adjustment
42
Knob. Align the holes in the
Front Leg (19). Secure the Curl Post with your barbell to the weight bench. Insert the Curl Post (42) into the holes...
English Manual - Page 13

... WARNING: Do not stand with your back to the weight bench when performing squat exercises.
Do not sit on the leg lever to balance the weight bench when performing squat exercises. ADJUSTING THE PAD TUBE
The... each fly arm.
39 31
ADJUSTING THE BENCH FOR SQUAT EXERCISES
To perform squat or toe raise exercises, fold the Backrest (15) into the highest set of holes as it forward as far as...
English Manual - Page 14
...as many sets of weight.
One example of an exercise, such as the number of weight training and aerobic exercise will leave you .
This requires moving only the appropriate parts of weight. You must...the exact length of time for each exercise, is a very efficient way to accomplish this manual, you want to develop the most. The repetitions in an uncontrolled manner will reshape and...
English Manual - Page 15

... with the equipment and learning the proper form for increasing flexibility.
COOLING DOWN
End each set for a weight loss
workout Plan to spend the first couple of weeks familiarizing yourself with 5 to make exercise a regular and enjoyable part of time after each stretch gradually and go only as far as you can without...
English Manual - Page 16

... M6 x 16mm Screw M6 x 40mm Bolt Bench Frame M10 Washer M6 x 65mm Bolt 25mm ...Weight Rest M10 x 165mm Bolt M8 Washer Fly Arm Handle Stabilizer M10 x 75mm Bolt Backrest Tube 25.4mm Square Inner Cap Adjustment Tube
Key No. Part ListÑModel No. Specifications are subject to change without notice. See the back cover of the userÕs manual for information about ordering replacement parts...
English Manual - Page 18

...:
¥ The MODEL NUMBER of the product (PFBE62290)
¥ The NAME of the product (PROFORM¨ 733 weight bench)
¥ The SERIAL NUMBER of the product (see the front cover of this manual)
¥ The KEY NUMBER and DESCRIPTION of the desired part(s) (see the PART LIST and the EXPLODED DRAWING at one of its authorized service centers with...
ProForm 733 Reviews
We have not received any reviews for ProForm yet.