
Uk Manual
Page 2
...IMPORTANT PRECAUTIONS 3 BEFORE YOU BEGIN 5 PART IDENTIFICATION CHART 6 ASSEMBLY 7 OPERATION AND ADJUSTMENT 14 HOW TO FOLD AND MOVE THE TREADMILL 21 TROUBLESHOOTING 22 EXERCISE GUIDELINES 25 PART LIST 26 EXPLODED DRAWING 28 ORDERING REPLACEMENT PARTS Back Cover RECYCLING INFORMATION Back Cover WARNING DECAL ...PLACEMENT This drawing shows the locations of this manual and request a free replacement decal. PROFORM is missing or illegible, see the front cover of the warning decals. Note: The decals may not...
...IMPORTANT PRECAUTIONS 3 BEFORE YOU BEGIN 5 PART IDENTIFICATION CHART 6 ASSEMBLY 7 OPERATION AND ADJUSTMENT 14 HOW TO FOLD AND MOVE THE TREADMILL 21 TROUBLESHOOTING 22 EXERCISE GUIDELINES 25 PART LIST 26 EXPLODED DRAWING 28 ORDERING REPLACEMENT PARTS Back Cover RECYCLING INFORMATION Back Cover WARNING DECAL ...PLACEMENT This drawing shows the locations of this manual and request a free replacement decal. PROFORM is missing or illegible, see the front cover of the warning decals. Note: The decals may not...
Uk Manual
Page 3
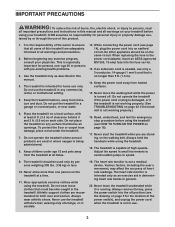
...Keep the power cord away from moisture and dust. Never start the treadmill while you are used only by or through the use . 3 The treadmill should be used or where oxygen is intended only as described in this manual. 4. Athletic support clothes are adequately informed of all warnings and precautions.... PRECAUTIONS WARNING: To reduce the risk of burns, fire, electric shock, or injury to persons, read all important precautions and instructions in this manual and all warnings on the walking belt. It is the responsibility of the owner to avoid sudden jumps in speed. 9. Do not use only...
...Keep the power cord away from moisture and dust. Never start the treadmill while you are used only by or through the use . 3 The treadmill should be used or where oxygen is intended only as described in this manual. 4. Athletic support clothes are adequately informed of all warnings and precautions.... PRECAUTIONS WARNING: To reduce the risk of burns, fire, electric shock, or injury to persons, read all important precautions and instructions in this manual and all warnings on the walking belt. It is the responsibility of the owner to avoid sudden jumps in speed. 9. Do not use only...

Uk Manual
Page 4
...the power cord immediately after use, before performing the maintenance and adjustment procedures described in this manual should be able to safely lift 45 lbs. (20 kg) to move the treadmill until it is holding the frame securely in the storage position. 23. Never remove the ...motor hood unless instructed to move the treadmill. 22. Over exercising may result in this manual. Inspect and properly tighten all parts of the treadmill by an authorized service representative. Servicing other than the procedures in serious injury or death...
...the power cord immediately after use, before performing the maintenance and adjustment procedures described in this manual should be able to safely lift 45 lbs. (20 kg) to move the treadmill until it is holding the frame securely in the storage position. 23. Never remove the ...motor hood unless instructed to move the treadmill. 22. Over exercising may result in this manual. Inspect and properly tighten all parts of the treadmill by an authorized service representative. Servicing other than the procedures in serious injury or death...

Uk Manual
Page 5
...enjoyable. To help us assist you for selecting the new PROFORM® 730 ZLT treadmill. If you have questions after reading this manual, please see the front cover of this manual carefully before contacting us. The model number and the location of this manual. Length: 5 ft. 10 in. (178 cm) Width...: 2 ft. 10 in the drawing below. BEFORE YOU BEGIN Thank you , note the product model number and serial number before you use the treadmill. The 730 ZLT treadmill provides an impressive selection of features...
...enjoyable. To help us assist you for selecting the new PROFORM® 730 ZLT treadmill. If you have questions after reading this manual, please see the front cover of this manual carefully before contacting us. The model number and the location of this manual. Length: 5 ft. 10 in. (178 cm) Width...: 2 ft. 10 in the drawing below. BEFORE YOU BEGIN Thank you , note the product model number and serial number before you use the treadmill. The 730 ZLT treadmill provides an impressive selection of features...
Uk Manual
Page 7
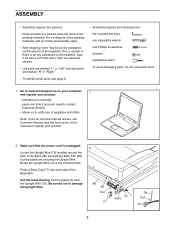
...on the treadmill, wipe it off with a soft cloth and a mild, non-abrasive cleaner. •• Left parts are marked “"L”" or “"Left”" and right parts are marked “"R”" or “"Right.”" •• To identify small parts, see the front cover of this manual) to damage... the Upright Wire. 2 80 68 Cut 77 70 Hole Tie Cut 70 7 Be careful not to register your warranty •• saves you time if you ever need to contact Customer Service •• allows us to notify you of the treadmill. Go to www...
...on the treadmill, wipe it off with a soft cloth and a mild, non-abrasive cleaner. •• Left parts are marked “"L”" or “"Left”" and right parts are marked “"R”" or “"Right.”" •• To identify small parts, see the front cover of this manual) to damage... the Upright Wire. 2 80 68 Cut 77 70 Hole Tie Cut 70 7 Be careful not to register your warranty •• saves you time if you ever need to contact Customer Service •• allows us to notify you of the treadmill. Go to www...
Uk Manual
Page 15
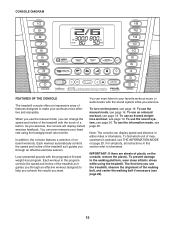
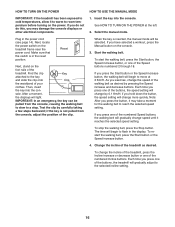
...use an onboard workout, see page 20. IMPORTANT: If there are sheets of the treadmill as it guides you through an effective exercise session. The rst time you want. When you use the manual mode, you exercise. To use an 8-week weightloss workout, see page 16. To ...use the manual mode, see page 19. To use the treadmill, observe the alignment of a button. CONSOLE DIAGRAM FEATURES OF THE CONSOLE The treadmill console offers an impressive array of onboard workouts. You can change the speed and ...
...use an onboard workout, see page 20. IMPORTANT: If there are sheets of the treadmill as it guides you through an effective exercise session. The rst time you want. When you use the manual mode, you exercise. To use an 8-week weightloss workout, see page 16. To ...use the manual mode, see page 19. To use the treadmill, observe the alignment of a button. CONSOLE DIAGRAM FEATURES OF THE CONSOLE The treadmill console offers an impressive array of onboard workouts. You can change the speed and ...
Uk Manual
Page 16
... Make sure that the switch is inserted, the manual mode will be pulled from the console, adjust the position of the buttons, the treadmill will change the incline of the treadmill, press the Incline increase or decrease button or one of the treadmill as desired by carefully taking a few steps backward;...numbered 2 through 18. If you do not do this, you have selected a workout, press the Manual button on the power. Then, insert the key into the console. Reset Next, stand on the treadmill frame near the power cord. If you may take a moment for the walking belt to ...
... Make sure that the switch is inserted, the manual mode will be pulled from the console, adjust the position of the buttons, the treadmill will change the incline of the treadmill, press the Incline increase or decrease button or one of the treadmill as desired by carefully taking a few steps backward;...numbered 2 through 18. If you do not do this, you have selected a workout, press the Manual button on the power. Then, insert the key into the console. Reset Next, stand on the treadmill frame near the power cord. If you may take a moment for the walking belt to ...
Uk Manual
Page 17
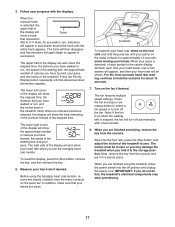
When the manual mode is selected, the upper half of the elapsed time. Measure your hands. Contacts To measure your heart rate, stand on the foot rails and ... from the console. The upper half of the display can also show the elapsed time, the distance that your pace, and the incline of the treadmill. The lower left corner of the display will again begin to turn off automatically after a few minutes. 8. To reset the display, press the Stop button...
When the manual mode is selected, the upper half of the elapsed time. Measure your hands. Contacts To measure your heart rate, stand on the foot rails and ... from the console. The upper half of the display can also show the elapsed time, the distance that your pace, and the incline of the treadmill. The lower left corner of the display will again begin to turn off automatically after a few minutes. 8. To reset the display, press the Stop button...
Uk Manual
Page 18
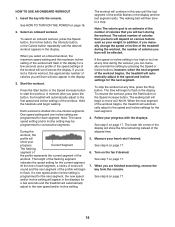
...press the Speed button, the Incline button, the Intensity button, or the Calorie button repeatedly until the last segment of the workout begins, the treadmill will depend on page 16. 2. If you select a Calorie workout, the approximate number of the workout will also appear in the display. ...segment. 4. During the workout, the prole will burn during the workout. In addition, if you manually change the speed or incline of the workout begins, the treadmill will automatically adjust to start the workout. To resume the workout, press the Start button or the Speed ...
...press the Speed button, the Incline button, the Intensity button, or the Calorie button repeatedly until the last segment of the workout begins, the treadmill will depend on page 16. 2. If you select a Calorie workout, the approximate number of the workout will also appear in the display. ...segment. 4. During the workout, the prole will burn during the workout. In addition, if you manually change the speed or incline of the workout begins, the treadmill will automatically adjust to start the workout. To resume the workout, press the Start button or the Speed ...
Uk Manual
Page 22
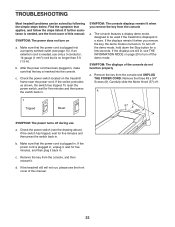
...plugged in, make sure that the power cord is plugged in. Check the power switch (see the front cover of this manual. 22 d. c. SYMPTOM: The displays of this manual. If the switch has tripped, wait for ve minutes, and then plug it . b. Remove the three #8 x... 3/4" Screws (6). a c Tripped Reset 6 57 SYMPTOM: The power turns off the demo mode. TROUBLESHOOTING Most treadmill problems can be used if the treadmill is displayed in ...
...plugged in, make sure that the power cord is plugged in. Check the power switch (see the front cover of this manual. 22 d. c. SYMPTOM: The displays of this manual. If the switch has tripped, wait for ve minutes, and then plug it . b. Remove the three #8 x... 3/4" Screws (6). a c Tripped Reset 6 57 SYMPTOM: The power turns off the demo mode. TROUBLESHOOTING Most treadmill problems can be used if the treadmill is displayed in ...
Uk Manual
Page 23
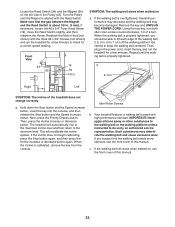
...to the minimum level. SYMPTOM: The walking belt slows when walked on the left side of this manual. 23 Remove the key and UNPLUG THE POWER CORD. Be careful to lift each edge of this manual. a 2–-3 in . If the walking belt still slows when walked on, see the front... the Reed Switch (94) and the Magnet (95) on a. Right Left SYMPTOM: The incline of a turn both idler roller screws counterclockwise, 1/4 of the treadmill does not change correctly a. c. Using the hex key, turn . Reattach the Motor Hood (not shown) with high-performance lubricant. Front View 43 95 19 94...
...to the minimum level. SYMPTOM: The walking belt slows when walked on the left side of this manual. 23 Remove the key and UNPLUG THE POWER CORD. Be careful to lift each edge of this manual. a 2–-3 in . If the walking belt still slows when walked on, see the front... the Reed Switch (94) and the Magnet (95) on a. Right Left SYMPTOM: The incline of a turn both idler roller screws counterclockwise, 1/4 of the treadmill does not change correctly a. c. Using the hex key, turn . Reattach the Motor Hood (not shown) with high-performance lubricant. Front View 43 95 19 94...

