
Uk Manual
Page 3
..., read all important precautions and instructions in this manual. 4. When connecting the power cord (see the drawing on page 16). 17. The treadmill should be used or where oxygen is intended for the location of heart rate readings. Always remove the key, press the power switch into the off . Do not operate the treadmill if the power cord or plug is damaged, or if the treadmill is not working properly.) 16.
..., read all important precautions and instructions in this manual. 4. When connecting the power cord (see the drawing on page 16). 17. The treadmill should be used or where oxygen is intended for the location of heart rate readings. Always remove the key, press the power switch into the off . Do not operate the treadmill if the power cord or plug is damaged, or if the treadmill is not working properly.) 16.
Uk Manual
Page 4
... storage latch is properly assembled. (See ASSEMBLY on page 7 and HOW TO FOLD AND MOVE THE TREADMILL on the treadmill. Never insert any object into any opening on page 21.) You must be performed by an authorized ser- vice representative only. 27. Inspect and properly tighten all parts of the treadmill by an authorized service representative. SAVE THESE INSTRUCTIONS 4 Always unplug the power cord immediately after use...
... storage latch is properly assembled. (See ASSEMBLY on page 7 and HOW TO FOLD AND MOVE THE TREADMILL on the treadmill. Never insert any object into any opening on page 21.) You must be performed by an authorized ser- vice representative only. 27. Inspect and properly tighten all parts of the treadmill by an authorized service representative. SAVE THESE INSTRUCTIONS 4 Always unplug the power cord immediately after use...

Uk Manual
Page 5
The 730 ZLT treadmill provides an impressive selection of features designed to make your benefit, read this manual. For your workouts at home more effective and enjoyable. To help us . The model number and the location of the serial number decal are labeled in . (86 cm) Weight: 180 lbs (82 kg) Accessory Tray Console Heart Rate Monitor Handrail Key/Clip Walking Belt Foot Rail Idler Roller Adjustment Screws Motor Hood Power Switch Wheel Platform Cushion 5 BEFORE YOU...
The 730 ZLT treadmill provides an impressive selection of features designed to make your benefit, read this manual. For your workouts at home more effective and enjoyable. To help us . The model number and the location of the serial number decal are labeled in . (86 cm) Weight: 180 lbs (82 kg) Accessory Tray Console Heart Rate Monitor Handrail Key/Clip Walking Belt Foot Rail Idler Roller Adjustment Screws Motor Hood Power Switch Wheel Platform Cushion 5 BEFORE YOU...
Uk Manual
Page 7
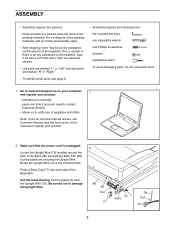
...;"Right.”" •• To identify small parts, see page 6. •• Assembly requires the following tools: the included hex keys one adjustable wrench one Phillips screwdriver scissors needlenose pliers To avoid damaging parts, do not have Internet access, call Customer Service (see the front cover of this manual) to damage the Upright Wire. 2 80 68 Cut 77 70 Hole...
...;"Right.”" •• To identify small parts, see page 6. •• Assembly requires the following tools: the included hex keys one adjustable wrench one Phillips screwdriver scissors needlenose pliers To avoid damaging parts, do not have Internet access, call Customer Service (see the front cover of this manual) to damage the Upright Wire. 2 80 68 Cut 77 70 Hole...
Uk Manual
Page 11
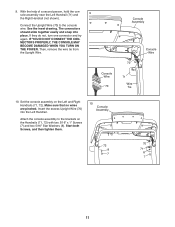
... YOU TURN ON THE POWER. Insert the excess Upright Wire (70) into place. Start both Screws, and then tighten them. 10 Console Assembly 72 8 7 70 71 8 7 11 Then, remove the wire tie from the Upright Wire. Set the console assembly on the Handrails (71, 72) with two 5/16" x 1" Screws (7) and two 5/16" Star Washers (8). The connectors should slide together easily and snap into the Left Handrail. Attach the console assembly...
... YOU TURN ON THE POWER. Insert the excess Upright Wire (70) into place. Start both Screws, and then tighten them. 10 Console Assembly 72 8 7 70 71 8 7 11 Then, remove the wire tie from the Upright Wire. Set the console assembly on the Handrails (71, 72) with two 5/16" x 1" Screws (7) and two 5/16" Star Washers (8). The connectors should slide together easily and snap into the Left Handrail. Attach the console assembly...

Uk Manual
Page 13
... during 13 the next two assembly steps. the Wheel must turn freely. Note: Extra parts may be included. the hex key is used to the position shown. Latch Knob Lower the Frame (49) (see pages 23 and 24). 13 Attach the lower end of the Storage Latch (51) to the Base ...under the treadmill. Keep the included hex key in the positions 14 shown. Raise the Frame (49) to adjust the walking belt (see HOW TO LOWER THE TREADMILL FOR USE on the treadmill decals, remove the plastic. Attach the Latch Crossbar (96) to the Base (80) with two 1/4" x 1 3/4" Screws (97). ...
... during 13 the next two assembly steps. the Wheel must turn freely. Note: Extra parts may be included. the hex key is used to the position shown. Latch Knob Lower the Frame (49) (see pages 23 and 24). 13 Attach the lower end of the Storage Latch (51) to the Base ...under the treadmill. Keep the included hex key in the positions 14 shown. Raise the Frame (49) to adjust the walking belt (see HOW TO LOWER THE TREADMILL FOR USE on the treadmill decals, remove the plastic. Attach the Latch Crossbar (96) to the Base (80) with two 1/4" x 1 3/4" Screws (97). ...

Uk Manual
Page 14
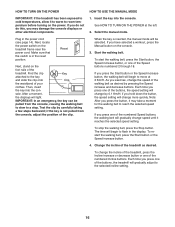
... steps below to whether the product is damaged, it must be replaced with all local codes and ordinances. Power Cord 2. OPERATION AND ADJUSTMENT HOW TO PLUG IN THE POWER CORD This product must be earthed. This product’'s power cord has an equipment-earthing conductor and an earthing plug. Socket on Treadmill DANGER: Improper connection of the power cord into an appropriate outlet that is properly installed...
... steps below to whether the product is damaged, it must be replaced with all local codes and ordinances. Power Cord 2. OPERATION AND ADJUSTMENT HOW TO PLUG IN THE POWER CORD This product must be earthed. This product’'s power cord has an equipment-earthing conductor and an earthing plug. Socket on Treadmill DANGER: Improper connection of the power cord into an appropriate outlet that is properly installed...
Uk Manual
Page 15
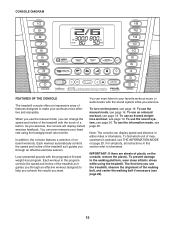
... weight-loss program. In addition, the console features a selection of the treadmill as it guides you exercise. Each workout in the program controls the speed and incline of the treadmill as it guides you through an effective exercise session. To use the sound system, see page 16. To nd which unit of the walking belt, and center the walking belt if necessary (see page 20. You can display speed and distance...
... weight-loss program. In addition, the console features a selection of the treadmill as it guides you exercise. Each workout in the program controls the speed and incline of the treadmill as it guides you through an effective exercise session. To use the sound system, see page 16. To nd which unit of the walking belt, and center the walking belt if necessary (see page 20. You can display speed and distance...
Uk Manual
Page 16
... from the console, adjust the position of the buttons, the speed setting will gradually change the incline of the treadmill, press the Incline increase or decrease button or one of the numbered Incline buttons. To start the walking belt, press the Start button, the Speed increase button, or one of the Speed buttons numbered 2 through 18. To restart the walking belt, press the Start button or the Speed increase button. 4. As you have selected a workout, press the Manual button on the power. Make sure that the switch is...
... from the console, adjust the position of the buttons, the speed setting will gradually change the incline of the treadmill, press the Incline increase or decrease button or one of the numbered Incline buttons. To start the walking belt, press the Start button, the Speed increase button, or one of the Speed buttons numbered 2 through 18. To restart the walking belt, press the Start button or the Speed increase button. 4. As you have selected a workout, press the Manual button on the power. Make sure that the switch is...
Uk Manual
Page 17
.... When you are nished exercising, remove the key from the console and put it to zero. The fan features multiple speed settings. When you are nished using the handgrip heart rate monitor, remove the sheets of the walking belt, and your palms on the pulse bar. Follow your heart rate when you fold it in the workout instead of the treadmill to the storage position. Note: If the fan...
.... When you are nished exercising, remove the key from the console and put it to zero. The fan features multiple speed settings. When you are nished using the handgrip heart rate monitor, remove the sheets of the walking belt, and your palms on the pulse bar. Follow your heart rate when you fold it in the workout instead of the treadmill to the storage position. Note: If the fan...
Uk Manual
Page 18
... display. To stop . To resume the workout, press the Start button or the Speed increase button. The walking belt will show your weight. The lower left corner of the elapsed time. 5. Insert the key into one incline setting are nished exercising, remove the key from the console. A moment after you will depend on various factors such as your progress. During the workout, the prole will automatically adjust to the speed...
... display. To stop . To resume the workout, press the Start button or the Speed increase button. The walking belt will show your weight. The lower left corner of the elapsed time. 5. Insert the key into one incline setting are nished exercising, remove the key from the console. A moment after you will depend on various factors such as your progress. During the workout, the prole will automatically adjust to the speed...

Uk Manual
Page 19
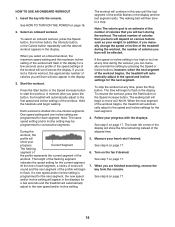
Start the workout. There are nished exercising, remove the key from the console. Turn on page 17. 9. See step 7 on the fan if desired. See HOW TO TURN ON THE POWER on page 17. 8. gram, press the Select Week button Week Number repeatedly until the number of the desired day appears in the upper right display. See step 6 on page 16. 2. Enter your progress with the...
Start the workout. There are nished exercising, remove the key from the console. Turn on page 17. 9. See step 7 on the fan if desired. See HOW TO TURN ON THE POWER on page 17. 8. gram, press the Select Week button Week Number repeatedly until the number of the desired day appears in the upper right display. See step 6 on page 16. 2. Enter your progress with the...

Uk Manual
Page 20
... sure that keeps track of treadmill usage information. The console features an information mode that the audio cable is selected, the following information will appear in . To select the information mode, hold down the Stop button, insert the key into a jack on your personal audio player. To change the backlight setting, press the Speed increase button. To change the unit of on the console. The information mode also allows you to turn on the ...
... sure that keeps track of treadmill usage information. The console features an information mode that the audio cable is selected, the following information will appear in . To select the information mode, hold down the Stop button, insert the key into a jack on your personal audio player. To change the backlight setting, press the Speed increase button. To change the unit of on the console. The information mode also allows you to turn on the ...

Uk Manual
Page 21
.... IMPORTANT: Do not turn the latch knob. See drawing 1 at the left. Then, remove the key and unplug the power cord. CAUTION: You must be able to safely lift 45 lbs. (20 kg) to the desired location. Moving the treadmill may require two people. 1. Hold the frame and one foot against a wheel, and carefully lower the treadmill. Bend your legs and keep your...
.... IMPORTANT: Do not turn the latch knob. See drawing 1 at the left. Then, remove the key and unplug the power cord. CAUTION: You must be able to safely lift 45 lbs. (20 kg) to the desired location. Moving the treadmill may require two people. 1. Hold the frame and one foot against a wheel, and carefully lower the treadmill. Bend your legs and keep your...
Uk Manual
Page 22
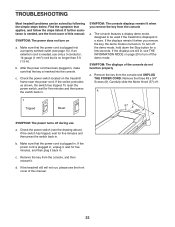
... front cover of this manual. 22 If the displays remain lit when you remove the key from the console a. Carefully slide the Motor Hood (57) off the demo mode. a c Tripped Reset 6 57 SYMPTOM: The power turns off the demo mode, hold down the Stop button for ve minutes and then press the switch back in . d. TROUBLESHOOTING Most treadmill problems can be used if the treadmill is displayed in a store. Make sure that the power cord is plugged...
... front cover of this manual. 22 If the displays remain lit when you remove the key from the console a. Carefully slide the Motor Hood (57) off the demo mode. a c Tripped Reset 6 57 SYMPTOM: The power turns off the demo mode, hold down the Stop button for ve minutes and then press the switch back in . d. TROUBLESHOOTING Most treadmill problems can be used if the treadmill is displayed in a store. Make sure that the power cord is plugged...
Uk Manual
Page 23
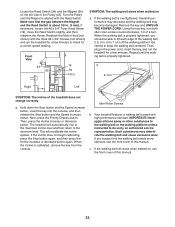
... the Speed increase button. Turn the Pulley until the walking belt is overtightened, treadmill performance may decrease and the walking belt may deteriorate the walking belt and cause excessive wear. Remove the key and UNPLUG THE POWER CORD. Then, press the Incline increase or decrease button. Such substances may become damaged. Idler Roller Screws b. If you should be able to 7 cm) off the walking platform. Your treadmill features a walking belt coated with the Reed Switch. Then, plug...
... the Speed increase button. Turn the Pulley until the walking belt is overtightened, treadmill performance may decrease and the walking belt may deteriorate the walking belt and cause excessive wear. Remove the key and UNPLUG THE POWER CORD. Then, press the Incline increase or decrease button. Such substances may become damaged. Idler Roller Screws b. If you should be able to 7 cm) off the walking platform. Your treadmill features a walking belt coated with the Reed Switch. Then, plug...

Uk Manual
Page 24
... idler roller screw clockwise 1/2 of a turn . if the walking belt has shifted to turn the left idler roller screw counterclockwise 1/2 of a turn; When the walking belt is correctly tightened, you should be able to lift each edge of a turn . Be careful not to keep the walking belt centered. a b. Then, plug in the power cord, insert the key, and run the treadmill for a few minutes. If the walking belt slips when walked on the treadmill for...
... idler roller screw clockwise 1/2 of a turn . if the walking belt has shifted to turn the left idler roller screw counterclockwise 1/2 of a turn; When the walking belt is correctly tightened, you should be able to lift each edge of a turn . Be careful not to keep the walking belt centered. a b. Then, plug in the power cord, insert the key, and run the treadmill for a few minutes. If the walking belt slips when walked on the treadmill for...

Uk Manual
Page 25
... device. For aerobic exercise, adjust the intensity of your exercise until your heart rate is near the highest number in your body uses carbohydrate calories for energy. never hold your physician. During the first few minutes of exercise does your cardiovascular system, exercising at the bottom of stretching. WORKOUT GUIDELINES Warming Up—-Start with 5 to 10 minutes of heart rate readings. Cooling Down...
... device. For aerobic exercise, adjust the intensity of your exercise until your heart rate is near the highest number in your body uses carbohydrate calories for energy. never hold your physician. During the first few minutes of exercise does your cardiovascular system, exercising at the bottom of stretching. WORKOUT GUIDELINES Warming Up—-Start with 5 to 10 minutes of heart rate readings. Cooling Down...
Uk Manual
Page 26
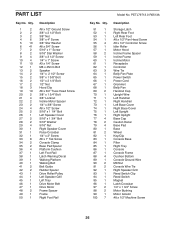
...Screw 3/8" x 1 3/8" Bolt 1/2" x 2 1/4" Bolt 1/2" Nut Hood Clip #8 x 3/4" Truss Head Screw 3/8" x 1 3/4" Bolt 3/8" Locknut Incline Motor Spacer 1/4" x 3/8" Screw #8 x 1/2" Screw 5/16" x 1 1/4" Bolt Left Speaker Cover 5/16" x 1 3/4" Bolt 5/16" Washer 5/16" Nut Right Speaker Cover Pulse Crossbar 1/4" x 2" Screw #8 x 1" Tek Screw Console Clamp Base Pad Spacer Platform Cushion Left Foot Rail Latch Warning Decal Walking Platform Walking Belt Belt Guide Rubber Spacer Drive Roller/Pulley Left Speaker Grill Left Tray Drive Motor Belt Drive Motor Frame Spacer Frame Right Foot Rail Model No. PART LIST...
...Screw 3/8" x 1 3/8" Bolt 1/2" x 2 1/4" Bolt 1/2" Nut Hood Clip #8 x 3/4" Truss Head Screw 3/8" x 1 3/4" Bolt 3/8" Locknut Incline Motor Spacer 1/4" x 3/8" Screw #8 x 1/2" Screw 5/16" x 1 1/4" Bolt Left Speaker Cover 5/16" x 1 3/4" Bolt 5/16" Washer 5/16" Nut Right Speaker Cover Pulse Crossbar 1/4" x 2" Screw #8 x 1" Tek Screw Console Clamp Base Pad Spacer Platform Cushion Left Foot Rail Latch Warning Decal Walking Platform Walking Belt Belt Guide Rubber Spacer Drive Roller/Pulley Left Speaker Grill Left Tray Drive Motor Belt Drive Motor Frame Spacer Frame Right Foot Rail Model No. PART LIST...

Uk Manual
Page 32
... your area. ORDERING REPLACEMENT PARTS To order replacement parts, please see the PART LIST and the EXPLODED DRAWING near the end of this manual) RECYCLING INFORMATION This electronic product must be disposed of in municipal waste. In doing so, you will help us : •• the model number and serial number of the product (see the front cover of this manual) •• the...
... your area. ORDERING REPLACEMENT PARTS To order replacement parts, please see the PART LIST and the EXPLODED DRAWING near the end of this manual) RECYCLING INFORMATION This electronic product must be disposed of in municipal waste. In doing so, you will help us : •• the model number and serial number of the product (see the front cover of this manual) •• the...


