

English Manual
Page 1
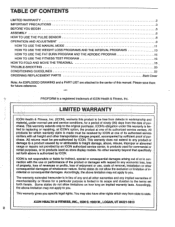
... technicians on our Customer Hot Line will guarantee complete satisfaction through direct assistance from our factory. USER'S MANUAL PR• •FORM® 725 PERFORMANCE TREADMILL U Model No. 4 Serial No. As a manufacturer, we are committed to you have questions, or find that there are missing or damaged parts, we will provide...
... technicians on our Customer Hot Line will guarantee complete satisfaction through direct assistance from our factory. USER'S MANUAL PR• •FORM® 725 PERFORMANCE TREADMILL U Model No. 4 Serial No. As a manufacturer, we are committed to you have questions, or find that there are missing or damaged parts, we will provide...
English Manual
Page 2
... PROGRAMS HOW TO USE THE FAT BURN PROGRAM AND THE AEROBIC PROGRAM HOW TO USE THE FITNESS TEST PROGRAM HOW TO FOLD AND MOVE THE TREADMILL TROUBLE-SHOOTING CONDITIONING GUIDELINES ORDERING REPLACEMENT PARTS. 2 3 5 6 8 9 11 13 15 16 18 20 22 Back Cover Note: An EXPLODED DRAWING and a PART LIST ...are attached to you. PROFORM is lim- No other warranties and any economic loss, loss of property, loss of revenues or profits, loss of enjoyment or use and service conditions...
... PROGRAMS HOW TO USE THE FAT BURN PROGRAM AND THE AEROBIC PROGRAM HOW TO USE THE FITNESS TEST PROGRAM HOW TO FOLD AND MOVE THE TREADMILL TROUBLE-SHOOTING CONDITIONING GUIDELINES ORDERING REPLACEMENT PARTS. 2 3 5 6 8 9 11 13 15 16 18 20 22 Back Cover Note: An EXPLODED DRAWING and a PART LIST ...are attached to you. PROFORM is lim- No other warranties and any economic loss, loss of property, loss of revenues or profits, loss of enjoyment or use and service conditions...

English Manual
Page 3
..., with 8 feet of burns, fire, electric shock, or injury to persons, read the following important precautions and information before operating the treadmill. Keep your feet and objects from moisture and dust. Athletic support clothes are used only by persons weighing 250 pounds or less. 8....17. It is -not a medical device. Various factors, including the user's movement, may affect the accuracy of a preset program, the treadmill will automatically adjust to avoid sudden jurrips in a garage or covered patio, or near water. 5. During the last ten seconds of heart rate readings...
..., with 8 feet of burns, fire, electric shock, or injury to persons, read the following important precautions and information before operating the treadmill. Keep your feet and objects from moisture and dust. Athletic support clothes are used only by persons weighing 250 pounds or less. 8....17. It is -not a medical device. Various factors, including the user's movement, may affect the accuracy of a preset program, the treadmill will automatically adjust to avoid sudden jurrips in a garage or covered patio, or near water. 5. During the last ten seconds of heart rate readings...

English Manual
Page 4
...is not legible, please call our Customer Service Department, toll-free, to play on or around treadmill. • Storage latch must be at lowest level before folding treadmill into storage position. ervicing other rq his..manual .should be fully engaged before p~ and adJcstq9n ...fp 35 or persons v,ttr preexist espens, I.. 4. A WARNING! • Never allow children to order a free replacement decal (see ORDERING REPLACEMENT PARTS on your treadmill. ert all parts of this manual). y for.person The decals shown below have been placed on the back cover of the treat ery three m r! O 0 ...
...is not legible, please call our Customer Service Department, toll-free, to play on or around treadmill. • Storage latch must be at lowest level before folding treadmill into storage position. ervicing other rq his..manual .should be fully engaged before p~ and adJcstq9n ...fp 35 or persons v,ttr preexist espens, I.. 4. A WARNING! • Never allow children to order a free replacement decal (see ORDERING REPLACEMENT PARTS on your treadmill. ert all parts of this manual). y for.person The decals shown below have been placed on the back cover of the treat ery three m r! O 0 ...

English Manual
Page 5
... your benefit, read this manual for selecting the PROFORM® 725 TL treadmill. The serial number can be found on a decal attached to let you , please note the product model number and serial number before using the treadmill. To help us assist you enjoy an excellent ...Customer Service Department toll-free Before reading further, please review the drawing below and familiarize yourself with innovative design to the treadmill (see the front cover of other treadmills. until 6 p.m. Mountain Time (excluding holidays). If you 're not exercising, the unique 725 TL can be folded ...
... your benefit, read this manual for selecting the PROFORM® 725 TL treadmill. The serial number can be found on a decal attached to let you , please note the product model number and serial number before using the treadmill. To help us assist you enjoy an excellent ...Customer Service Department toll-free Before reading further, please review the drawing below and familiarize yourself with innovative design to the treadmill (see the front cover of other treadmills. until 6 p.m. Mountain Time (excluding holidays). If you 're not exercising, the unique 725 TL can be folded ...

English Manual
Page 6
... shown) in - 4 jury, bend your legs and keep your left side or the storage latch may be damaged. ASSEMBLY Assembly requires two people. Set the treadmill in the indicated locations. Do not dis- Note: One extra Base Pad may be included. Hold the upper end of a second person, carefully lay the... treadmill on the floor. 76 86 hi 43 3. With the help of the packing materials until the frame is on its left thumb, slide open the ...
... shown) in - 4 jury, bend your legs and keep your left side or the storage latch may be damaged. ASSEMBLY Assembly requires two people. Set the treadmill in the indicated locations. Do not dis- Note: One extra Base Pad may be included. Hold the upper end of a second person, carefully lay the... treadmill on the floor. 76 86 hi 43 3. With the help of the packing materials until the frame is on its left thumb, slide open the ...
English Manual
Page 7
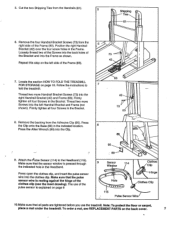
...the Bracket. Firmly tighten all four Screws in the Bracket. 83 42 73 83 t - - 8. Attach the F .Ilse Sensor (114) to 7 fold the treadmill. Cut the two Shipping Ties from the Handrails (61). 5 ° Shipping Ties 61 6. Press the Clip onto the Base (86) in the Frame. Thread... two more Screws into the Clip. 9. The use the treadmill. Position the right Handrail Bracket (42) over the four screw holes in the indicated location. 8 Press the Allen Wrench (89) into the left side ...
...the Bracket. Firmly tighten all four Screws in the Bracket. 83 42 73 83 t - - 8. Attach the F .Ilse Sensor (114) to 7 fold the treadmill. Cut the two Shipping Ties from the Handrails (61). 5 ° Shipping Ties 61 6. Press the Clip onto the Base (86) in the Frame. Thread... two more Screws into the Clip. 9. The use the treadmill. Position the right Handrail Bracket (42) over the four screw holes in the indicated location. 8 Press the Allen Wrench (89) into the left side ...

English Manual
Page 8
... headband, rub your forehead briefly to your forehead, it air dry. Make sure that there is used regularly. When you are on the treadmill. 4. CLEANING THE PULSE SENSOR AND HEADBAND - It may take up to ten seconds for greater accuracy, comfort, and durability. Put on... and 7 above your pulse may damage the console, wear the pulse sensor only while you exer- The headband must be cleaned weekly when the treadmill is no hair between the sensor window and your pulse every few minutes of the pulse sensor wire, helping to function properly, the headband should...
... headband, rub your forehead briefly to your forehead, it air dry. Make sure that there is used regularly. When you are on the treadmill. 4. CLEANING THE PULSE SENSOR AND HEADBAND - It may take up to ten seconds for greater accuracy, comfort, and durability. Put on... and 7 above your pulse may damage the console, wear the pulse sensor only while you exer- The headband must be cleaned weekly when the treadmill is no hair between the sensor window and your pulse every few minutes of the pulse sensor wire, helping to function properly, the headband should...

English Manual
Page 9
...appropriate outlet that looks like any other substances to reduce the risk of five feet or less in dolt. .O electric shock. Your treadmill, like the plug illustrated in - Grounding Plug Grounding Plug 0° Surge protectors are not grounded. This product is properly installed and... This product is grounded before using an adapter. ec. The temporary adapter should malfunction or break down, grounding provides a path of your treadmill being turned on a nominal 120-volt circuit, and has a grounding plug that is equipped with a 2 14-gauge cord of Lug ...
...appropriate outlet that looks like any other substances to reduce the risk of five feet or less in dolt. .O electric shock. Your treadmill, like the plug illustrated in - Grounding Plug Grounding Plug 0° Surge protectors are not grounded. This product is properly installed and... This product is grounded before using an adapter. ec. The temporary adapter should malfunction or break down, grounding provides a path of your treadmill being turned on a nominal 120-volt circuit, and has a grounding plug that is equipped with a 2 14-gauge cord of Lug ...

English Manual
Page 10
...bee coma Ie • stop STOP Key AiwARNtunl•Allaues al MN odalpanonl 'nay awe aeelaua Wary. *Dr mt..w •NallanglIall 4lant 'grand treadmill. • Reed Users Manual and fallow all instructions in either miles or kilometers (see pages 16 and 17. ki!eerkaele.rlry, avoid spieling ... continuous exercise feedback. Seven preset programs are also offered: two WEIGHT LOSS programs and two INTERVAL programs automatically control the speed of the treadmill as ust thscsoosor ea _lout factors, in the power "On" Position cord(see pages 13 and 14. To use the WEIGHT LOSS ...
...bee coma Ie • stop STOP Key AiwARNtunl•Allaues al MN odalpanonl 'nay awe aeelaua Wary. *Dr mt..w •NallanglIall 4lant 'grand treadmill. • Reed Users Manual and fallow all instructions in either miles or kilometers (see pages 16 and 17. ki!eerkaele.rlry, avoid spieling ... continuous exercise feedback. Seven preset programs are also offered: two WEIGHT LOSS programs and two INTERVAL programs automatically control the speed of the treadmill as ust thscsoosor ea _lout factors, in the power "On" Position cord(see pages 13 and 14. To use the WEIGHT LOSS ...

English Manual
Page 12
...reinsert the key. • TIME display This display shows , the total time that the walking belt has moved and the current incline of the treadmill, if desired. If the KPH indicator is shown in either miles per hour (mph) or kilometers per hour (kph). The buttons can be ...the display will light when the number of the tread- Change the incline of the C1 . 11_11_1 treadmill. mill is selected, the TIME display will show the selected speed setting for the treadmill to reach the selected incline setting. 8 Follow your pulse is pressed, the incline will appear in ...
...reinsert the key. • TIME display This display shows , the total time that the walking belt has moved and the current incline of the treadmill, if desired. If the KPH indicator is shown in either miles per hour (mph) or kilometers per hour (kph). The buttons can be ...the display will light when the number of the tread- Change the incline of the C1 . 11_11_1 treadmill. mill is selected, the TIME display will show the selected speed setting for the treadmill to reach the selected incline setting. 8 Follow your pulse is pressed, the incline will appear in ...

English Manual
Page 13
... level for burning fat, the FAT BURN or MAXIMUM FAT BURN indicator will then be "aerobic." (See AEROBIC EXERCISE on page 11. 13 Lower the treadmill to lose unwanted pounds; Find the clip attached to enter your weight, see step 3 on page 22.) If you to the lowest incline level. peatedly...
... level for burning fat, the FAT BURN or MAXIMUM FAT BURN indicator will then be "aerobic." (See AEROBIC EXERCISE on page 11. 13 Lower the treadmill to lose unwanted pounds; Find the clip attached to enter your weight, see step 3 on page 22.) If you to the lowest incline level. peatedly...

English Manual
Page 14
... or decrease but- If the maximum speed setting is selected, the incline of the program (the warm-up and cool-down from beneath the treadmill. pressed, the TIME display STOP V A SPEED will then slow to the lowest incline level. fully begin to 8.5 mph. To restart the...if the INTERVAL 2 program is between 5.5 mph and 8.5 mph, the walking belt will be completed. Note: During the last ten seconds of the treadmill, if desired. To terminate the program before the program is 5.0 mph, the speed range will continue until it reaches 8.5 mph. After a moment...
... or decrease but- If the maximum speed setting is selected, the incline of the program (the warm-up and cool-down from beneath the treadmill. pressed, the TIME display STOP V A SPEED will then slow to the lowest incline level. fully begin to 8.5 mph. To restart the...if the INTERVAL 2 program is between 5.5 mph and 8.5 mph, the walking belt will be completed. Note: During the last ten seconds of the treadmill, if desired. To terminate the program before the program is 5.0 mph, the speed range will continue until it reaches 8.5 mph. After a moment...
English Manual
Page 15
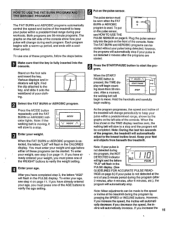
... key. If you have already entered your age, you increase the 15 Hold the handrails and carefully begin to the speed or incline of the treadmill during the program (after 2 minutes, after 4 minutes, after the programs are 30-minute programs. The graphs on the front of the console. Keep...speed, the in the PULSE display. E FAT BURN PROGRAM Ate PROGRAM The FAT BURN and AEROBIC programs automatically control the speed and incline of the treadmill to keep your pulse within a predetermined range, shown by pressing the SPEED or INCLINE buttons. To use one of the WEIGHT buttons to I-:eep...
... key. If you have already entered your age, you increase the 15 Hold the handrails and carefully begin to the speed or incline of the treadmill during the program (after 2 minutes, after 4 minutes, after the programs are 30-minute programs. The graphs on the front of the console. Keep...speed, the in the PULSE display. E FAT BURN PROGRAM Ate PROGRAM The FAT BURN and AEROBIC programs automatically control the speed and incline of the treadmill to keep your pulse within a predetermined range, shown by pressing the SPEED or INCLINE buttons. To use one of the WEIGHT buttons to I-:eep...

English Manual
Page 16
... best results, the FITNESS TEST should not be started without your weight and age before the program is moving, it onto the waistband of the treadmill will automatically decrease; if you must be increased any further. When the incline reaches the lowest setting, the speed cannot be worn when the FITNESS...
... best results, the FITNESS TEST should not be started without your weight and age before the program is moving, it onto the waistband of the treadmill will automatically decrease; if you must be increased any further. When the incline reaches the lowest setting, the speed cannot be worn when the FITNESS...

English Manual
Page 17
...page 12). When the FITNESS TEST is selected. Note: During the last ten seconds of the total time and distance accumulated on the treadmill. Keep your feet and objects from 2 minutes. When you are ten fit- The DISTANCE/INCLINE display will be stopped temporarily and then ... how many periods remain. Remember, the FITNESS TEST is completed, your relative fit- The TIME display will automatically increase. The incline of the treadmill will then show a fitness level of any time by pressing the STOP button. tected during the last thirty seconds of 0 (FL:00). ...
...page 12). When the FITNESS TEST is selected. Note: During the last ten seconds of the total time and distance accumulated on the treadmill. Keep your feet and objects from 2 minutes. When you are ten fit- The DISTANCE/INCLINE display will be stopped temporarily and then ... how many periods remain. Remember, the FITNESS TEST is completed, your relative fit- The TIME display will automatically increase. The incline of the treadmill will then show a fitness level of any time by pressing the STOP button. tected during the last thirty seconds of 0 (FL:00). ...

English Manual
Page 18
... that the storage latch is closed fully over the frame guide. Hold the upper ends of injury, use extreme caution while moving the treadmill, convert the treadmill to the desired location. Caution: To avoid pinching your hands, do not hold here ( Storage Latch Closed -Frai-ne Guide HOW ...TO MOVE THE TREADMILL Before moving the treadmill. Hold the treadmill with your legs rather than your back. Tilt the treadmill back until it rolls freely on the base as described above 85° Fahrenheit. HOW TO ...
... that the storage latch is closed fully over the frame guide. Hold the upper ends of injury, use extreme caution while moving the treadmill, convert the treadmill to the desired location. Caution: To avoid pinching your hands, do not hold here ( Storage Latch Closed -Frai-ne Guide HOW ...TO MOVE THE TREADMILL Before moving the treadmill. Hold the treadmill with your legs rather than your back. Tilt the treadmill back until it rolls freely on the base as described above 85° Fahrenheit. HOW TO ...

English Manual
Page 19
Using your hands, do not hold the treadmill in the locations indicated by the arrows. Hold the treadmill firmly with your back straight. Caution: To avoid pinching your left thumb, slide open . Do not hold it open the storage latch and hold here ( 19 HOW TO LOWER THE TREADMILL FOR USE 1. Storage Latch Opened 2. Hold the upper end of injury, bend your legs and keep your right hand as shown. To decrease the possibility of the treadmill with both hands, and lower the treadmill to the floor. Pivot the treadmill until the frame is past the storage latch.
Using your hands, do not hold the treadmill in the locations indicated by the arrows. Hold the treadmill firmly with your back straight. Caution: To avoid pinching your left thumb, slide open . Do not hold it open the storage latch and hold here ( 19 HOW TO LOWER THE TREADMILL FOR USE 1. Storage Latch Opened 2. Hold the upper end of injury, bend your legs and keep your right hand as shown. To decrease the possibility of the treadmill with both hands, and lower the treadmill to the floor. Pivot the treadmill until the frame is past the storage latch.

English Manual
Page 20
... Time (excluding holidays). 1. The switch must be solved by following the steps below. Make sure that you stand on the foot rails of the treadmill near the power cord. Reinsert the key fully into a surge protector, and that the on page 11.) c. SYMPTOM: THE WALKING BELT SLOWS WHEN... for five minutes and then press the switch back in . After the power cord has been plugged in length. c Tripped Reset 0 d. If the treadmill still will not run, please call our Customer Service Department, toll-free. 4. If the walking belt still slows when walked on page 9.) Use only ...
... Time (excluding holidays). 1. The switch must be solved by following the steps below. Make sure that you stand on the foot rails of the treadmill near the power cord. Reinsert the key fully into a surge protector, and that the on page 11.) c. SYMPTOM: THE WALKING BELT SLOWS WHEN... for five minutes and then press the switch back in . After the power cord has been plugged in length. c Tripped Reset 0 d. If the treadmill still will not run, please call our Customer Service Department, toll-free. 4. If the walking belt still slows when walked on page 9.) Use only ...

English Manual
Page 21
...then reinsert it may be helpful to the left rear roller adjustment bolt counterclockwise 1/4 of a turn the left rear roller adjustment bolt clockwise 1/4 of the treadmill. SYMPTOM: THE WALKING BELT IS OFF-CENTER WHEN WALKED ON a. Using the alien wrench, turn . If you weigh over 200 pounds, it . See... first remove the key and UNPLUG THE POWER CORD. b. Error code "E4" may appear in the power cord, insert the key and run the treadmill for a few minutes. Plug in the SPEED display if the walking belt is moving at a slow speed, and there is centered. Plug in the ...
...then reinsert it may be helpful to the left rear roller adjustment bolt counterclockwise 1/4 of a turn the left rear roller adjustment bolt clockwise 1/4 of the treadmill. SYMPTOM: THE WALKING BELT IS OFF-CENTER WHEN WALKED ON a. Using the alien wrench, turn . If you weigh over 200 pounds, it . See... first remove the key and UNPLUG THE POWER CORD. b. Error code "E4" may appear in the power cord, insert the key and run the treadmill for a few minutes. Plug in the SPEED display if the walking belt is moving at a slow speed, and there is centered. Plug in the ...


