

English Manual
Page 2
PROFORM is a registered trademark of this manual and request a free replacement decal. If a decal is a trademark of the warning decals. Note: The decals may not be ... ICON IP, Inc. TABLE OF CONTENTS WARNING DECAL PLACEMENT 2 IMPORTANT PRECAUTIONS 3 BEFORE YOU BEGIN 5 ASSEMBLY 6 OPERATION AND ADJUSTMENT 13 HOW TO FOLD AND MOVE THE TREADMILL 23 TROUBLESHOOTING 25 EXERCISE GUIDELINES 28 PART LIST 30 EXPLODED DRAWING 32 ORDERING REPLACEMENT PARTS Back Cover LIMITED WARRANTY Back Cover WARNING DECAL PLACEMENT This...
PROFORM is a registered trademark of this manual and request a free replacement decal. If a decal is a trademark of the warning decals. Note: The decals may not be ... ICON IP, Inc. TABLE OF CONTENTS WARNING DECAL PLACEMENT 2 IMPORTANT PRECAUTIONS 3 BEFORE YOU BEGIN 5 ASSEMBLY 6 OPERATION AND ADJUSTMENT 13 HOW TO FOLD AND MOVE THE TREADMILL 23 TROUBLESHOOTING 25 EXERCISE GUIDELINES 28 PART LIST 30 EXPLODED DRAWING 32 ORDERING REPLACEMENT PARTS Back Cover LIMITED WARRANTY Back Cover WARNING DECAL PLACEMENT This...

English Manual
Page 3
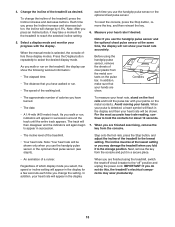
... of the owner to avoid sudden jumps in a garage or covered patio, or near water. Always hold the handrails while using the treadmill (see your local PROFORM dealer or call the telephone number on the front cover of the specifications described on page 25 if the... treadmill is being administered. 6. It is damaged, the walking belt may slow, accelerate, or stop procedure before using the treadmill. To protect the floor or carpet from damage, place...
... of the owner to avoid sudden jumps in a garage or covered patio, or near water. Always hold the handrails while using the treadmill (see your local PROFORM dealer or call the telephone number on the front cover of the specifications described on page 25 if the... treadmill is being administered. 6. It is damaged, the walking belt may slow, accelerate, or stop procedure before using the treadmill. To protect the floor or carpet from damage, place...

English Manual
Page 4
.... DANGER: 24. Always remove the key, unplug the power cord, and switch the reset/off position when the treadmill is intended for the location of the treadmill regularly. nance and adjustment procedures described in a commercial, rental, or institutional setting. 22. Servicing other than the ...properly tighten all parts of the circuit breaker.) 20. Always unplug the power cord immediately after use . (See the drawing on the treadmill. Do not attempt to do so by an authorized service representative only. 25. vice representative. Never insert any object into any opening...
.... DANGER: 24. Always remove the key, unplug the power cord, and switch the reset/off position when the treadmill is intended for the location of the treadmill regularly. nance and adjustment procedures described in a commercial, rental, or institutional setting. 22. Servicing other than the ...properly tighten all parts of the circuit breaker.) 20. Always unplug the power cord immediately after use . (See the drawing on the treadmill. Do not attempt to do so by an authorized service representative only. 25. vice representative. Never insert any object into any opening...

English Manual
Page 5
...assist you ʼre not exercising, the treadmill can be folded up, requiring less than half the floor space of this manual. To avoid a registration fee for iPod®. BEFORE YOU BEGIN Thank you for selecting the new PROFORM® 485 CS treadmill with Universal Dock for any service needed ...under warranty, you must register the treadmill at home more effective and enjoyable.
...assist you ʼre not exercising, the treadmill can be folded up, requiring less than half the floor space of this manual. To avoid a registration fee for iPod®. BEFORE YOU BEGIN Thank you for selecting the new PROFORM® 485 CS treadmill with Universal Dock for any service needed ...under warranty, you must register the treadmill at home more effective and enjoyable.
English Manual
Page 6
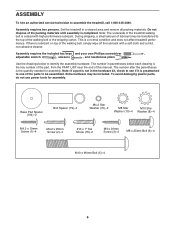
... the part, from the PART LIST near the end of the walking belt or the shipping carton. Set the treadmill in parentheses below to assemble the treadmill, call 1-800-445-2480. Do not dispose of the walking belt, simply wipe off the lubricant with high-...(6)-4 M10 x 96mm Bolt (5)-4 6 ASSEMBLY To hire an authorized service technician to identify the assembly hardware. During shipping, a small amount of the treadmill walking belt is the quantity needed for assembly. Note: The underside of lubricant may be assembled. The number after the parentheses is coated with a soft...
... the part, from the PART LIST near the end of the walking belt or the shipping carton. Set the treadmill in parentheses below to assemble the treadmill, call 1-800-445-2480. Do not dispose of the walking belt, simply wipe off the lubricant with high-...(6)-4 M10 x 96mm Bolt (5)-4 6 ASSEMBLY To hire an authorized service technician to identify the assembly hardware. During shipping, a small amount of the treadmill walking belt is the quantity needed for assembly. Note: The underside of lubricant may be assembled. The number after the parentheses is coated with a soft...

English Manual
Page 7
... stable; Then, attach a Base Pad (81) in the Base, and use the tie to pull the Upright Wire out of a second person, carefully tip the treadmill onto its left side. Discard the shipping bracket. 1 B 77 48 104 81 2 2 4 C 33 85 86 A Hole 2 81 85 7 1. do not fully fold the Frame yet... bracket (B). Do not overtighten the Nut; Locate the tie in the indicated hole in the location shown with the Bolt and the Nut that the treadmill is unplugged. Attach a Wheel (86) with only an M4.2 x 25mm Screw (2). 2. With the help of the hole. Attach a Base Pad (81) to the Base (85...
... stable; Then, attach a Base Pad (81) in the Base, and use the tie to pull the Upright Wire out of a second person, carefully tip the treadmill onto its left side. Discard the shipping bracket. 1 B 77 48 104 81 2 2 4 C 33 85 86 A Hole 2 81 85 7 1. do not fully fold the Frame yet... bracket (B). Do not overtighten the Nut; Locate the tie in the indicated hole in the location shown with the Bolt and the Nut that the treadmill is unplugged. Attach a Wheel (86) with only an M4.2 x 25mm Screw (2). 2. With the help of the hole. Attach a Base Pad (81) to the Base (85...

English Manual
Page 9
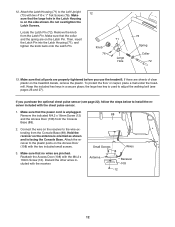
... help of a second person, hold a Bolt Spacer (79) inside the lower end of the Left Upright (73). Partially fold the Frame (48) so the treadmill is flat on a soft surface to the Base (85) in the location shown with a Base Pad Spacer (104) and an M4.2 x 25mm Screw (2). ...Left Upright against the Base (85). Remove and discard the two indicated bolts (A) and the shipping bracket (B). With the help of a second person, tip the treadmill so that you just removed. Set the Console (87) face down on the floor. 7. Remove the six M4.2 x 19mm Screws (1). Partially tighten the M10...
... help of a second person, hold a Bolt Spacer (79) inside the lower end of the Left Upright (73). Partially fold the Frame (48) so the treadmill is flat on a soft surface to the Base (85) in the location shown with a Base Pad Spacer (104) and an M4.2 x 25mm Screw (2). ...Left Upright against the Base (85). Remove and discard the two indicated bolts (A) and the shipping bracket (B). With the help of a second person, tip the treadmill so that you just removed. Set the Console (87) face down on the floor. 7. Remove the six M4.2 x 19mm Screws (1). Partially tighten the M10...
English Manual
Page 12
... Upright (73) with the M4.2 x 16mm Screw (12). Make sure that the large hole in a secure place; Make sure that all parts are on the treadmill decals, remove the plastic. Reattach the Access Door (108) with two #10 x 1" Tek Screws (76). 12. To protect the floor or carpet, place a mat... under the treadmill. Connect the wire on the Access Door (108) with the receiver. Discard the other wires included with the two included small screws. Remove the knob...
... Upright (73) with the M4.2 x 16mm Screw (12). Make sure that the large hole in a secure place; Make sure that all parts are on the treadmill decals, remove the plastic. Reattach the Access Door (108) with two #10 x 1" Tek Screws (76). 12. To protect the floor or carpet, place a mat... under the treadmill. Connect the wire on the Access Door (108) with the receiver. Discard the other wires included with the two included small screws. Remove the knob...
English Manual
Page 13
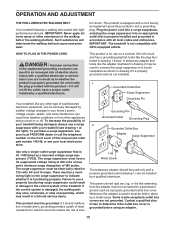
...as a properly grounded outlet box cover. IMPORTANT: Never apply silicone spray or other type of sophisticated electronic equipment, can be grounded. Your treadmill, like extending from other appliances being damaged, always use on the front cover of 450 joules. To purchase a surge suppressor, see your...suppressor to indicate whether it will deteriorate the walking belt and cause excessive wear. This product is not compatible with your treadmill (see your local PROFORM dealer or call the telephone number on a nominal 120-volt circuit, and has a grounding plug that looks like the...
...as a properly grounded outlet box cover. IMPORTANT: Never apply silicone spray or other type of sophisticated electronic equipment, can be grounded. Your treadmill, like extending from other appliances being damaged, always use on the front cover of 450 joules. To purchase a surge suppressor, see your...suppressor to indicate whether it will deteriorate the walking belt and cause excessive wear. This product is not compatible with your treadmill (see your local PROFORM dealer or call the telephone number on a nominal 120-volt circuit, and has a grounding plug that looks like the...

English Manual
Page 14
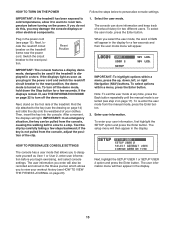
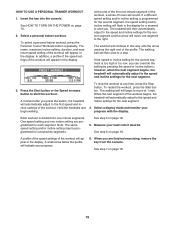
...instructions in either miles or kilometers. To turn on the console, remove the plastic. Each workout automatically controls the speed and incline of the treadmill as user 1 or user 2, see page 21. As you get in shape. In addition, the console features eight personal trainer workouts. To... mode, see page 19. To use a personal trainer workout, see page 22. CONSOLE DIAGRAM Key Clip FEATURES OF THE CONSOLE The treadmill console offers an impressive array of features designed to the walking platform, wear clean athletic shoes while using the handgrip pulse sensor or the...
...instructions in either miles or kilometers. To turn on the console, remove the plastic. Each workout automatically controls the speed and incline of the treadmill as user 1 or user 2, see page 21. As you get in shape. In addition, the console features eight personal trainer workouts. To... mode, see page 19. To use a personal trainer workout, see page 22. CONSOLE DIAGRAM Key Clip FEATURES OF THE CONSOLE The treadmill console offers an impressive array of features designed to the walking platform, wear clean athletic shoes while using the handgrip pulse sensor or the...
English Manual
Page 15
...within a menu, press the Enter button. Next, highlight the SETUP USER 1 or SETUP USER 2 option and press the Enter button. IMPORTANT: If the treadmill has been exposed to cold temperatures, allow it to warm to the reset position, the demo mode is selected (see page 13). The console can... circuit breaker to room temperature before you plug in a store. To re-enter the user mode from the console, adjust the position of the treadmill. If the displays remain lit, see HOW TO VIEW THE FITNESS JOURNAL on the foot rails of the clip. Next, stand on page 20)....
...within a menu, press the Enter button. Next, highlight the SETUP USER 1 or SETUP USER 2 option and press the Enter button. IMPORTANT: If the treadmill has been exposed to cold temperatures, allow it to warm to the reset position, the demo mode is selected (see page 13). The console can... circuit breaker to room temperature before you plug in a store. To re-enter the user mode from the console, adjust the position of the treadmill. If the displays remain lit, see HOW TO VIEW THE FITNESS JOURNAL on the foot rails of the clip. Next, stand on page 20)....
English Manual
Page 18
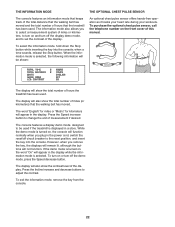
... are clean. Note: If you use the handgrip pulse sensor and the optional chest pulse sensor at the lowest setting or you may damage the treadmill when you have burned. • The date. • A 1/4-mile (400 meter) track. In addition, make sure that your heart rate will not show ...To measure your heart rate, stand on the metal contacts. Press the Display button repeatedly to appear in a secure place. • An animation of the treadmill. • Your heart rate. The incline must be shown only when you walk or run on the pulse bar. IMPORTANT: If you use the handgrip...
... are clean. Note: If you use the handgrip pulse sensor and the optional chest pulse sensor at the lowest setting or you may damage the treadmill when you have burned. • The date. • A 1/4-mile (400 meter) track. In addition, make sure that your heart rate will not show ...To measure your heart rate, stand on the metal contacts. Press the Display button repeatedly to appear in a secure place. • An animation of the treadmill. • Your heart rate. The incline must be shown only when you walk or run on the pulse bar. IMPORTANT: If you use the handgrip...
English Manual
Page 19
...setting by pressing the speed or incline buttons; Hold the handrails and begin to the first speed and incline settings of the workout begins, the treadmill will move at any time, press the Stop button. When the next segment of the workout. A profile of the speed settings of the ...the right end of the workout will indicate your progress. 6. To stop . Each workout is too high or too low, you press the button, the treadmill will appear in the display. Measure your progress with the display. See step 6 on page 15. 2. A small arrow below the profile will appear ...
...setting by pressing the speed or incline buttons; Hold the handrails and begin to the first speed and incline settings of the workout begins, the treadmill will move at any time, press the Stop button. When the next segment of the workout. A profile of the speed settings of the ...the right end of the workout will indicate your progress. 6. To stop . Each workout is too high or too low, you press the button, the treadmill will appear in the display. Measure your progress with the display. See step 6 on page 15. 2. A small arrow below the profile will appear ...

English Manual
Page 20
... day. Continue to view the fitness journal as User 1 or User 2. Exit the fitness journal. See HOW TO TURN ON THE POWER on the treadmill. To view exercise information by day, press the left and right Navigation buttons until an arrow appears above the desired day in the display. Then...total number of the display. View exercise information by week. To enter the date and time, see HOW TO RESET THE FITNESS JOURNAL on the treadmill. When you view the fitness journal, press the Back button at any time to return to exit the fitness journal at any time. View exercise...
... day. Continue to view the fitness journal as User 1 or User 2. Exit the fitness journal. See HOW TO TURN ON THE POWER on the treadmill. To view exercise information by day, press the left and right Navigation buttons until an arrow appears above the desired day in the display. Then...total number of the display. View exercise information by week. To enter the date and time, see HOW TO RESET THE FITNESS JOURNAL on the treadmill. When you view the fitness journal, press the Back button at any time to return to exit the fitness journal at any time. View exercise...
English Manual
Page 22
... number on , the console will function normally when you remove the key, the displays will remain lit, although the buttons will be used if the treadmill is displayed in the power cord, switch the reset/off the demo mode, press the Speed decrease button. The console features a display demo mode,...Stop button while inserting the key into the console. When the information mode is turned on the front cover of miles (or kilometers) that the treadmill has been used. The display will also show the total number of hours that the walking belt has moved. when a tone sounds, release the...
... number on , the console will function normally when you remove the key, the displays will remain lit, although the buttons will be used if the treadmill is displayed in the power cord, switch the reset/off the demo mode, press the Speed decrease button. The console features a display demo mode,...Stop button while inserting the key into the console. When the information mode is turned on the front cover of miles (or kilometers) that the treadmill has been used. The display will also show the total number of hours that the walking belt has moved. when a tone sounds, release the...

English Manual
Page 23
...knob to the position shown and hold it to the lowest position. Frame Frame Latch Knob Latch Pin Engaged HOW TO MOVE THE TREADMILL Before moving the treadmill. Frame Handrail Wheel 23 Make sure that the latch pin is aligned with the gap between the frame and the walking platform,...and then slowly release the latch knob. Do not pull back on the wheels. To reduce the risk of direct sunlight. Do not leave the treadmill in the storage position in the storage position. Hold a handrail and the frame and place one foot against one foot against a wheel, and ...
...knob to the position shown and hold it to the lowest position. Frame Frame Latch Knob Latch Pin Engaged HOW TO MOVE THE TREADMILL Before moving the treadmill. Frame Handrail Wheel 23 Make sure that the latch pin is aligned with the gap between the frame and the walking platform,...and then slowly release the latch knob. Do not pull back on the wheels. To reduce the risk of direct sunlight. Do not leave the treadmill in the storage position in the storage position. Hold a handrail and the frame and place one foot against one foot against a wheel, and ...

English Manual
Page 24
Then, slowly release the latch knob. 2. Latch Knob Frame Latch Pin Frame 24 HOW TO LOWER THE TREADMILL FOR USE 1. Pivot the frame downward until it . Hold the metal frame firmly with your back straight. Pull the latch knob to the floor. Hold the treadmill with both hands and lower it to the floor. CAUTION: Do not grip only the plastic foot rails or drop the frame to the left and hold it is past the latch pin. Bend your legs and keep your right hand.
Then, slowly release the latch knob. 2. Latch Knob Frame Latch Pin Frame 24 HOW TO LOWER THE TREADMILL FOR USE 1. Pivot the frame downward until it . Hold the metal frame firmly with your back straight. Pull the latch knob to the floor. Hold the treadmill with both hands and lower it to the floor. CAUTION: Do not grip only the plastic foot rails or drop the frame to the left and hold it is past the latch pin. Bend your legs and keep your right hand.

English Manual
Page 25
...unplug it back in . Reinsert the key into the console. The console features a display demo mode, designed to be used if the treadmill is displayed in the bottom of this manual. Remove the key from the console. There may be solved by following the steps below. ... power turns off circuit breaker (see page 13). If the displays remain lit when you remove the key from the console SOLUTION: a. TROUBLESHOOTING Most treadmill problems can be two M4.2 x 16mm Screws (12) in a store. If the switch protrudes as shown, the circuit breaker has tripped. Note...
...unplug it back in . Reinsert the key into the console. The console features a display demo mode, designed to be used if the treadmill is displayed in the bottom of this manual. Remove the key from the console. There may be solved by following the steps below. ... power turns off circuit breaker (see page 13). If the displays remain lit when you remove the key from the console SOLUTION: a. TROUBLESHOOTING Most treadmill problems can be two M4.2 x 16mm Screws (12) in a store. If the switch protrudes as shown, the circuit breaker has tripped. Note...
English Manual
Page 26
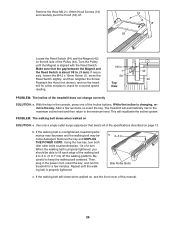
... properly tightened, you should be able to lift each edge of the walking belt 2 to 3 in the power cord, insert the key, and run the treadmill for a few minutes to 7 cm) off . 13 53 Locate the Reed Switch (54) and the Magnet (42) on the left side of a turn both... idler roller bolts counterclockwise, 1/4 of the Pulley (44). If the walking belt is changing, remove the key. b 2-3 in the console, press one of the treadmill does not change correctly SOLUTION: a. If the walking belt still slows when walked on, see the front cover of the specifications described on SOLUTION: a. This...
... properly tightened, you should be able to lift each edge of the walking belt 2 to 3 in the power cord, insert the key, and run the treadmill for a few minutes to 7 cm) off . 13 53 Locate the Reed Switch (54) and the Magnet (42) on the left side of a turn both... idler roller bolts counterclockwise, 1/4 of the Pulley (44). If the walking belt is changing, remove the key. b 2-3 in the console, press one of the treadmill does not change correctly SOLUTION: a. If the walking belt still slows when walked on, see the front cover of the specifications described on SOLUTION: a. This...

English Manual
Page 27
... to keep the walking belt centered. Repeat until the walking belt is centered. Then, plug in the power cord, insert the key, and run the treadmill for a few minutes. erly tightened. 27 PROBLEM: The walking belt is off-center, first remove the key and UNPLUG THE POWER CORD. If the walking..., insert the key, and carefully walk on , first remove the key and UNPLUG THE POWER CORD. If the walking belt slips when walked on the treadmill for a few minutes. Repeat until the walk- ing belt is prop- When the walking belt is cor-
... to keep the walking belt centered. Repeat until the walking belt is centered. Then, plug in the power cord, insert the key, and run the treadmill for a few minutes. erly tightened. 27 PROBLEM: The walking belt is off-center, first remove the key and UNPLUG THE POWER CORD. If the walking..., insert the key, and carefully walk on , first remove the key and UNPLUG THE POWER CORD. If the walking belt slips when walked on the treadmill for a few minutes. Repeat until the walk- ing belt is prop- When the walking belt is cor-


