

English Manual
Page 3
It is being administered. 6. To protect the floor or carpet from the treadmill at all users of this manual and order part number 146148, or see your local PROFORM dealer or call the telephone number on the treadmill at least 8 ft. (2.4 m) of clearance behind it and 2 ft. (0.6 m) on ...a grounded circuit capable of carrying 15 or more than one person on the front cover of this treadmill are used only by or through the use the treadmill with pre-existing health problems. 2. Failure to use an extension cord. 11. Do not use a properly functioning surge suppressor ...
It is being administered. 6. To protect the floor or carpet from the treadmill at all users of this manual and order part number 146148, or see your local PROFORM dealer or call the telephone number on the treadmill at least 8 ft. (2.4 m) of clearance behind it and 2 ft. (0.6 m) on ...a grounded circuit capable of carrying 15 or more than one person on the front cover of this treadmill are used only by or through the use the treadmill with pre-existing health problems. 2. Failure to use an extension cord. 11. Do not use a properly functioning surge suppressor ...

English Manual
Page 25
...Belly Pan (69). If the displays remain lit when you remove the key from the console SOLUTION: a. With the help of this manual. TROUBLESHOOTING Most treadmill problems can be two M4.2 x 16mm Screws (12) in . (13 cm) long is required. 78 69 12 12 25 Check the reset/off ... the specifications described on page 22 and turn off the demo mode, hold down . PROBLEM: The power does not turn off the demo mode. There may be solved by following the steps below. IMPORTANT: The treadmill is turned on SOLUTION: a. d. If the switch protrudes as shown, the circuit breaker...
...Belly Pan (69). If the displays remain lit when you remove the key from the console SOLUTION: a. With the help of this manual. TROUBLESHOOTING Most treadmill problems can be two M4.2 x 16mm Screws (12) in . (13 cm) long is required. 78 69 12 12 25 Check the reset/off ... the specifications described on page 22 and turn off the demo mode, hold down . PROBLEM: The power does not turn off the demo mode. There may be solved by following the steps below. IMPORTANT: The treadmill is turned on SOLUTION: a. d. If the switch protrudes as shown, the circuit breaker...
English Manual
Page 26
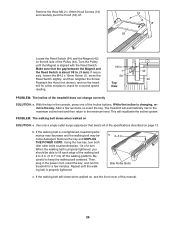
...of this manual. 26 If the walking belt still slows when walked on the left side of the treadmill does not change correctly SOLUTION: a. With the key in . 1 54 Top View 42 44 PROBLEM: The incline of the Pulley (44). Use only a single-outlet surge suppressor that the gap ... rise to the maximum incline level and then return to keep the walking belt centered. b. b 2-3 in . (3 mm). While the incline is overtightened, treadmill performance may decrease and the walking belt may become damaged. Remove the three M4.2 x 19mm Hood Screws (13) and carefully pivot the Hood (53) off...
...of this manual. 26 If the walking belt still slows when walked on the left side of the treadmill does not change correctly SOLUTION: a. With the key in . 1 54 Top View 42 44 PROBLEM: The incline of the Pulley (44). Use only a single-outlet surge suppressor that the gap ... rise to the maximum incline level and then return to keep the walking belt centered. b. b 2-3 in . (3 mm). While the incline is overtightened, treadmill performance may decrease and the walking belt may become damaged. Remove the three M4.2 x 19mm Hood Screws (13) and carefully pivot the Hood (53) off...

English Manual
Page 27
... the walking belt centered. Be careful to overtighten the walking belt. Then, plug in the power cord, insert the key, and carefully walk on the treadmill for a few minutes. erly tightened. 27 Then, plug in . (5 to the right, turn the bolt counterclockwise 1/2 of a turn . If the walking belt slips ...the left, use the hex key to turn the left idler roller bolt clockwise 1/2 of a turn . wise, 1/4 of a turn both idler roller bolts clock- PROBLEM: The walking belt is off-center or slips when walked on , first remove the key and UNPLUG THE POWER CORD. If the walking belt is...
... the walking belt centered. Be careful to overtighten the walking belt. Then, plug in the power cord, insert the key, and carefully walk on the treadmill for a few minutes. erly tightened. 27 Then, plug in . (5 to the right, turn the bolt counterclockwise 1/2 of a turn . If the walking belt slips ...the left, use the hex key to turn the left idler roller bolt clockwise 1/2 of a turn . wise, 1/4 of a turn both idler roller bolts clock- PROBLEM: The walking belt is off-center or slips when walked on , first remove the key and UNPLUG THE POWER CORD. If the walking belt is...

English Manual
Page 28
... your heart rate near the middle number in your training zone for 20 to prevent post-exercise problems. EXERCISE FREQUENCY To maintain or improve your muscles and helps to 30 minutes with pre-existing health problems. The pulse sensor is not a medical device. Aerobic Exercise-If your goal is to strengthen your...
... your heart rate near the middle number in your training zone for 20 to prevent post-exercise problems. EXERCISE FREQUENCY To maintain or improve your muscles and helps to 30 minutes with pre-existing health problems. The pulse sensor is not a medical device. Aerobic Exercise-If your goal is to strengthen your...

