

English Manual
Page 4
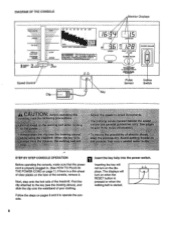
...an excellent form of cardiovascular exercise in the convenience and privacy of your benefit, read this manual for selecting the PROFORM® 585 TL treadmill. Book Rack Console Towel Rack Accessory Tray Incline Control Storage Latch LEFT SIDE Key/Clip Handrails Water Bottle Holder ... not included) RIGHT SIDE FRONT Power Cord Uprights Circuit Breaker Foot Rails Front Wheel Cushioned Walking Platform 0 Walking Belt Rear Roller Adjustment Bolt BACK 4 For your home. The 585 TL treadmill blends advanced technology with the parts that are labeled. If you , please note the ...
...an excellent form of cardiovascular exercise in the convenience and privacy of your benefit, read this manual for selecting the PROFORM® 585 TL treadmill. Book Rack Console Towel Rack Accessory Tray Incline Control Storage Latch LEFT SIDE Key/Clip Handrails Water Bottle Holder ... not included) RIGHT SIDE FRONT Power Cord Uprights Circuit Breaker Foot Rails Front Wheel Cushioned Walking Platform 0 Walking Belt Rear Roller Adjustment Bolt BACK 4 For your home. The 585 TL treadmill blends advanced technology with the parts that are labeled. If you , please note the ...

English Manual
Page 7
... provides a path of least resistance for use a surge protector (not in your treadmill. 0 Grounding Plug Grounding Plug Surge protectors are not grounded. They will deteriorate the walking belt and cause excessive wear. HOW TO PLUG IN THE POWER CORD ~uiplrrt #- Plug...below. If it should be used it must be installed by a metal screw. OPERATION AND ADJUSTMENT THE PERFORMANT LUBETm WALKING BELT Your treadmill features a walking belt coated with a 14-gauge cord of Grounded Outlet Grounding Pin 0 o44,.. 2 Grounded Outlet Box Adapter Grounding Pin 0,&#...
... provides a path of least resistance for use a surge protector (not in your treadmill. 0 Grounding Plug Grounding Plug Surge protectors are not grounded. They will deteriorate the walking belt and cause excessive wear. HOW TO PLUG IN THE POWER CORD ~uiplrrt #- Plug...below. If it should be used it must be installed by a metal screw. OPERATION AND ADJUSTMENT THE PERFORMANT LUBETm WALKING BELT Your treadmill features a walking belt coated with a 14-gauge cord of Grounded Outlet Grounding Pin 0 o44,.. 2 Grounded Outlet Box Adapter Grounding Pin 0,&#...
English Manual
Page 8
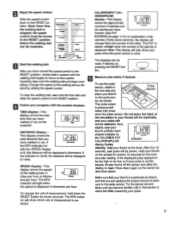
... turn on page 7.) If there is started. • ON OFF J 8 The displays will not turn on when the RESET button is pressed or when the walking belt is a thin sheet of your clothing. lightly kw "Ad twang. For best welts. 7_N sea _on_1 490 • Aados .r4ir0e. , Pulse Sensor Incline Switch Key... RATE TRAINING ZONES P.a. ...same wrimoi inky. • Osre,shadav wicing owl,'mai. • IleaI UNA SAN..I .noreme. Follow the steps on the face of the treadmill.
... turn on page 7.) If there is started. • ON OFF J 8 The displays will not turn on when the RESET button is pressed or when the walking belt is a thin sheet of your clothing. lightly kw "Ad twang. For best welts. 7_N sea _on_1 490 • Aados .r4ir0e. , Pulse Sensor Incline Switch Key... RATE TRAINING ZONES P.a. ...same wrimoi inky. • Osre,shadav wicing owl,'mai. • IleaI UNA SAN..I .noreme. Follow the steps on the face of the treadmill.
English Manual
Page 9
..., or the circulation in 3.6 miles per hour. Try the sensor several times until you have walked or run . After you have burned. (See FAT BURNING on the TIME treadmill. TIME display-This display shows the total time that you 2.36 have moved the speed control...speed control. "WomanCs Amble' Fat Sum TRAINING ZONES FAST SLOW SPEED Start the walking belt. Carefully step onto the walking belt and begin exercising. Change the speed of the walking belt as shown, and that you have walked or run on page 14 for the most accurate reading. DISTANCE display- This ...
..., or the circulation in 3.6 miles per hour. Try the sensor several times until you have walked or run . After you have burned. (See FAT BURNING on the TIME treadmill. TIME display-This display shows the total time that you 2.36 have moved the speed control...speed control. "WomanCs Amble' Fat Sum TRAINING ZONES FAST SLOW SPEED Start the walking belt. Carefully step onto the walking belt and begin exercising. Change the speed of the walking belt as shown, and that you have walked or run on page 14 for the most accurate reading. DISTANCE display- This ...
English Manual
Page 10
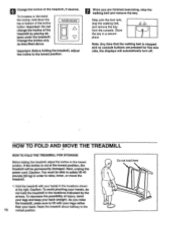
...hands, do not hold the treadmill in order to the 10 vertical position. Raise the treadmill about halfway to raise, lower, or move the treadmill. 1. Do not hold down the top or bottom of the treadmill by the arrows. A V ON OFF L J Note: Any time that the walking belt is not at the right.... Step onto the foot rails, stop the walking belt and remove the key...
...hands, do not hold the treadmill in order to the 10 vertical position. Raise the treadmill about halfway to raise, lower, or move the treadmill. 1. Do not hold down the top or bottom of the treadmill by the arrows. A V ON OFF L J Note: Any time that the walking belt is not at the right.... Step onto the foot rails, stop the walking belt and remove the key...
English Manual
Page 12
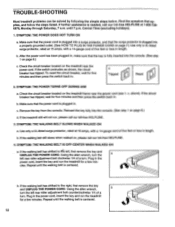
...and then press the switch back in length. c. If the treadmill still will not run the treadmill for a few minutes. If the walking belt has shifted to the right, first remove the key and UNPLUG THE POWER CORD. If the walking belt has shifted to the left rear roller adjustment bolt clockwise 1/4...SYMPTOM: THE POWER TURNS OFF DURING USE a. Reinsert the key fully into the console. (See step 1 on the treadmill near the power cord (see 1. If the walking belt still slows when walked on page 8.) c. Using the alien wrench, turn . After the power cord has been plugged in . Find the ...
...and then press the switch back in length. c. If the treadmill still will not run the treadmill for a few minutes. If the walking belt has shifted to the right, first remove the key and UNPLUG THE POWER CORD. If the walking belt has shifted to the left rear roller adjustment bolt clockwise 1/4...SYMPTOM: THE POWER TURNS OFF DURING USE a. Reinsert the key fully into the console. (See step 1 on the treadmill near the power cord (see 1. If the walking belt still slows when walked on page 8.) c. Using the alien wrench, turn . After the power cord has been plugged in . Find the ...


