
English Manual
Page 1
PRO•FORM® five series Model No. Serial Number Decal 13: 0 XT QUESTIONS? CUSTOMER HOT LINE: 1-800-999-3756 Mon.-Fri., 6 a.m.-6 p.m. If you have questions, or find that there are missing or damaged parts, we are committed to USER'S MANUAL As a manufacturer, we will provide immediate assistance, free of charge to you complete satisfaction through direct assistance from our factory. MST...
PRO•FORM® five series Model No. Serial Number Decal 13: 0 XT QUESTIONS? CUSTOMER HOT LINE: 1-800-999-3756 Mon.-Fri., 6 a.m.-6 p.m. If you have questions, or find that there are missing or damaged parts, we are committed to USER'S MANUAL As a manufacturer, we will provide immediate assistance, free of charge to you complete satisfaction through direct assistance from our factory. MST...

English Manual
Page 2
...; 0/Fpr LIMITED WARRANTY ICON Health & Fitness, Inc. ("ICON"), warrants this warranty is authorized by ICON. All products for which vary from state to be pre-authorized by ICON. ACCORDINGLY, THE ABOVE LIMITATION MAY NOT APPLY TO YOU. ACCORDINGLY, THE ABOVE LIMITATION MAY NOT APPLY TO YOU. You may also have other warranty beyond that specifically set forth above is limited to replacing or repairing, at ICON's option, the...
...; 0/Fpr LIMITED WARRANTY ICON Health & Fitness, Inc. ("ICON"), warrants this warranty is authorized by ICON. All products for which vary from state to be pre-authorized by ICON. ACCORDINGLY, THE ABOVE LIMITATION MAY NOT APPLY TO YOU. ACCORDINGLY, THE ABOVE LIMITATION MAY NOT APPLY TO YOU. You may also have other warranty beyond that specifically set forth above is limited to replacing or repairing, at ICON's option, the...

English Manual
Page 3
... Back Cover Note: An EXPLODED DRAWING and a PART LIST are attached to the center of this product 3 WARNING Before beginningthis or Anyexeroiooptogrom; pro-Oasting fieOth:problenw: ReadsitipstrUCtiont before using ICON assumes .no responsibility fOt pert0tialinjurV:•ot property damage sustained by or through the use of ..35 be:persons.With. PRO•FORAN 111 five series XT TABLE OF CONTENTS LIMITED WARRANTY...
... Back Cover Note: An EXPLODED DRAWING and a PART LIST are attached to the center of this product 3 WARNING Before beginningthis or Anyexeroiooptogrom; pro-Oasting fieOth:problenw: ReadsitipstrUCtiont before using ICON assumes .no responsibility fOt pert0tialinjurV:•ot property damage sustained by or through the use of ..35 be:persons.With. PRO•FORAN 111 five series XT TABLE OF CONTENTS LIMITED WARRANTY...
English Manual
Page 4
It is turned off. Always hold the handrails or upper body arms while using the treadmill. Never allow more amps. The pulse sensor is not working properly.) 11. Always remove the key and move the walking belt while the power is the responsibility of the owner to ensure that all users of this manual should be performed by an authorized service representative only. If an extension cord is not in...
It is turned off. Always hold the handrails or upper body arms while using the treadmill. Never allow more amps. The pulse sensor is not working properly.) 11. Always remove the key and move the walking belt while the power is the responsibility of the owner to ensure that all users of this manual should be performed by an authorized service representative only. If an extension cord is not in...

English Manual
Page 5
... front cover of the treadmill is not included) Upper Body Arms Walking Belt Foot Rails BACK Rear Roller Adjustment Bolt Handrails Resistance Knobs Circuit Breaker On/Off .A_____------Switch FRONT Power Cord Cushioned Walking Platform for selecting the PROFORM® 575 XT treadmill. BEFORE YOU BEGIN Thank you enjoy an excellent form of cardiovascular exercise in the convenience and privacy of your benefit, read this manual for the location). until 6 p.m. The serial number can...
... front cover of the treadmill is not included) Upper Body Arms Walking Belt Foot Rails BACK Rear Roller Adjustment Bolt Handrails Resistance Knobs Circuit Breaker On/Off .A_____------Switch FRONT Power Cord Cushioned Walking Platform for selecting the PROFORM® 575 XT treadmill. BEFORE YOU BEGIN Thank you enjoy an excellent form of cardiovascular exercise in the convenience and privacy of your benefit, read this manual for the location). until 6 p.m. The serial number can...

English Manual
Page 6
.... pose of the Right Upright (99). Connect the Short Wire Harness (54) to identify the small parts used in the Console Plate (3), cut them ; Do not dis- Be careful not to damage the Wire Harnesses. Cut the wire tie holding the Upright Wire Harness (11). Attach each Bolt. Plug the lower end of the Wire 6 Harnesses. The small latch on the Upright Wire Harness should snap onto the...
.... pose of the Right Upright (99). Connect the Short Wire Harness (54) to identify the small parts used in the Console Plate (3), cut them ; Do not dis- Be careful not to damage the Wire Harnesses. Cut the wire tie holding the Upright Wire Harness (11). Attach each Bolt. Plug the lower end of the Wire 6 Harnesses. The small latch on the Upright Wire Harness should snap onto the...

English Manual
Page 7
... used to covers are tightened before using the treadmill. grounded before using an adapter. 7 Grounded Outlet Box Adapter Grounding Pin Grounding Plug A DANGER: Improper connection of the equipment-grounding conductor can be used only until a properly grounded outlet (drawing 1) can result in cian to protect the floor or carpet. 30 87 76 • 82 OPERATION AND ADJUSTMENT THE PERFORMANT LUBETm WALKING BELT Your treadmill features a low-maintenance walking belt...
... used to covers are tightened before using the treadmill. grounded before using an adapter. 7 Grounded Outlet Box Adapter Grounding Pin Grounding Plug A DANGER: Improper connection of the equipment-grounding conductor can be used only until a properly grounded outlet (drawing 1) can result in cian to protect the floor or carpet. 30 87 76 • 82 OPERATION AND ADJUSTMENT THE PERFORMANT LUBETm WALKING BELT Your treadmill features a low-maintenance walking belt...

English Manual
Page 8
... the speed control:are general guidelines only. The four displays and the green MANUAL mode indicator will automatically control the speed as it guides you through an effective workout. The treadmill console features a manual mode and six preset workout programs. In the manual mode, the speed of the workout programs is properly plugged in the "on" position. When one of the walking belt can be restarted. Before operating the console, make sure that 8 the power cord...
... the speed control:are general guidelines only. The four displays and the green MANUAL mode indicator will automatically control the speed as it guides you through an effective workout. The treadmill console features a manual mode and six preset workout programs. In the manual mode, the speed of the workout programs is properly plugged in the "on" position. When one of the walking belt can be restarted. Before operating the console, make sure that 8 the power cord...

English Manual
Page 9
... during the programs. During PROGRAM A, for the program. To stop . Follow your pulse when the pulse sensor is completed, press the START/STOP button. ber of Calories and Fat Calories SPEED you have selected. • DISTANCE/ PULSE display- SPEED ri n „,,„LI.Lin Note: To change the unit of the walking belt will change from the number shown if the speed or incline is running, the walking belt will be the minimum speed setting for example...
... during the programs. During PROGRAM A, for the program. To stop . Follow your pulse when the pulse sensor is completed, press the START/STOP button. ber of Calories and Fat Calories SPEED you have selected. • DISTANCE/ PULSE display- SPEED ri n „,,„LI.Lin Note: To change the unit of the walking belt will change from the number shown if the speed or incline is running, the walking belt will be the minimum speed setting for example...

English Manual
Page 10
... START/STOP button while inserting the key into the console. Try the sensor several times until you are finished, remove the key. To change the in a secure place. To exit the information mode, remove the key from the console. Store the key in - Next, slightly raise your arms, shoulders and back for a total body workout. The TIME display will show an "E" or an "M," indicating miles or kilometers (see SPEED DISPLAY on the treadmill...
... START/STOP button while inserting the key into the console. Try the sensor several times until you are finished, remove the key. To change the in a secure place. To exit the information mode, remove the key from the console. Store the key in - Next, slightly raise your arms, shoulders and back for a total body workout. The TIME display will show an "E" or an "M," indicating miles or kilometers (see SPEED DISPLAY on the treadmill...

English Manual
Page 11
... a turn the left , first remove the key and UNPLUG THE POWER CORD. b. Check the circuit breaker located on the treadmill near the power cord. b. Repeat until 6 p.m. TROUBLE-SHOOTING Most treadmill problems can be in . Find the symptom that the power cord is needed , use only a 14-gauge general-purpose cord of five feet or less in . If further assistance is plugged in the "on the console should light. (See step...
... a turn the left , first remove the key and UNPLUG THE POWER CORD. b. Check the circuit breaker located on the treadmill near the power cord. b. Repeat until 6 p.m. TROUBLE-SHOOTING Most treadmill problems can be in . Find the symptom that the power cord is needed , use only a 14-gauge general-purpose cord of five feet or less in . If further assistance is plugged in the "on the console should light. (See step...

English Manual
Page 12
... Washer (97). Turn the 62 Resistance Knob (69) counterclockwise until the walking belt is pulled out, push it can be removed. Reattach all parts in the power cord, insert the key and run the treadmill for a few minutes. b. Using the 3/16" alien wrench, turn the left rear roller adjustment bolt counterclockwise 1/4 of the Resistance Cone (68). Plug in the order shown at most department stores. Correcting this problem requires a small...
... Washer (97). Turn the 62 Resistance Knob (69) counterclockwise until the walking belt is pulled out, push it can be removed. Reattach all parts in the power cord, insert the key and run the treadmill for a few minutes. b. Using the 3/16" alien wrench, turn the left rear roller adjustment bolt counterclockwise 1/4 of the Resistance Cone (68). Plug in the order shown at most department stores. Correcting this problem requires a small...

English Manual
Page 13
... of regular exercise, your pulse can measure your pulse using your pulse as you exercise. Training zones are general guide- During the first few minutes of your maxi- If your goal is to bum fat, set the speed control on the console to PERFORMANCE to help you to use stored fat calories for energy. If your pulse is too high or too low, adjust the...
... of regular exercise, your pulse can measure your pulse using your pulse as you exercise. Training zones are general guide- During the first few minutes of your maxi- If your goal is to bum fat, set the speed control on the console to PERFORMANCE to help you to use stored fat calories for energy. If your pulse is too high or too low, adjust the...

English Manual
Page 14
.... WORKOUT ATTIRE Exercise clothing should leave you stop and walk the remaining distance. Stop smoking; Increase midday productivity, creativity and energy by making a few changes in your training zone for increased flexibility is preferable. 14 Always wear athletic shoes that are flexible and provide good protection and support. Remember, the key to success is a major cause of liver problems and other problems...
.... WORKOUT ATTIRE Exercise clothing should leave you stop and walk the remaining distance. Stop smoking; Increase midday productivity, creativity and energy by making a few changes in your training zone for increased flexibility is preferable. 14 Always wear athletic shoes that are flexible and provide good protection and support. Remember, the key to success is a major cause of liver problems and other problems...

English Manual
Page 15
...the wall. Reach toward your groin area as far as possible. Bend your front leg, lean forward and move your hips toward your toes as far as possible. Hold for 15 counts, then... relax. • Repeat 3 times for 15 counts, then relax. Hold for 15 counts, then relax. TOE TOUCH STRETCH Stand with the soles of your back leg as you reach down . Stretches: Hamstrings, lower.../ACHILLES STRETCH With one leg in the drawings below. Pull your knees outward. Correct form for 15 counts, then relax.
...the wall. Reach toward your groin area as far as possible. Bend your front leg, lean forward and move your hips toward your toes as far as possible. Hold for 15 counts, then... relax. • Repeat 3 times for 15 counts, then relax. Hold for 15 counts, then relax. TOE TOUCH STRETCH Stand with the soles of your back leg as you reach down . Stretches: Hamstrings, lower.../ACHILLES STRETCH With one leg in the drawings below. Pull your knees outward. Correct form for 15 counts, then relax.

English Manual
Page 16
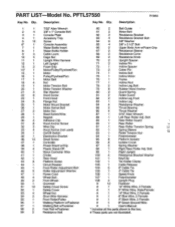
... following information: • The MODEL NUMBER OF THE PRODUCT (PFTL57550). • The NAME OF THE PRODUCT (PROFORM® 575 XT treadmill). • The SERIAL NUMBER OF THE PRODUCT (see the front cover of this manual). • The KEY NUMBER OF THE PART(S) (see the EXPLODED DRAWING and PART LIST attached to the center of this manual) • The DESCRIPTION OF THE PART(S) (see the EXPLODED DRAWING and PART LIST attached...
... following information: • The MODEL NUMBER OF THE PRODUCT (PFTL57550). • The NAME OF THE PRODUCT (PROFORM® 575 XT treadmill). • The SERIAL NUMBER OF THE PRODUCT (see the front cover of this manual). • The KEY NUMBER OF THE PART(S) (see the EXPLODED DRAWING and PART LIST attached to the center of this manual) • The DESCRIPTION OF THE PART(S) (see the EXPLODED DRAWING and PART LIST attached...

English Manual
Page 17
See the back cover of the users manual for future reference. 0 Note: Specifications are subject to change without notice. REMOVE THIS EXPLODED DRAWING AND PART LIST FROM THE MANUAL Save this EXPLODED DRAWING and PART LIST for information about ordering replacement parts.
See the back cover of the users manual for future reference. 0 Note: Specifications are subject to change without notice. REMOVE THIS EXPLODED DRAWING AND PART LIST FROM THE MANUAL Save this EXPLODED DRAWING and PART LIST for information about ordering replacement parts.

English Manual
Page 18
... 44 5 99 46 52 1 13 47 49 62 100 63 60 59 P7 / 69 11 70 8686 65 86 97 66 68 67 EXPLODED DRAWING-Model No.
... 44 5 99 46 52 1 13 47 49 62 100 63 60 59 P7 / 69 11 70 8686 65 86 97 66 68 67 EXPLODED DRAWING-Model No.
English Manual
Page 19
... 1 Motor Controller Wire 41 1 Choke 42 1 Rear Hood 43 8 Platform Screw 44 1 Circuit Breaker 45 1 Front Roller Adjustment Bolt 46 5 Roller Adjustment Washer 47 1 Power Cord 48 4 Wheel Bolt 49 2 Front Wheel 50 1 Grommet 51 12 Safety Cover Screw 52 1 Safety Cover 53 4 Wheel Nut 54 2 Short Wire Harness 55 1 Front Roller/Pulley 56 1 Walking Platform w/Fastener 57 1 Walking Belt w/Fastener 58 2 Foot Rail w/Fastener 59 2 Resistance Bolt 60 2 Belt Guide 61 2 Motor Bolt 62 2 Resistance Bracket 63 4 Resistance Bracket Bolt 64...
... 1 Motor Controller Wire 41 1 Choke 42 1 Rear Hood 43 8 Platform Screw 44 1 Circuit Breaker 45 1 Front Roller Adjustment Bolt 46 5 Roller Adjustment Washer 47 1 Power Cord 48 4 Wheel Bolt 49 2 Front Wheel 50 1 Grommet 51 12 Safety Cover Screw 52 1 Safety Cover 53 4 Wheel Nut 54 2 Short Wire Harness 55 1 Front Roller/Pulley 56 1 Walking Platform w/Fastener 57 1 Walking Belt w/Fastener 58 2 Foot Rail w/Fastener 59 2 Resistance Bolt 60 2 Belt Guide 61 2 Motor Bolt 62 2 Resistance Bracket 63 4 Resistance Bracket Bolt 64...


