
Uk Manual
Page 2
... turned off. When connecting the power cord (see page 7), plug the power cord into an earthed circuit. Never allow more than one person on the treadmill at least 2.5 m (8 ft.) of clearance behind it and 0.5 m (2 ft.) on any surface that blocks air openings. If you are recommended for both men... of all warnings and precautions. 2. To protect the floor or carpet from damage, place a mat under the age of 12 and pets away from the treadmill at all times. 7. Always wear athletic shoes. Never use only a 1 mm2 (14-gauge) cord of the owner to persons, read the following important...
... turned off. When connecting the power cord (see page 7), plug the power cord into an earthed circuit. Never allow more than one person on the treadmill at least 2.5 m (8 ft.) of clearance behind it and 0.5 m (2 ft.) on any surface that blocks air openings. If you are recommended for both men... of all warnings and precautions. 2. To protect the floor or carpet from damage, place a mat under the age of 12 and pets away from the treadmill at all times. 7. Always wear athletic shoes. Never use only a 1 mm2 (14-gauge) cord of the owner to persons, read the following important...
Uk Manual
Page 3
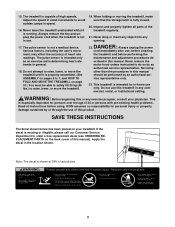
...should be able to safely lift 20 kg (45 lbs.) to order a free replacement decal (see ORDERING REPLACEMENT PARTS on your physician. This treadmill is running. Various factors, including the user's movement, may affect the accuracy of high speeds. Never drop or insert any object into any... setting. vice representative only. 23. SAVE THESE INSTRUCTIONS The decal shown below has been placed on the back cover of the treadmill regularly. 21. Never leave the treadmill unattended whilst it is not in general. 18. Apply the decal in -home use only. When folding or moving the...
...should be able to safely lift 20 kg (45 lbs.) to order a free replacement decal (see ORDERING REPLACEMENT PARTS on your physician. This treadmill is running. Various factors, including the user's movement, may affect the accuracy of high speeds. Never drop or insert any object into any... setting. vice representative only. 23. SAVE THESE INSTRUCTIONS The decal shown below has been placed on the back cover of the treadmill regularly. 21. Never leave the treadmill unattended whilst it is not in general. 18. Apply the decal in -home use only. When folding or moving the...
Uk Manual
Page 4
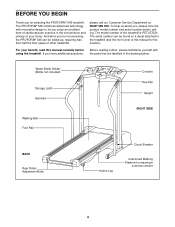
... Incline Leg Cushioned Walking Platform for the location). If you 're not exercising, the PROFORM® 545 can be folded up, requiring less than half the floor space of other treadmills. please call our Customer Service Department at 08457 089 009. And when you have additional...this manual carefully before calling. The serial number can be found on a decal attached to let you for selecting the PROFORM® 545 treadmill. The PROFORM® 545 combines advanced technology with the parts that are labelled in the convenience and privacy of your benefit, read this manual ...
... Incline Leg Cushioned Walking Platform for the location). If you 're not exercising, the PROFORM® 545 can be folded up, requiring less than half the floor space of other treadmills. please call our Customer Service Department at 08457 089 009. And when you have additional...this manual carefully before calling. The serial number can be found on a decal attached to let you for selecting the PROFORM® 545 treadmill. The PROFORM® 545 combines advanced technology with the parts that are labelled in the convenience and privacy of your benefit, read this manual ...
Uk Manual
Page 5
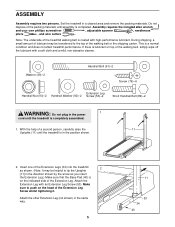
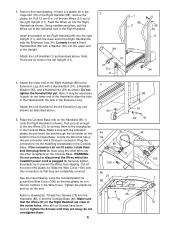
...be transferred to push on top of the Extension Leg. With the help of a second person, carefully raise the 11 Uprights (11) until the treadmill is on the indicated side of the walking belt, simply wipe off the lubricant with a soft cloth and a mild, non-abrasive cleaner. Insert...pliers , and wire cutters . Attach the Extension Leg with high-performance lubricant. Make sure to the top of the Extension Legs (34) into the treadmill 2 as you insert the Extension Leg.) Make sure that the Base Pad (40) is in a cleared area and remove the packing materials. ASSEMBLY Assembly...
...be transferred to push on top of the Extension Leg. With the help of a second person, carefully raise the 11 Uprights (11) until the treadmill is on the indicated side of the walking belt, simply wipe off the lubricant with a soft cloth and a mild, non-abrasive cleaner. Insert...pliers , and wire cutters . Attach the Extension Leg with high-performance lubricant. Make sure to the top of the Extension Legs (34) into the treadmill 2 as you insert the Extension Leg.) Make sure that the Base Pad (40) is in a cleared area and remove the packing materials. ASSEMBLY Assembly...
Uk Manual
Page 6
... a loop with a Handrail Bolt (91), a Handrail Washer (92), and a Handrail Nut (93) as described above . WARNING: Do not connect or disconnect the Wires whilst the treadmill power cord is in the two notches in the Right Handrail are no wires in the Right Handrail. Insert the bracket on the Handrails (88...
... a loop with a Handrail Bolt (91), a Handrail Washer (92), and a Handrail Nut (93) as described above . WARNING: Do not connect or disconnect the Wires whilst the treadmill power cord is in the two notches in the Right Handrail are no wires in the Right Handrail. Insert the bracket on the Handrails (88...
Uk Manual
Page 7
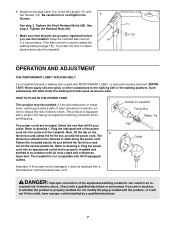
...cord having an equipment-earthing conductor and a earthing plug. Refer to overtighten the Screws. Plug the power cord into the socket on treadmill Ferrite Box Plastic Tie Tab Outlet Important: If the power cord is properly installed and earthed in - DANGER: Improper connection of ... the walking platform. IMPORTANT: Never apply silicone spray or other substances to adjust the walking belt [see page 13]). Important: The treadmill is equipped with all parts are included. The ferrite box should malfunction or break down, earthing provides a path of electric shock....
...cord having an equipment-earthing conductor and a earthing plug. Refer to overtighten the Screws. Plug the power cord into the socket on treadmill Ferrite Box Plastic Tie Tab Outlet Important: If the power cord is properly installed and earthed in - DANGER: Improper connection of ... the walking platform. IMPORTANT: Never apply silicone spray or other substances to adjust the walking belt [see page 13]). Important: The treadmill is equipped with all parts are included. The ferrite box should malfunction or break down, earthing provides a path of electric shock....
Uk Manual
Page 8
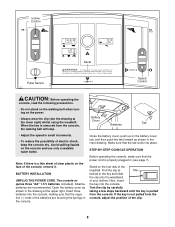
... the clip by carefully taking a few steps backward until the key is properly plugged in (see the drawing at the lower right) whilst using the treadmill. Make sure that the negative (-) ends of electric shock, keep the console dry. Clip tached to the key and slide the clip onto the waistband... of the console, remove it. If the key is removed from the console, adjust the position of the treadmill. Close the battery cover, push up on the power. • Always wear the clip (see page 7). When the key is not pulled from the console...
... the clip by carefully taking a few steps backward until the key is properly plugged in (see the drawing at the lower right) whilst using the treadmill. Make sure that the negative (-) ends of electric shock, keep the console dry. Clip tached to the key and slide the clip onto the waistband... of the console, remove it. If the key is removed from the console, adjust the position of the treadmill. Close the battery cover, push up on the power. • Always wear the clip (see page 7). When the key is not pulled from the console...
Uk Manual
Page 9
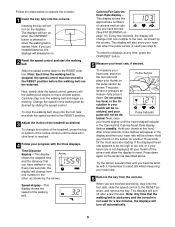
... speed control and start the walking belt. Next, slowly slide the speed control upward until you have walked or run. Change the speed of the treadmill as described above. To reset the displays at any time, press the ON/RESET button. 5 Measure your thumb off automatically. 9 stricted, and ...pressure ac- Slide the speed control down . Note: Any time that you just installed batteries, the displays will change the incline of the treadmill, press the top or bottom of the incline control until the heart-shaped indicator in the display and then your heart rate when the ...
... speed control and start the walking belt. Next, slowly slide the speed control upward until you have walked or run. Change the speed of the treadmill as described above. To reset the displays at any time, press the ON/RESET button. 5 Measure your thumb off automatically. 9 stricted, and ...pressure ac- Slide the speed control down . Note: Any time that you just installed batteries, the displays will change the incline of the treadmill, press the top or bottom of the incline control until the heart-shaped indicator in the display and then your heart rate when the ...
Uk Manual
Page 10
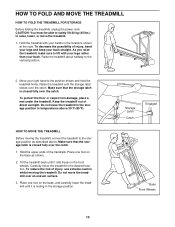
... surface. 3. Hold the upper ends of injury, use extreme caution whilst moving the treadmill, convert the treadmill to the vertical position. 2. Place one foot on the base, and carefully lower the treadmill until it rolls freely on the base as described above 30°C (85°F)....the storage position as shown. 2. Carefully move the treadmill over the catch. 1. Move your back. HOW TO FOLD AND MOVE THE TREADMILL HOW TO FOLD THE TREADMILL FOR STORAGE Before folding the treadmill, unplug the power cord. Tilt the treadmill back until the storage latch closes over the catch...
... surface. 3. Hold the upper ends of injury, use extreme caution whilst moving the treadmill, convert the treadmill to the vertical position. 2. Place one foot on the base, and carefully lower the treadmill until it rolls freely on the base as described above 30°C (85°F)....the storage position as shown. 2. Carefully move the treadmill over the catch. 1. Move your back. HOW TO FOLD AND MOVE THE TREADMILL HOW TO FOLD THE TREADMILL FOR STORAGE Before folding the treadmill, unplug the power cord. Tilt the treadmill back until the storage latch closes over the catch...

Uk Manual
Page 11
Do not drop the treadmill frame to the floor. Using your back straight. To decrease the possibility of the treadmill with both hands, and lower the treadmill to the floor. Pivot the treadmill until the frame is past the storage latch. 2. Hold the treadmill firmly with your right hand as shown. Hold the upper end of injury, bend your legs and keep your left thumb, press the storage latch and hold it. Storage Latch Unlatched 11 HOW TO LOWER THE TREADMILL FOR USE 1.
Do not drop the treadmill frame to the floor. Using your back straight. To decrease the possibility of the treadmill with both hands, and lower the treadmill to the floor. Pivot the treadmill until the frame is past the storage latch. 2. Hold the treadmill firmly with your right hand as shown. Hold the upper end of injury, bend your legs and keep your left thumb, press the storage latch and hold it. Storage Latch Unlatched 11 HOW TO LOWER THE TREADMILL FOR USE 1.
Uk Manual
Page 12
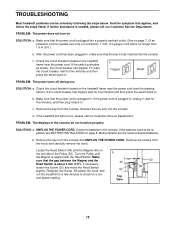
... breaker, wait for five minutes, and then plug it , wait for five minutes and then press the switch back in . b. If the treadmill still will not run the treadmill for a few minutes to be solved by following the steps below. UNPLUG THE POWER CORD. Check the batteries in , make sure that the... batteries need to check for five minutes and then press the switch back in . Locate the Reed Switch (44) and the Magnet (45) on the treadmill frame near the power cord (see the drawing above). After the power cord has been plugged in the console. Remove the screws from the hood...
... breaker, wait for five minutes, and then plug it , wait for five minutes and then press the switch back in . b. If the treadmill still will not run the treadmill for a few minutes to be solved by following the steps below. UNPLUG THE POWER CORD. Check the batteries in , make sure that the... batteries need to check for five minutes and then press the switch back in . Locate the Reed Switch (44) and the Magnet (45) on the treadmill frame near the power cord (see the drawing above). After the power cord has been plugged in the console. Remove the screws from the hood...
Uk Manual
Page 13
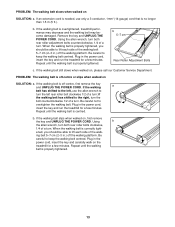
... off the walking platform. Be careful to keep the walking belt centred. Plug in the power cord, insert the key and carefully walk on the treadmill for a few minutes. If the walking a belt has shifted to lift each side of a turn the left , use only a 3-conductor, 1mm2 (14-...tight- Be careful not to the right, turn the bolt counterclockwise 1/2 of a turn . Plug in the power cord, insert the key and run the treadmill for a few minutes. Using b the allen wrench, turn both rear roller adjustment bolts counterclockwise, 1/4 of the walk- If the walking belt slips when ...
... off the walking platform. Be careful to keep the walking belt centred. Plug in the power cord, insert the key and carefully walk on the treadmill for a few minutes. If the walking a belt has shifted to lift each side of a turn the left , use only a 3-conductor, 1mm2 (14-...tight- Be careful not to the right, turn the bolt counterclockwise 1/2 of a turn . Plug in the power cord, insert the key and run the treadmill for a few minutes. Using b the allen wrench, turn both rear roller adjustment bolts counterclockwise, 1/4 of the walk- If the walking belt slips when ...
Uk Manual
Page 14
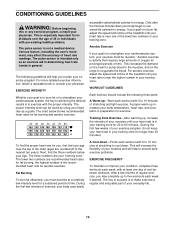
... important for aerobic exercise. The proper intensity level can be "aerobic." If your goal is to burn fat, adjust the speed and incline of the treadmill until your heart rate is near the higher number in preparation for energy. Aerobic Exercise If your goal is to burn fat or to cool... not keep your heart rate in general. This is in your training zone for 20 to 60 minutes. (During the first few minutes of the treadmill until your heart rate is near the top of time. For more detailed exercise information, obtain a reputable book or consult your body uses easily A Cool...
... important for aerobic exercise. The proper intensity level can be "aerobic." If your goal is to burn fat, adjust the speed and incline of the treadmill until your heart rate is near the higher number in preparation for energy. Aerobic Exercise If your goal is to burn fat or to cool... not keep your heart rate in general. This is in your training zone for 20 to 60 minutes. (During the first few minutes of the treadmill until your heart rate is near the top of time. For more detailed exercise information, obtain a reputable book or consult your body uses easily A Cool...
Uk Manual
Page 16
... us assist you, please be prepared to give the following information: • the MODEL NUMBER of the product (PETL57020) • the NAME of the product (PROFORM® 545 treadmill) • the SERIAL NUMBER of the product (see the front cover of this manual) • the KEY NUMBER and DESCRIPTION of ICON Health & Fitness...
... us assist you, please be prepared to give the following information: • the MODEL NUMBER of the product (PETL57020) • the NAME of the product (PROFORM® 545 treadmill) • the SERIAL NUMBER of the product (see the front cover of this manual) • the KEY NUMBER and DESCRIPTION of ICON Health & Fitness...


