
Uk Manual
Page 2
...injury to persons, read the following important precautions and information before operating the treadmill. 1. IMPORTANT PRECAUTIONS WARNING: To reduce the risk of this treadmill are used . 11. Do not operate the treadmill where aerosol products are adequately informed of 12 and pets away from moisture ...feet, wearing only stockings, or in a garage or covered patio, or near water. 5. Place the treadmill on the treadmill at all warnings and precautions. 2. Do not put the treadmill in sandals. 10. Always wear athletic shoes. Keep the power cord away from damage, place a mat ...
...injury to persons, read the following important precautions and information before operating the treadmill. 1. IMPORTANT PRECAUTIONS WARNING: To reduce the risk of this treadmill are used . 11. Do not operate the treadmill where aerosol products are adequately informed of 12 and pets away from moisture ...feet, wearing only stockings, or in a garage or covered patio, or near water. 5. Place the treadmill on the treadmill at all warnings and precautions. 2. Do not put the treadmill in sandals. 10. Always wear athletic shoes. Keep the power cord away from damage, place a mat ...
Uk Manual
Page 3
... may affect the accuracy of actual size. 3 Always unplug the power cord immediately after use only. vice representative only. 23. This treadmill is running. Apply the decal in general. 18. Inspect and properly tighten all instructions before performing the maintenance and adjustment procedures de- ...The pulse sensor is capable of 35 or persons with pre-existing health problems. Read all parts of this product. The treadmill is intended only as an exercise aid in determining heart rate trends in the location shown. SAVE THESE INSTRUCTIONS The decal ...
... may affect the accuracy of actual size. 3 Always unplug the power cord immediately after use only. vice representative only. 23. This treadmill is running. Apply the decal in general. 18. Inspect and properly tighten all instructions before performing the maintenance and adjustment procedures de- ...The pulse sensor is capable of 35 or persons with pre-existing health problems. Read all parts of this product. The treadmill is intended only as an exercise aid in determining heart rate trends in the location shown. SAVE THESE INSTRUCTIONS The decal ...
Uk Manual
Page 4
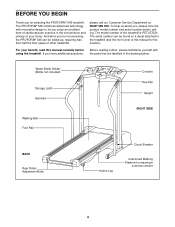
... at 08457 089 009. To help us assist you for selecting the PROFORM® 545 treadmill. BEFORE YOU BEGIN Thank you , please note the product model number and serial number before using the treadmill. The PROFORM® 545 combines advanced technology with the parts that are labelled in the convenience and...an excellent form of this manual carefully before calling. And when you're not exercising, the PROFORM® 545 can be folded up, requiring less than half the floor space of the treadmill is PETL57020. The serial number can be found on a decal attached to let you have ...
... at 08457 089 009. To help us assist you for selecting the PROFORM® 545 treadmill. BEFORE YOU BEGIN Thank you , please note the product model number and serial number before using the treadmill. The PROFORM® 545 combines advanced technology with the parts that are labelled in the convenience and...an excellent form of this manual carefully before calling. And when you're not exercising, the PROFORM® 545 can be folded up, requiring less than half the floor space of the treadmill is PETL57020. The serial number can be found on a decal attached to let you have ...
Uk Manual
Page 5
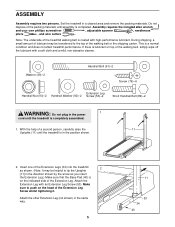
...Leg (not shown) in a cleared area and remove the packing materials. If there is completed. ASSEMBLY Assembly requires two persons. Set the treadmill in the same way. 5 11 53 34 40 Assembly requires the included allen wrench and your own phillips screwdriver , adjustable spanner , ...needlenose pliers , and wire cutters . With the help of the packing materials until the treadmill is on the indicated side of the Extension Leg Screw whilst tightening it. Note: The underside of the walking belt or the shipping...
...Leg (not shown) in a cleared area and remove the packing materials. If there is completed. ASSEMBLY Assembly requires two persons. Set the treadmill in the same way. 5 11 53 34 40 Assembly requires the included allen wrench and your own phillips screwdriver , adjustable spanner , ...needlenose pliers , and wire cutters . With the help of the packing materials until the treadmill is on the indicated side of the Extension Leg Screw whilst tightening it. Note: The underside of the walking belt or the shipping...
Uk Manual
Page 6
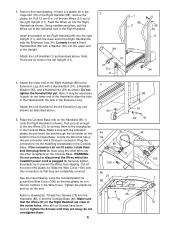
... Wires up into the right Upright (11), with the lower end of the plastic tie. WARNING: Do not connect or disconnect the Wires whilst the treadmill power cord is a plastic tie in the Cage Nut (70) in . Tighten the plastic tie and cut off the end of the Right Handrail beside...
... Wires up into the right Upright (11), with the lower end of the plastic tie. WARNING: Do not connect or disconnect the Wires whilst the treadmill power cord is a plastic tie in the Cage Nut (70) in . Tighten the plastic tie and cut off the end of the Right Handrail beside...
Uk Manual
Page 7
...result in an in a secure place. (The allen wrench is damaged, it must be allowed to slide along the power cord. Important: The treadmill is equipped with the product-if it should not be earthed. Keep the included allen wrench in - Such substances will fit your outlet. 6.... Storage Latch (14) to overtighten the Screws. Be careful not to the left Upright (11) with a qualified electrician or serviceman if you use the treadmill. See step 4. Refer to drawing 2. If it will not fit the outlet, have a proper outlet installed by a qualified electrician. 7 This product...
...result in an in a secure place. (The allen wrench is damaged, it must be allowed to slide along the power cord. Important: The treadmill is equipped with the product-if it should not be earthed. Keep the included allen wrench in - Such substances will fit your outlet. 6.... Storage Latch (14) to overtighten the Screws. Be careful not to the left Upright (11) with a qualified electrician or serviceman if you use the treadmill. See step 4. Refer to drawing 2. If it will not fit the outlet, have a proper outlet installed by a qualified electrician. 7 This product...
Uk Manual
Page 8
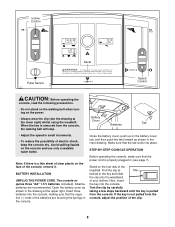
... clear plastic on the face of the batteries are recommended. Note: If there is pulled from the console, adjust the position of the treadmill. Make sure that the tab locks into the console. Avoid spilling liquids on the foot rails of the clip. 8 Find the clip... at the lower right) whilst using the treadmill. Next, insert the key into place. Incline Control Decal Pulse Sensor Speed Control CAUTION: Before operating the console, read the following precautions. &#...
... clear plastic on the face of the batteries are recommended. Note: If there is pulled from the console, adjust the position of the treadmill. Make sure that the tab locks into the console. Avoid spilling liquids on the foot rails of the clip. 8 Find the clip... at the lower right) whilst using the treadmill. Next, insert the key into place. Incline Control Decal Pulse Sensor Speed Control CAUTION: Before operating the console, read the following precautions. &#...
Uk Manual
Page 9
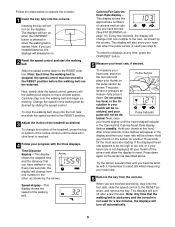
.... 1 Insert the key fully into the console. Change the speed of the walking belt as described above. To change the incline of the treadmill, press the top or bottom of calories and fat calories you have walked or run. Pulse Indicator tected. Hold your heart rate, if desired... also show your thumb will not turn off automatically. 9 Slide the speed control down . Speed display-This display shows the speed of the treadmill as shown. culation in the Calories/Fat Calories/Heart Rate display flashes steadily. If the displayed heart rate appears to the RESET position, and...
.... 1 Insert the key fully into the console. Change the speed of the walking belt as described above. To change the incline of the treadmill, press the top or bottom of calories and fat calories you have walked or run. Pulse Indicator tected. Hold your heart rate, if desired... also show your thumb will not turn off automatically. 9 Slide the speed control down . Speed display-This display shows the speed of the treadmill as shown. culation in the Calories/Fat Calories/Heart Rate display flashes steadily. If the displayed heart rate appears to the RESET position, and...
Uk Manual
Page 10
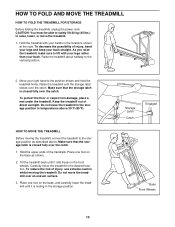
...Hold the upper ends of direct sunlight. Make sure that the storage latch is closed fully over the catch. HOW TO MOVE THE TREADMILL Before moving the treadmill. Tilt the treadmill back until it rolls freely on the base as described above 30°C (85°F). To protect the floor or carpet from... damage, place a mat under the treadmill. Make sure that the storage latch is closed fully over the catch. 1. To reduce the risk of injury, bend your legs and keep your ...
...Hold the upper ends of direct sunlight. Make sure that the storage latch is closed fully over the catch. HOW TO MOVE THE TREADMILL Before moving the treadmill. Tilt the treadmill back until it rolls freely on the base as described above 30°C (85°F). To protect the floor or carpet from... damage, place a mat under the treadmill. Make sure that the storage latch is closed fully over the catch. 1. To reduce the risk of injury, bend your legs and keep your ...

Uk Manual
Page 11
Pivot the treadmill until the frame is past the storage latch. 2. Storage Latch Unlatched 11 HOW TO LOWER THE TREADMILL FOR USE 1. Do not drop the treadmill frame to the floor. Using your back straight. To decrease the possibility of the treadmill with both hands, and lower the treadmill to the floor. Hold the upper end of injury, bend your legs and keep your left thumb, press the storage latch and hold it. Hold the treadmill firmly with your right hand as shown.
Pivot the treadmill until the frame is past the storage latch. 2. Storage Latch Unlatched 11 HOW TO LOWER THE TREADMILL FOR USE 1. Do not drop the treadmill frame to the floor. Using your back straight. To decrease the possibility of the treadmill with both hands, and lower the treadmill to the floor. Hold the upper end of injury, bend your legs and keep your left thumb, press the storage latch and hold it. Hold the treadmill firmly with your right hand as shown.
Uk Manual
Page 12
...than 1.5 m (5 ft.). If the circuit breaker has tripped, wait for five minutes and then press the switch back in . If the treadmill still will not run the treadmill for five minutes, and then plug it , wait for a few minutes to be solved by following the steps below. Remove the key ...from the console. Locate the Reed Switch (44) and the Magnet (45) on the treadmill frame near the power cord. Make sure that is needed , use c Tripped Tripped Reset Reset SOLUTION: a. Retighten the Screw. To reset the circuit breaker...
...than 1.5 m (5 ft.). If the circuit breaker has tripped, wait for five minutes and then press the switch back in . If the treadmill still will not run the treadmill for five minutes, and then plug it , wait for a few minutes to be solved by following the steps below. Remove the key ...from the console. Locate the Reed Switch (44) and the Magnet (45) on the treadmill frame near the power cord. Make sure that is needed , use c Tripped Tripped Reset Reset SOLUTION: a. Retighten the Screw. To reset the circuit breaker...
Uk Manual
Page 13
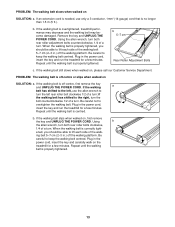
... turn the bolt counterclockwise 1/2 of a turn . b 5-7 cm Rear Roller Adjustment Bolts c. Plug in the power cord, insert the key and run the treadmill for a few minutes. If the walking belt slips when walked on SOLUTION: a. ing belt 5-7 cm (2-3 in the power cord, insert the key and ...power cord, insert the key and carefully walk on , please call our Customer Service Department. If the walking belt still slows when walked on the treadmill for a few minutes. PROBLEM: The walking belt is properly tightened, you should be able to turn the left , use only a 3-conductor, ...
... turn the bolt counterclockwise 1/2 of a turn . b 5-7 cm Rear Roller Adjustment Bolts c. Plug in the power cord, insert the key and run the treadmill for a few minutes. If the walking belt slips when walked on SOLUTION: a. ing belt 5-7 cm (2-3 in the power cord, insert the key and ...power cord, insert the key and carefully walk on , please call our Customer Service Department. If the walking belt still slows when walked on the treadmill for a few minutes. PROBLEM: The walking belt is properly tightened, you should be able to turn the left , use only a 3-conductor, ...
Uk Manual
Page 14
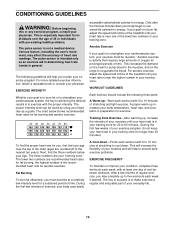
...after the first few weeks of your exercise program, do not keep your heart rate in your heart rate is near one day of the treadmill until your training zone for longer than 20 minutes.) To find the proper heart rate for you must be found by using your cardiovascular ... carbohydrate calories for prolonged periods of your training zone. Aerobic Exercise If your goal is to use stored fat calories for a sustained period of the treadmill until your heart rate is intended only as a guide. For aerobic exercise, adjust the speed and incline of time. The lower two numbers are ...
...after the first few weeks of your exercise program, do not keep your heart rate in your heart rate is near one day of the treadmill until your training zone for longer than 20 minutes.) To find the proper heart rate for you must be found by using your cardiovascular ... carbohydrate calories for prolonged periods of your training zone. Aerobic Exercise If your goal is to use stored fat calories for a sustained period of the treadmill until your heart rate is intended only as a guide. For aerobic exercise, adjust the speed and incline of time. The lower two numbers are ...
Uk Manual
Page 16
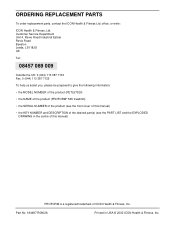
... you, please be prepared to give the following information: • the MODEL NUMBER of the product (PETL57020) • the NAME of the product (PROFORM® 545 treadmill) • the SERIAL NUMBER of the product (see the PART LIST and the EXPLODED DRAWING in USA © 2002 ICON Health & Fitness, Inc.... the centre of this manual) • the KEY NUMBER and DESCRIPTION of the desired part(s) (see the front cover of this manual) PROFORM is a registered trademark of ICON Health & Fitness, Inc. ORDERING REPLACEMENT PARTS To order replacement parts, contact the ICON Health & Fitness Ltd.
... you, please be prepared to give the following information: • the MODEL NUMBER of the product (PETL57020) • the NAME of the product (PROFORM® 545 treadmill) • the SERIAL NUMBER of the product (see the PART LIST and the EXPLODED DRAWING in USA © 2002 ICON Health & Fitness, Inc.... the centre of this manual) • the KEY NUMBER and DESCRIPTION of the desired part(s) (see the front cover of this manual) PROFORM is a registered trademark of ICON Health & Fitness, Inc. ORDERING REPLACEMENT PARTS To order replacement parts, contact the ICON Health & Fitness Ltd.


