

Uk Manual
Page 1
... and instructions in the space above for future reference. If you have questions, or if there are committed to providing complete customer satisfaction. As a manufacturer, we are missing or damaged parts, please call: 08457 089 009 Or write: ICON Health & Fitness, Ltd. Save this equipment. USER'S MANUAL Visit our website at www.iconeurope.com Serial Number Decal QUESTIONS? Model No. PETL57020 Serial...
... and instructions in the space above for future reference. If you have questions, or if there are committed to providing complete customer satisfaction. As a manufacturer, we are missing or damaged parts, please call: 08457 089 009 Or write: ICON Health & Fitness, Ltd. Save this equipment. USER'S MANUAL Visit our website at www.iconeurope.com Serial Number Decal QUESTIONS? Model No. PETL57020 Serial...

Uk Manual
Page 2
... 4 ASSEMBLY 5 OPERATION AND ADJUSTMENT 7 HOW TO FOLD AND MOVE THE TREADMILL 10 TROUBLESHOOTING 12 CONDITIONING GUIDELINES 14 ORDERING REPLACEMENT PARTS Back Cover Note: An EXPLODED DRAWING and a PART LIST are standing on any surface that blocks air openings. Do not place the treadmill on the walking belt. To protect the floor or carpet from the treadmill at a time. 9. using the treadmill. 2 Never start the treadmill whilst you need an extension cord, use the treadmill...
... 4 ASSEMBLY 5 OPERATION AND ADJUSTMENT 7 HOW TO FOLD AND MOVE THE TREADMILL 10 TROUBLESHOOTING 12 CONDITIONING GUIDELINES 14 ORDERING REPLACEMENT PARTS Back Cover Note: An EXPLODED DRAWING and a PART LIST are standing on any surface that blocks air openings. Do not place the treadmill on the walking belt. To protect the floor or carpet from the treadmill at a time. 9. using the treadmill. 2 Never start the treadmill whilst you need an extension cord, use the treadmill...
Uk Manual
Page 3
... Service Department to do so by or through the use , before cleaning the treadmill, and before using. Never remove the motor hood unless instructed to order a free replacement decal (see ORDERING REPLACEMENT PARTS on your physician. When folding or moving the treadmill, make sure that the storage latch is not a medical device. WARNING: Before beginning this product. ICON assumes no responsibility for in any opening. Various factors, including the user...
... Service Department to do so by or through the use , before cleaning the treadmill, and before using. Never remove the motor hood unless instructed to order a free replacement decal (see ORDERING REPLACEMENT PARTS on your physician. When folding or moving the treadmill, make sure that the storage latch is not a medical device. WARNING: Before beginning this product. ICON assumes no responsibility for in any opening. Various factors, including the user...
Uk Manual
Page 4
... model number and serial number before using the treadmill. And when you enjoy an excellent form of cardiovascular exercise in the drawing below. please call our Customer Service Department at 08457 089 009. Water Bottle Holder (Bottle not included) Storage Latch Handrail Walking Belt Foot Rail Console Key/Clip Upright RIGHT SIDE BACK Rear Roller Adjustment Bolts Circuit Breaker Incline Leg Cushioned Walking Platform for the location). The PROFORM® 545 combines advanced technology with the parts...
... model number and serial number before using the treadmill. And when you enjoy an excellent form of cardiovascular exercise in the drawing below. please call our Customer Service Department at 08457 089 009. Water Bottle Holder (Bottle not included) Storage Latch Handrail Walking Belt Foot Rail Console Key/Clip Upright RIGHT SIDE BACK Rear Roller Adjustment Bolts Circuit Breaker Incline Leg Cushioned Walking Platform for the location). The PROFORM® 545 combines advanced technology with the parts...
Uk Manual
Page 5
Do not dispose of a second person, carefully raise the 11 Uprights (11) until the treadmill is completed. Washer (39)-2 Handrail Bolt (91)-2 Screw (79)-6 Extension Leg Handrail Nut (93)-2 Handrail Washer (92)-2 Screw (53)-2 Short Handrail Bolt (89)-2 WARNING: Do not plug in the power 1 cord until assembly is in the direction shown by the arrow as shown. (Note: It may be helpful...
Do not dispose of a second person, carefully raise the 11 Uprights (11) until the treadmill is completed. Washer (39)-2 Handrail Bolt (91)-2 Screw (79)-6 Extension Leg Handrail Nut (93)-2 Handrail Washer (92)-2 Screw (53)-2 Short Handrail Bolt (89)-2 WARNING: Do not plug in the power 1 cord until assembly is in the direction shown by the arrow as shown. (Note: It may be helpful...
Uk Manual
Page 6
... tighten the plastic tie to the inset drawing. Slide the Wire Cover (106) onto the connectors so that the plastic tie is plugged in the Console Base. Feed the Wires up into the other receptacle on the lower end of the Right Handrail beside the Extension Leg (34). Attach the lower end of the Upright. Refer to prevent the Wires from slipping. Attach the...
... tighten the plastic tie to the inset drawing. Slide the Wire Cover (106) onto the connectors so that the plastic tie is plugged in the Console Base. Feed the Wires up into the other receptacle on the lower end of the Right Handrail beside the Extension Leg (34). Attach the lower end of the Upright. Refer to prevent the Wires from slipping. Attach the...
Uk Manual
Page 7
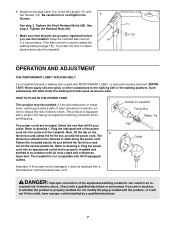
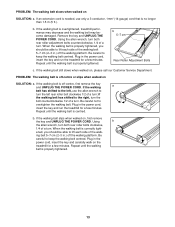
... a mat under the treadmill. 6 14 11 79 OPERATION AND ADJUSTMENT THE PERFORMANT LUBETM WALKING BELT Your treadmill features a walking belt coated with two Screws (79). IMPORTANT: Never apply silicone spray or other substances to drawing 1. HOW TO PLUG IN THE POWER CORD 1 This product must be replaced with a qualified electrician or serviceman if you use the treadmill. Refer to the walking belt or the walking platform. Fasten...
... a mat under the treadmill. 6 14 11 79 OPERATION AND ADJUSTMENT THE PERFORMANT LUBETM WALKING BELT Your treadmill features a walking belt coated with two Screws (79). IMPORTANT: Never apply silicone spray or other substances to drawing 1. HOW TO PLUG IN THE POWER CORD 1 This product must be replaced with a qualified electrician or serviceman if you use the treadmill. Refer to the walking belt or the walking platform. Fasten...
Uk Manual
Page 8
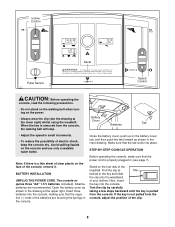
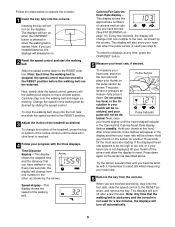
... the console, remove it. Make sure that the negative (-) ends of your clothes. When the key is pulled from the console, Battery Cover Batteries Tab the walking belt will stop. • Adjust the speed in the console. Find the clip at the upper right. Incline Control Decal Pulse Sensor Speed Control CAUTION: Before operating the console, read the following precautions. • Do not stand on the walking belt when turning on the power. •...
... the console, remove it. Make sure that the negative (-) ends of your clothes. When the key is pulled from the console, Battery Cover Batteries Tab the walking belt will stop. • Adjust the speed in the console. Find the clip at the upper right. Incline Control Decal Pulse Sensor Speed Control CAUTION: Before operating the console, read the following precautions. • Do not stand on the walking belt when turning on the power. •...
Uk Manual
Page 9
... RESET position. 3 Adjust the incline of the walking belt. Remember to the other, as desired. Slide the speed control down again on the pulse sensor as described above. Carefully step onto the walking belt and begin exercising. Time/Distance display-This display Arrow shows the elapsed time and the distance that the walking belt is stationary and the console is used for the most accurate reading. Speed display-This display shows the speed of the treadmill...
... RESET position. 3 Adjust the incline of the walking belt. Remember to the other, as desired. Slide the speed control down again on the pulse sensor as described above. Carefully step onto the walking belt and begin exercising. Time/Distance display-This display Arrow shows the elapsed time and the distance that the walking belt is stationary and the console is used for the most accurate reading. Speed display-This display shows the speed of the treadmill...
Uk Manual
Page 10
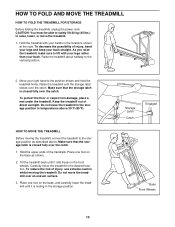
... shown. 2. Hold the upper ends of direct sunlight. Make sure that the storage latch is closed fully over an uneven surface. 3. Storage Latch Catch Engaged Base Front Wheels 10 Raise the treadmill about halfway to the desired location. Place one foot on the front wheels. HOW TO FOLD AND MOVE THE TREADMILL HOW TO FOLD THE TREADMILL FOR STORAGE Before folding the treadmill, unplug the power cord.
... shown. 2. Hold the upper ends of direct sunlight. Make sure that the storage latch is closed fully over an uneven surface. 3. Storage Latch Catch Engaged Base Front Wheels 10 Raise the treadmill about halfway to the desired location. Place one foot on the front wheels. HOW TO FOLD AND MOVE THE TREADMILL HOW TO FOLD THE TREADMILL FOR STORAGE Before folding the treadmill, unplug the power cord.

Uk Manual
Page 11
Storage Latch Unlatched 11 To decrease the possibility of the treadmill with both hands, and lower the treadmill to the floor. Pivot the treadmill until the frame is past the storage latch. 2. Hold the treadmill firmly with your right hand as shown. Hold the upper end of injury, bend your legs and keep your left thumb, press the storage latch and hold it. Do not drop the treadmill frame to the floor. Using your back straight. HOW TO LOWER THE TREADMILL FOR USE 1.
Storage Latch Unlatched 11 To decrease the possibility of the treadmill with both hands, and lower the treadmill to the floor. Pivot the treadmill until the frame is past the storage latch. 2. Hold the treadmill firmly with your right hand as shown. Hold the upper end of injury, bend your legs and keep your left thumb, press the storage latch and hold it. Do not drop the treadmill frame to the floor. Using your back straight. HOW TO LOWER THE TREADMILL FOR USE 1.
Uk Manual
Page 12
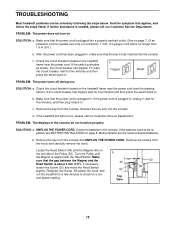
... located on the treadmill frame near the power cord (see BATTERY INSTALLATION on page 8. b. If the treadmill still will not run the treadmill for a few minutes to be solved by following the steps below. UNPLUG THE POWER CORD. Remove the key from the hood, and carefully remove the hood. Retighten the Screw. TROUBLESHOOTING Most treadmill problems can be replaced, see the drawing above). If further assistance is needed , use c Tripped Tripped Reset Reset SOLUTION: a. c. PROBLEM: The power turns...
... located on the treadmill frame near the power cord (see BATTERY INSTALLATION on page 8. b. If the treadmill still will not run the treadmill for a few minutes to be solved by following the steps below. UNPLUG THE POWER CORD. Remove the key from the hood, and carefully remove the hood. Retighten the Screw. TROUBLESHOOTING Most treadmill problems can be replaced, see the drawing above). If further assistance is needed , use c Tripped Tripped Reset Reset SOLUTION: a. c. PROBLEM: The power turns...
Uk Manual
Page 13
... the walking a belt has shifted to the left, use only a 3-conductor, 1mm2 (14-gauge) cord that is overtightened, treadmill performance may decrease and the walking belt may become damaged. b. Be careful to turn the left rear roller bolt clockwise 1/2 of a turn ; Plug in the power cord, insert the key and carefully walk on , please call our Customer Service Department. If the walking belt is no longer than 1.5 m (5 ft.). PROBLEM: The walking belt is...
... the walking a belt has shifted to the left, use only a 3-conductor, 1mm2 (14-gauge) cord that is overtightened, treadmill performance may decrease and the walking belt may become damaged. b. Be careful to turn the left rear roller bolt clockwise 1/2 of a turn ; Plug in the power cord, insert the key and carefully walk on , please call our Customer Service Department. If the walking belt is no longer than 1.5 m (5 ft.). PROBLEM: The walking belt is...
Uk Manual
Page 14
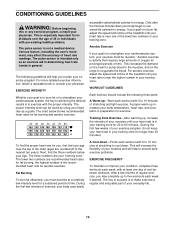
... increases your physician. The chart below your exercise must exercise at least one of 35 or individuals with 5 to five workouts each workout with pre-existing health problems. The pulse sensor is in your training zone for 20 to use stored fat calories for energy. For aerobic exercise, adjust the speed and incline of the treadmill until your condition, complete three workouts each workout with 5 to 10 minutes...
... increases your physician. The chart below your exercise must exercise at least one of 35 or individuals with 5 to five workouts each workout with pre-existing health problems. The pulse sensor is in your training zone for 20 to use stored fat calories for energy. For aerobic exercise, adjust the speed and incline of the treadmill until your condition, complete three workouts each workout with 5 to 10 minutes...
Uk Manual
Page 15
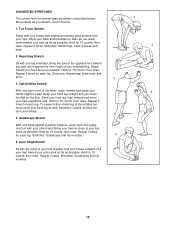
Bring the sole of your groin area as far as possible. Stretches: Hamstrings, lower back and groin. 3 3. Bend your front leg, lean forward and move your hips toward you and rest it against the inner thigh of the opposite foot toward the wall. Hold for 15 counts, ...well. Allow your back and shoulders to your back foot flat on the floor. Calf/Achilles Stretch With one leg extended. Repeat 3 times for each leg. SUGGESTED STRETCHES The correct form for 15 counts, then relax. Toe Touch Stretch Stand with the soles of the achilles tendons, bend your hands...
Bring the sole of your groin area as far as possible. Stretches: Hamstrings, lower back and groin. 3 3. Bend your front leg, lean forward and move your hips toward you and rest it against the inner thigh of the opposite foot toward the wall. Hold for 15 counts, ...well. Allow your back and shoulders to your back foot flat on the floor. Calf/Achilles Stretch With one leg extended. Repeat 3 times for each leg. SUGGESTED STRETCHES The correct form for 15 counts, then relax. Toe Touch Stretch Stand with the soles of the achilles tendons, bend your hands...
Uk Manual
Page 16
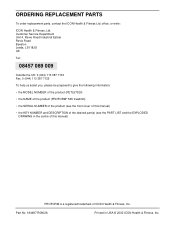
... MODEL NUMBER of the product (PETL57020) • the NAME of the product (PROFORM® 545 treadmill) • the SERIAL NUMBER of the product (see the front cover of this manual) PROFORM is a registered trademark of the desired part(s) (see the PART LIST and the EXPLODED DRAWING in USA © 2002 ICON Health & Fitness, Inc. Part No. 184487 R0802A Printed in the centre of this manual) • the KEY NUMBER and...
... MODEL NUMBER of the product (PETL57020) • the NAME of the product (PROFORM® 545 treadmill) • the SERIAL NUMBER of the product (see the front cover of this manual) PROFORM is a registered trademark of the desired part(s) (see the PART LIST and the EXPLODED DRAWING in USA © 2002 ICON Health & Fitness, Inc. Part No. 184487 R0802A Printed in the centre of this manual) • the KEY NUMBER and...

Uk Manual
Page 17
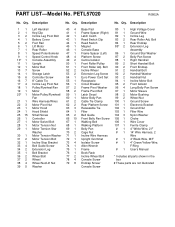
REMOVE THIS EXPLODED DRAWING AND PART LIST FROM THE MANUAL Save this EXPLODED DRAWING and PART LIST for future reference. For information about ordering replacement parts, see the back cover of the User's Manual. 34 Note: Specifications are subject to change without notice.
REMOVE THIS EXPLODED DRAWING AND PART LIST FROM THE MANUAL Save this EXPLODED DRAWING and PART LIST for future reference. For information about ordering replacement parts, see the back cover of the User's Manual. 34 Note: Specifications are subject to change without notice.
Uk Manual
Page 18
... 37 2 38 4 39 5 Left Handrail Key/Clip Incline Leg Pivot Bolt Battery Cover Foot Rail Lift Motor Rear Roller Speed Potentiometer Speed Control Knob Console Assembly Upright Motor Belt Screw Storage Latch Controller Screw 8" Cable Tie Incline Leg Pivot Nut Pulley/Flywheel/Fan Motor Motor/Pulley/Flywheel/ Fan Wire Harness/Wires Motor Pivot Nut Motor Hood Hood Shield Small Screw Controller Motor Swivel Bolt Motor Tension Nut Motor Tension Star Washer Motor Tension Washer Motor Tension Bolt Incline Stop Bracket Belt Guide Screw Extension Leg Belt Bracket Wheel Bolt Wheel Wheel Nut/Lift Nut Washer...
... 37 2 38 4 39 5 Left Handrail Key/Clip Incline Leg Pivot Bolt Battery Cover Foot Rail Lift Motor Rear Roller Speed Potentiometer Speed Control Knob Console Assembly Upright Motor Belt Screw Storage Latch Controller Screw 8" Cable Tie Incline Leg Pivot Nut Pulley/Flywheel/Fan Motor Motor/Pulley/Flywheel/ Fan Wire Harness/Wires Motor Pivot Nut Motor Hood Hood Shield Small Screw Controller Motor Swivel Bolt Motor Tension Nut Motor Tension Star Washer Motor Tension Washer Motor Tension Bolt Incline Stop Bracket Belt Guide Screw Extension Leg Belt Bracket Wheel Bolt Wheel Wheel Nut/Lift Nut Washer...

