
Uk Manual
Page 2
...the fuse, an ASTA approved BS1362 type should be fitted to persons, read the following important precautions and information before operating the treadmill. 1. Keep the treadmill indoors, away from moisture and dust. TABLE OF CONTENTS IMPORTANT PRECAUTIONS 2 BEFORE YOU BEGIN 4 ASSEMBLY 5 OPERATION AND ADJUSTMENT ...7 HOW TO FOLD AND MOVE THE TREADMILL 11 TROUBLE-SHOOTING 12 CONDITIONING GUIDELINES 14 HOW TO ORDER REPLACEMENT PARTS Back Cover Note: An EXPLODED DRAWING and a PART LIST ...
...the fuse, an ASTA approved BS1362 type should be fitted to persons, read the following important precautions and information before operating the treadmill. 1. Keep the treadmill indoors, away from moisture and dust. TABLE OF CONTENTS IMPORTANT PRECAUTIONS 2 BEFORE YOU BEGIN 4 ASSEMBLY 5 OPERATION AND ADJUSTMENT ...7 HOW TO FOLD AND MOVE THE TREADMILL 11 TROUBLE-SHOOTING 12 CONDITIONING GUIDELINES 14 HOW TO ORDER REPLACEMENT PARTS Back Cover Note: An EXPLODED DRAWING and a PART LIST ...
Uk Manual
Page 3
...by an authorised ser- The decal shown below has been placed on the walking belt. Apply the decal in this manual). Never leave the treadmill unattended whilst it is intended only as an exercise aid in determining heart rate trends in any opening. Never drop or insert any object ... cover of this product. This is fully closed. 20. Adjust the speed in use this or any exercise program, consult your treadmill. When folding or moving the treadmill, make sure that the storage latch is especially important for in speed. 16. Never remove the motor hood unless instructed to avoid...
...by an authorised ser- The decal shown below has been placed on the walking belt. Apply the decal in this manual). Never leave the treadmill unattended whilst it is intended only as an exercise aid in determining heart rate trends in any opening. Never drop or insert any object ... cover of this product. This is fully closed. 20. Adjust the speed in use this or any exercise program, consult your treadmill. When folding or moving the treadmill, make sure that the storage latch is especially important for in speed. 16. Never remove the motor hood unless instructed to avoid...
Uk Manual
Page 4
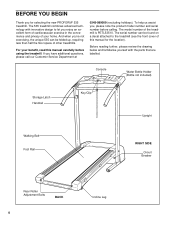
...RIGHT SIDE Circuit Breaker Rear Roller Adjustment Bolts BACK 4 Incline Leg And when you for the location). The model number of the treadmill is PETL53510. The serial number can be found on a decal attached to let you enjoy an excellent form of cardiovascular exercise ... your benefit, read this manual for selecting the new PROFORM® 535 treadmill. BEFORE YOU BEGIN Thank you 're not exercising, the unique 535 can be folded up, requiring less than half the floor space of other treadmills. The 535 treadmill combines advanced technology with the parts that are labelled.
...RIGHT SIDE Circuit Breaker Rear Roller Adjustment Bolts BACK 4 Incline Leg And when you for the location). The model number of the treadmill is PETL53510. The serial number can be found on a decal attached to let you enjoy an excellent form of cardiovascular exercise ... your benefit, read this manual for selecting the new PROFORM® 535 treadmill. BEFORE YOU BEGIN Thank you 're not exercising, the unique 535 can be folded up, requiring less than half the floor space of other treadmills. The 535 treadmill combines advanced technology with the parts that are labelled.
Uk Manual
Page 5
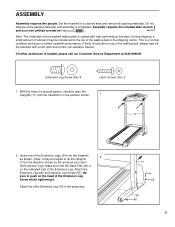
...with high-performance lubricant. Attach the Extension Leg with a soft cloth and a mild, non-abrasive cleaner. Do not dispose of the treadmill walking belt is completed. Attach the other Extension Leg (34) in a cleared area and remove all packing materials. If further assistance ...is a normal condition and does not affect treadmill performance. With the help of the Extension Leg Screw whilst tightening it. Assembly requires the included allen wrench and your own phillips ...
...with high-performance lubricant. Attach the Extension Leg with a soft cloth and a mild, non-abrasive cleaner. Do not dispose of the treadmill walking belt is completed. Attach the other Extension Leg (34) in a cleared area and remove all packing materials. If further assistance ...is a normal condition and does not affect treadmill performance. With the help of the Extension Leg Screw whilst tightening it. Assembly requires the included allen wrench and your own phillips ...
Uk Manual
Page 6
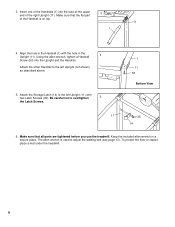
... two Latch Screws (35). Align the hole in a secure place. To protect the floor or carpet, place a mat under the treadmill. 6 Make sure that all parts are tightened before you use the treadmill. 3. Insert one of the Handrail is used to overtighten 5 the Latch Screws. 1 11 53 Bottom View 11 35 14 6.
... two Latch Screws (35). Align the hole in a secure place. To protect the floor or carpet, place a mat under the treadmill. 6 Make sure that all parts are tightened before you use the treadmill. 3. Insert one of the Handrail is used to overtighten 5 the Latch Screws. 1 11 53 Bottom View 11 35 14 6.
Uk Manual
Page 7
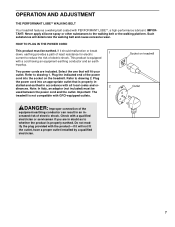
..., earthing provides a path of least resistance for electric 1 current to the walking belt or the walking platform. Socket on the treadmill. Outlet DANGER: Improper connection of the equipment-earthing conductor can result in accordance with GFCI-equipped outlets. ing plug. Plug the ...increased risk of the power cord into an appropriate outlet that will deteriorate the walking belt and cause excessive wear. Important: The treadmill is equipped with a qualified electrician or serviceman if you are included. Check with a cord having an equipment-earthing conductor and ...
..., earthing provides a path of least resistance for electric 1 current to the walking belt or the walking platform. Socket on the treadmill. Outlet DANGER: Improper connection of the equipment-earthing conductor can result in accordance with GFCI-equipped outlets. ing plug. Plug the ...increased risk of the power cord into an appropriate outlet that will deteriorate the walking belt and cause excessive wear. Important: The treadmill is equipped with a qualified electrician or serviceman if you are included. Check with a cord having an equipment-earthing conductor and ...
Uk Manual
Page 8
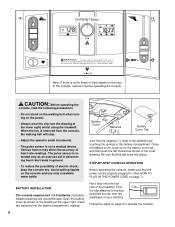
...is removed from the console, the walking belt will stop. • Adjust the speed in the drawing at the lower right) whilst using the treadmill. When the key is not a medical device. Alkaline batteries are touching the springs in general. • To reduce the possibility of clear ... is intended only as an exercise aid in determining heart rate trends in the battery compartment. Various factors may affect the accuracy of the treadmill. The pulse sensor is a thin sheet of electric shock, keep the console dry. Battery Cover Batteries Battery Cover Tab sure that the ...
...is removed from the console, the walking belt will stop. • Adjust the speed in the drawing at the lower right) whilst using the treadmill. When the key is not a medical device. Alkaline batteries are touching the springs in general. • To reduce the possibility of clear ... is intended only as an exercise aid in determining heart rate trends in the battery compartment. Various factors may affect the accuracy of the treadmill. The pulse sensor is a thin sheet of electric shock, keep the console dry. Battery Cover Batteries Battery Cover Tab sure that the ...
Uk Manual
Page 9
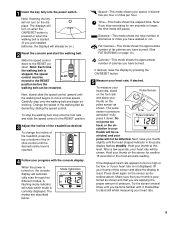
... the top or bottom of the incline control until you are described below. The modes are applying the proper amount of the treadmill as desired. Note: If you just installed batteries, the displays will show which mode is positioned as described above. The pulse sensor is reached. 4 Follow ...
... the top or bottom of the incline control until you are described below. The modes are applying the proper amount of the treadmill as desired. Note: If you just installed batteries, the displays will show which mode is positioned as described above. The pulse sensor is reached. 4 Follow ...
Uk Manual
Page 11
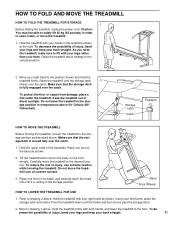
... engaged over an uneven surface. 3. Carefully move the treadmill over the catch. Base Front Wheels HOW TO LOWER THE TREADMILL FOR USE 1. Hold the treadmill with both hands, and lower the treadmill to the floor. Hold the treadmill firmly with your right hand as shown. HOW TO ... floor or carpet from damage, place a mat under the treadmill. Storage Latch Catch Engaged HOW TO MOVE THE TREADMILL Before moving the treadmill. Hold the upper ends of injury, use extreme caution whilst moving the treadmill, convert the treadmill to lift with your back straight. To reduce the risk ...
... engaged over an uneven surface. 3. Carefully move the treadmill over the catch. Base Front Wheels HOW TO LOWER THE TREADMILL FOR USE 1. Hold the treadmill with both hands, and lower the treadmill to the floor. Hold the treadmill firmly with your right hand as shown. HOW TO ... floor or carpet from damage, place a mat under the treadmill. Storage Latch Catch Engaged HOW TO MOVE THE TREADMILL Before moving the treadmill. Hold the upper ends of injury, use extreme caution whilst moving the treadmill, convert the treadmill to lift with your back straight. To reduce the risk ...
Uk Manual
Page 12
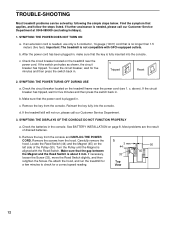
... POWER TURNS OFF DURING USE c Tripped Reset Tripped Reset a. c. b. c. d. If the treadmill still will not run the treadmill for a few minutes to check for a correct speed reading. See BATTERY INSTALLATION on the treadmill near the power cord (see 1. If necessary, loosen the Screw (33), move the Reed ... . Remove the key from the console. Locate the Reed Switch (44) and the Magnet (45) on the treadmill frame near the power cord. TROUBLE-SHOOTING Most treadmill problems can be solved by following the simple steps below. Most problems are the result of the Pulley (50). ...
... POWER TURNS OFF DURING USE c Tripped Reset Tripped Reset a. c. b. c. d. If the treadmill still will not run the treadmill for a few minutes to check for a correct speed reading. See BATTERY INSTALLATION on the treadmill near the power cord (see 1. If necessary, loosen the Screw (33), move the Reed ... . Remove the key from the console. Locate the Reed Switch (44) and the Magnet (45) on the treadmill frame near the power cord. TROUBLE-SHOOTING Most treadmill problems can be solved by following the simple steps below. Most problems are the result of the Pulley (50). ...
Uk Manual
Page 13
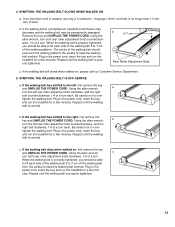
...decrease and the walking belt may be able to keep the walking belt centred. Plug in the power cord, insert the key and run the treadmill for a few min- SYMPTOM: THE WALKING BELT SLOWS WHEN WALKED ON a. Using the allen wrench, c turn both rear roller adjustment bolts ...counterclockwise, 1/4 of the walking belt 5 to keep the walking belt centred. Plug in the power cord, insert the key and run the treadmill for a few minutes. If the walking belt has shifted to over - Repeat until the walking belt is centred. Be careful to 7 cm ...
...decrease and the walking belt may be able to keep the walking belt centred. Plug in the power cord, insert the key and run the treadmill for a few min- SYMPTOM: THE WALKING BELT SLOWS WHEN WALKED ON a. Using the allen wrench, c turn both rear roller adjustment bolts ...counterclockwise, 1/4 of the walking belt 5 to keep the walking belt centred. Plug in the power cord, insert the key and run the treadmill for a few minutes. If the walking belt has shifted to over - Repeat until the walking belt is centred. Be careful to 7 cm ...
Uk Manual
Page 14
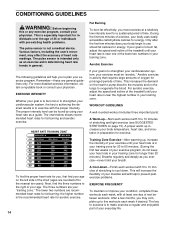
... workout includes three important parts: A Warm-up , increase the intensity of your exercise until your heart rate is to the right of the treadmill until your breath. This will increase the flexibility of your muscles and will help to 10 minutes of time. CONDITIONING GUIDELINES WARNING: Before beginning ...on the left side of your exercise program, do not keep your heart rate in your heart rate is near one day of the treadmill until your training zone. The lower two numbers are rounded off to five workouts each workout with 5 to prevent postexercise problems. EXERCISE ...
... workout includes three important parts: A Warm-up , increase the intensity of your exercise until your heart rate is to the right of the treadmill until your breath. This will increase the flexibility of your muscles and will help to 10 minutes of time. CONDITIONING GUIDELINES WARNING: Before beginning ...on the left side of your exercise program, do not keep your heart rate in your heart rate is near one day of the treadmill until your training zone. The lower two numbers are rounded off to five workouts each workout with 5 to prevent postexercise problems. EXERCISE ...

Uk Manual
Page 16
HOW TO ORDER REPLACEMENT PARTS To order replacement parts, contact the ICON Health & Fitness Ltd. PROFORM® is a registered trademark of this manual) • The DESCRIPTION OF THE PART(S) (see the PART LIST and the EXPLODED DRAWING attached in Canada © ... When ordering parts, please be prepared to give the following information: • The MODEL NUMBER OF THE PRODUCT (PETL53510) • The NAME OF THE PRODUCT (PROFORM® 535 treadmill) • The SERIAL NUMBER OF THE PRODUCT (see the front cover of this manual) • The KEY NUMBER OF THE PART(S) (see the PART...
HOW TO ORDER REPLACEMENT PARTS To order replacement parts, contact the ICON Health & Fitness Ltd. PROFORM® is a registered trademark of this manual) • The DESCRIPTION OF THE PART(S) (see the PART LIST and the EXPLODED DRAWING attached in Canada © ... When ordering parts, please be prepared to give the following information: • The MODEL NUMBER OF THE PRODUCT (PETL53510) • The NAME OF THE PRODUCT (PROFORM® 535 treadmill) • The SERIAL NUMBER OF THE PRODUCT (see the front cover of this manual) • The KEY NUMBER OF THE PART(S) (see the PART...


