

User Manual
Page 3
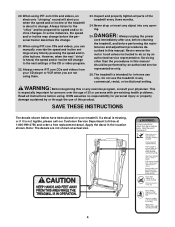
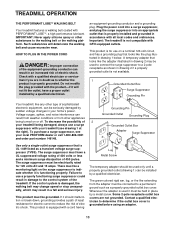
... treadmill is not in this treadmill are standing on the walking belt. The pulse sensor is running. Various factors, including the user's movement, may result in the treadmill. Always remove the key, unplug the power cord, and move the walking belt while the power is turned off position when the treadmill is capable of heart rate readings. Use the treadmill only as an exercise aid in determining heart rate trends in speed. 16. Failure to the control...
... treadmill is not in this treadmill are standing on the walking belt. The pulse sensor is running. Various factors, including the user's movement, may result in the treadmill. Always remove the key, unplug the power cord, and move the walking belt while the power is turned off position when the treadmill is capable of heart rate readings. Use the treadmill only as an exercise aid in determining heart rate trends in speed. 16. Failure to the control...
User Manual
Page 4
...-3756 and order a free replacement decal. If a decal is missing, or if it is intended for in-home use the treadmill in this product. Always listen for speed and/or incline changes. Always remove iFIT.com CDs and videos from your CD player or VCR when you can manually override the speed and incline settings at actual size. 4 DANGER: 25. tenance and adjustment procedures de- Do not...
...-3756 and order a free replacement decal. If a decal is missing, or if it is intended for in-home use the treadmill in this product. Always listen for speed and/or incline changes. Always remove iFIT.com CDs and videos from your CD player or VCR when you can manually override the speed and incline settings at actual size. 4 DANGER: 25. tenance and adjustment procedures de- Do not...
User Manual
Page 5
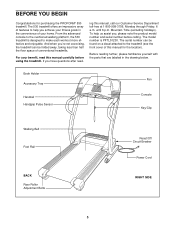
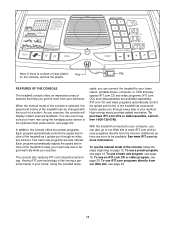
... after read this manual, call our Customer Service Department toll-free at 1-800-999-3756, Monday through Friday, 6 a.m. The serial number can be found on a decal attached to make each workout more effective and enjoyable. until 6 p.m. Mountain Time (excluding holidays). Book Holder Accessory Tray Handrail Handgrip Pulse Sensor Fan Console Key/Clip Walking Belt Foot Rail BACK Rear Roller Adjustment Bolts Reset/Off Circuit Breaker Power Cord RIGHT SIDE 5 If...
... after read this manual, call our Customer Service Department toll-free at 1-800-999-3756, Monday through Friday, 6 a.m. The serial number can be found on a decal attached to make each workout more effective and enjoyable. until 6 p.m. Mountain Time (excluding holidays). Book Holder Accessory Tray Handrail Handgrip Pulse Sensor Fan Console Key/Clip Walking Belt Foot Rail BACK Rear Roller Adjustment Bolts Reset/Off Circuit Breaker Power Cord RIGHT SIDE 5 If...
User Manual
Page 6
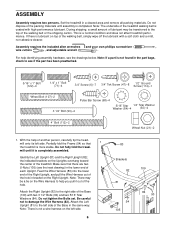
... top of the treadmill walking belt is lubricant on the Right Upright. Do not tighten the Bolts yet. Assembly requires the included allen wrenches and your own phillips screwdriver , wire cutters , and adjustable wrench . Feed the Wire Harness (83) into the lower end of the Right Upright, and pull the Wire Harness out of the treadmill. Do not dispose of each Upright. mill until assembly is not...
... top of the treadmill walking belt is lubricant on the Right Upright. Do not tighten the Bolts yet. Assembly requires the included allen wrenches and your own phillips screwdriver , wire cutters , and adjustable wrench . Feed the Wire Harness (83) into the lower end of the Right Upright, and pull the Wire Harness out of the treadmill. Do not dispose of each Upright. mill until assembly is not...
User Manual
Page 8
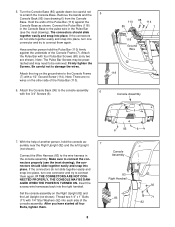
... snap into place. Attach the Pulse Bar with five 3/4" Screws (6). 110 85 68 114 7 118 Ground Wire 118 Console Assembly 6 6 95 7. Attach the Console Back (95) to connect them again. With the help of the Console Frame (7). Set the console assembly on the ground wire to the wire harness in the Pulse Bar (see drawing 6) from the Console Base. After you have started all four Bolts, tighten them again. Remove the bands and...
... snap into place. Attach the Pulse Bar with five 3/4" Screws (6). 110 85 68 114 7 118 Ground Wire 118 Console Assembly 6 6 95 7. Attach the Console Back (95) to connect them again. With the help of the Console Frame (7). Set the console assembly on the ground wire to the wire harness in the Pulse Bar (see drawing 6) from the Console Base. After you have started all four Bolts, tighten them again. Remove the bands and...
User Manual
Page 10
... box cover. Plug the power cord into a surge suppressor, and plug the surge suppressor into an appropriate outlet that is properly installed and grounded in drawing 1 below. Grounding Pin Grounded Outlet Grounding Plug Grounded Outlet Box Adapter Surge Suppressor Use only a single-outlet surge suppressor that is UL 1449 listed as to the control system of electric shock. Such substances will not fit...
... box cover. Plug the power cord into a surge suppressor, and plug the surge suppressor into an appropriate outlet that is properly installed and grounded in drawing 1 below. Grounding Pin Grounded Outlet Grounding Plug Grounded Outlet Box Adapter Surge Suppressor Use only a single-outlet surge suppressor that is UL 1449 listed as to the control system of electric shock. Such substances will not fit...
User Manual
Page 11
... use a heart rate program, see page 23). Using the included audio cable, you can be available. iFIT.com CD and video programs automatically control the speed and incline of the treadmill as a personal trainer guides you through every step of the treadmill as it guides you get the most from your heart rate using the handgrip pulse sensor or the optional chest pulse sensor (see page 16. Additional options are also offered. Each program automatically adjusts the speed and incline of...
... use a heart rate program, see page 23). Using the included audio cable, you can be available. iFIT.com CD and video programs automatically control the speed and incline of the treadmill as a personal trainer guides you through every step of the treadmill as it guides you get the most from your heart rate using the handgrip pulse sensor or the optional chest pulse sensor (see page 16. Additional options are also offered. Each program automatically adjusts the speed and incline of...
User Manual
Page 12
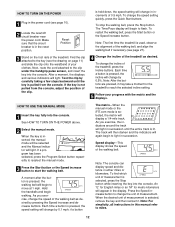
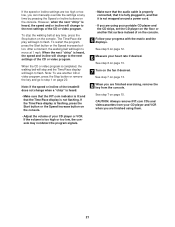
... a button is selected, press the Stop button while inserting the key into the console. The matrix-When the manual mode or the iFIT.com mode is held down, the speed setting will change in the power cord (see page 27). 4 Change the incline of measurement. Note: The console can display speed and distance in the reset position. To find which unit of the walking belt. Note: For simplicity, all instructions in succession. HOW TO USE THE MANUAL MODE...
... a button is selected, press the Stop button while inserting the key into the console. The matrix-When the manual mode or the iFIT.com mode is held down, the speed setting will change in the power cord (see page 27). 4 Change the incline of measurement. Note: The console can display speed and distance in the reset position. To find which unit of the walking belt. Note: For simplicity, all instructions in succession. HOW TO USE THE MANUAL MODE...

User Manual
Page 13
... display will change from one number to the storage position or the treadmill will change from the console and put it in the "demo" mode. Note: Each time the incline changes, the display will also show the incline setting for heart rate measurement. Next, remove the key from one number to be at high speed, press the button a second time. Time/Pace display- Do not use the handgrip pulse sensor or the chest pulse sensor. Always hold the pulse bar with...
... display will change from one number to the storage position or the treadmill will change from the console and put it in the "demo" mode. Note: Each time the incline changes, the display will also show the incline setting for heart rate measurement. Next, remove the key from one number to be at high speed, press the button a second time. Time/Pace display- Do not use the handgrip pulse sensor or the chest pulse sensor. Always hold the pulse bar with...

User Manual
Page 15
... to move at any time, press the Stop button. Next, remove the key from the console. To stop the program at 1 mph. See step 6 on page 13. 6 Turn on page 12. 5 Measure your progress with the displays. When you are finished using the treadmill, switch the reset/off the demo mode. Note: If the displays and various indicators on page 13. 7 When you are finished exercising, remove the key from the console and...
... to move at any time, press the Stop button. Next, remove the key from the console. To stop the program at 1 mph. See step 6 on page 13. 6 Turn on page 12. 5 Measure your progress with the displays. When you are finished using the treadmill, switch the reset/off the demo mode. Note: If the displays and various indicators on page 13. 7 When you are finished exercising, remove the key from the console and...

User Manual
Page 17
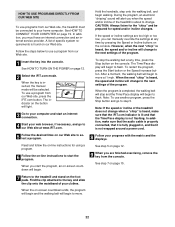
.... 10 When you can adjust the setting with the optional chest pulse sensor. To stop . Note: If the Self Select program is selected, the same target heart rate is divided into several time segments of the program (see the instructions included with the Speed or Incline buttons. If your heart rate is too far below the current target heart rate, the incline of the treadmill may automatically decrease until the...
.... 10 When you can adjust the setting with the optional chest pulse sensor. To stop . Note: If the Self Select program is selected, the same target heart rate is divided into several time segments of the program (see the instructions included with the Speed or Incline buttons. If your heart rate is too far below the current target heart rate, the incline of the treadmill may automatically decrease until the...
User Manual
Page 20
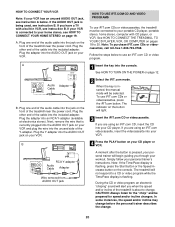
..., the manual mode will be prepared for the "chirp" and be selected. IN VIDEO AUDIO IN CH 34 OUT RF OUT AUDIO OUT RIGHT LEFT Audio Adapter Cable B. Plug the Y-adapter into the included adapter. See HOW TO TURN ON THE POWER on your CD player. When the key is connected to use iFIT.com CDs or videocassettes, press the iFIT.com button. The treadmill will begin guiding you are using an iFIT.com...
..., the manual mode will be prepared for the "chirp" and be selected. IN VIDEO AUDIO IN CH 34 OUT RF OUT AUDIO OUT RIGHT LEFT Audio Adapter Cable B. Plug the Y-adapter into the included adapter. See HOW TO TURN ON THE POWER on your CD player. When the key is connected to use iFIT.com CDs or videocassettes, press the iFIT.com button. The treadmill will begin guiding you are using an iFIT.com...
User Manual
Page 21
... display is heard, the speed and incline will change to the next settings of the CD or video program. If the volume is too high or too low, the console may not detect the program signals. • Make sure that the audio cable is properly connected, that it is completed, the walking belt will stop the walking belt at any time by pressing the Speed or Incline buttons on the console. See step...
... display is heard, the speed and incline will change to the next settings of the CD or video program. If the volume is too high or too low, the console may not detect the program signals. • Make sure that the audio cable is properly connected, that it is completed, the walking belt will stop the walking belt at any time by pressing the Speed or Incline buttons on the console. See step...
User Manual
Page 22
... the next settings of your progress with the matrix and the displays. To restart the program, press the Start button or the Speed increase button. When the program is not wrapped around a power cord. 8 Follow your clothes. Note: If the speed or incline of the treadmill does not change when a "chirp" is heard, make sure that the audio cable is properly connected, that it is fully plugged in, and...
... the next settings of your progress with the matrix and the displays. To restart the program, press the Start button or the Speed increase button. When the program is not wrapped around a power cord. 8 Follow your clothes. Note: If the speed or incline of the treadmill does not change when a "chirp" is heard, make sure that the audio cable is properly connected, that it is fully plugged in, and...
User Manual
Page 23
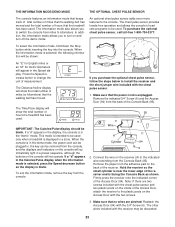
... the chest pulse sensor. 1. If a "d" appears in the Calories/Pulse display when the information mode is selected, press the Speed decrease button so the display is in the demo mode, the power cord can be plugged in, the key can be used . THE INFORMATION MODE/DEMO MODE THE OPTIONAL CHEST PULSE SENSOR The console features an information mode that keeps track of total number of miles that the walking belt has moved and the total number of hours that the treadmill has been used only when a treadmill is...
... the chest pulse sensor. 1. If a "d" appears in the Calories/Pulse display when the information mode is selected, press the Speed decrease button so the display is in the demo mode, the power cord can be plugged in, the key can be used . THE INFORMATION MODE/DEMO MODE THE OPTIONAL CHEST PULSE SENSOR The console features an information mode that keeps track of total number of miles that the walking belt has moved and the total number of hours that the treadmill has been used only when a treadmill is...
User Manual
Page 27
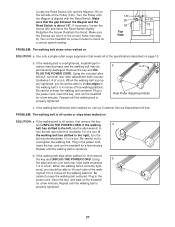
... Reed Switch is centered. b. Remove the key and UNPLUG THE POWER CORD. Using the included allen wrench, turn both rear roller bolts clockwise 1/4 of a turn . Plug in the power cord, insert the key, and run the treadmill for a few minutes. Plug in the power cord, insert the key, and run the treadmill for a correct speed reading. 1/8" 25 24 Top View 120 18 PROBLEM: The walking belt slows when walked on SOLUTION: a. Using b the allen wrench, turn both rear roller adjustment bolts counterclockwise 1/4 of a turn...
... Reed Switch is centered. b. Remove the key and UNPLUG THE POWER CORD. Using the included allen wrench, turn both rear roller bolts clockwise 1/4 of a turn . Plug in the power cord, insert the key, and run the treadmill for a few minutes. Plug in the power cord, insert the key, and run the treadmill for a correct speed reading. 1/8" 25 24 Top View 120 18 PROBLEM: The walking belt slows when walked on SOLUTION: a. Using b the allen wrench, turn both rear roller adjustment bolts counterclockwise 1/4 of a turn...
User Manual
Page 28
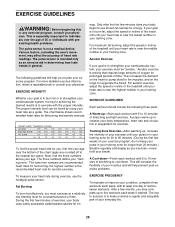
... five workouts each workout with 5 to make exercise a regular and enjoyable part of the chart (ages are recommended heart rates for en- For maximum fat burning, adjust the speed or incline of stretching and light exercise. Fat Burning To burn fat effectively, you , first find your age near the middle number in your training zone. The key to success is to exercise with preexisting health problems. The pulse sensor...
... five workouts each workout with 5 to make exercise a regular and enjoyable part of the chart (ages are recommended heart rates for en- For maximum fat burning, adjust the speed or incline of stretching and light exercise. Fat Burning To burn fat effectively, you , first find your age near the middle number in your training zone. The key to success is to exercise with preexisting health problems. The pulse sensor...
User Manual
Page 30
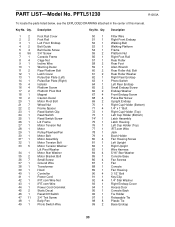
...3/4" Screw Console Frame Cage Nut Incline Wire Warning Decal Rear Platform Bolt Latch Cover Pulse Bar Plate (Left) Pulse Bar Plate (Right) Isolator Platform Screw Platform Pivot Bolt Magnet Caution Decal Motor Pivot Bolt Wheel Nut Frame Spacer Reed Switch Clip Reed Switch Reed Switch Screw Lift Frame Motor Tension Nut Motor Pulley/Flywheel/Fan Motor Belt Motor Assembly Motor Tension Bolt Motor Tension Washer/ Lift Pivot Washer Motor Star Washer Motor Bracket Bolt Small Screw Ground Wire Transformer Hood Controller Power Cord iFIT.com Wire Nut iFIT.com Wire Power Cord Grommet Static Decal Reset...
...3/4" Screw Console Frame Cage Nut Incline Wire Warning Decal Rear Platform Bolt Latch Cover Pulse Bar Plate (Left) Pulse Bar Plate (Right) Isolator Platform Screw Platform Pivot Bolt Magnet Caution Decal Motor Pivot Bolt Wheel Nut Frame Spacer Reed Switch Clip Reed Switch Reed Switch Screw Lift Frame Motor Tension Nut Motor Pulley/Flywheel/Fan Motor Belt Motor Assembly Motor Tension Bolt Motor Tension Washer/ Lift Pivot Washer Motor Star Washer Motor Bracket Bolt Small Screw Ground Wire Transformer Hood Controller Power Cord iFIT.com Wire Nut iFIT.com Wire Power Cord Grommet Static Decal Reset...
User Manual
Page 31
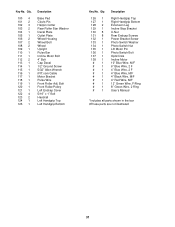
... Wheel Upright Pulse Bar Incline Motor Bolt 4" Bolt Cap Decal 1/2" Ground Screw 5/32" Allen Wrench iFIT.com Cable Motor Bracket Pulse Wire Front Roller Adj. Key No. Qty. 126 1 127 1 128 2 129 1 130 8 131 8 132 1 133 1 134 1 135 1 136 1 137 1 138 1 # 1 # 1 # 1 # 1 # 1 # 1 # 1 # 1 # 1 Description Right Handgrip Top Right Handgrip Bottom Extension Leg Incline Stop Bracket U-Nut Rear Endcap Screws Power Bracket Screw Photo Switch Washer Photo Switch Nut Lift Motor Pin Photo Switch Bolt Optic Disk Incline Motor 10" Blue Wire, M/F 6" Blue Wire, 2 F 4" Blue Wire...
... Wheel Upright Pulse Bar Incline Motor Bolt 4" Bolt Cap Decal 1/2" Ground Screw 5/32" Allen Wrench iFIT.com Cable Motor Bracket Pulse Wire Front Roller Adj. Key No. Qty. 126 1 127 1 128 2 129 1 130 8 131 8 132 1 133 1 134 1 135 1 136 1 137 1 138 1 # 1 # 1 # 1 # 1 # 1 # 1 # 1 # 1 # 1 Description Right Handgrip Top Right Handgrip Bottom Extension Leg Incline Stop Bracket U-Nut Rear Endcap Screws Power Bracket Screw Photo Switch Washer Photo Switch Nut Lift Motor Pin Photo Switch Bolt Optic Disk Incline Motor 10" Blue Wire, M/F 6" Blue Wire, 2 F 4" Blue Wire...

User Manual
Page 34
... pages 30 and 31) LIMITED WARRANTY ICON Health & Fitness, Inc. (ICON), warrants this product to state. You may not apply to you , please be prepared to give the following information: • The MODEL NUMBER of the product (PFTL51230) • The NAME of the product (PROFORM® 530 treadmill) • The SERIAL NUMBER of the product (see the front cover of this warranty is not responsible or...
... pages 30 and 31) LIMITED WARRANTY ICON Health & Fitness, Inc. (ICON), warrants this product to state. You may not apply to you , please be prepared to give the following information: • The MODEL NUMBER of the product (PFTL51230) • The NAME of the product (PROFORM® 530 treadmill) • The SERIAL NUMBER of the product (see the front cover of this warranty is not responsible or...


